Red Henry Type Solid Mandolin Bridge Construction
© Alan Dunwell - 2002
Last Modified: 10/05/2011
The various projects here are listed in chronological order, so the most recent
is at the bottom. Jump links provided here in the text.
Red Henry started
looking into making mandolin bridges that are single piece rather than adjustable.
For the most part he started with a mandolin design bridge and has been working
towards a violin looking bridge. He has been posting up his results and those
of others on his web pages and on the CoMando mailing list and the designs and
development of this type of bridge is off to a good start. I was intrigued by
the idea. The first section below shows a
detailed process of the first two bridges that I built. A second
section below shows less detail but includes modifications or refinements
to the process on subsequent bridges built. Project Three
is a bridge similar in construction to the shedua one for Greg in the second
section. The KA Project is a mandolin I built for a
friends 50th birthday and put a shedula (shedua?) solid bridge on. With the
TR Project I've changed my design yet again. This reflects
Red's success with more recent multi-hole designs. This was for a mandolin for
Tom Risner in Texas and included an under-saddle type pickup.
The Initial Project:
Bridges #1 and #2:
For this project I was contacted by Brian Eyster, a local CoMando list member.
He had a K&G F5 mandolin by Mark Gresham and the bridge had been worked
sometime in the past and was no longer fitting well. We decided to try out Red's
ideas and see what difference it would make.
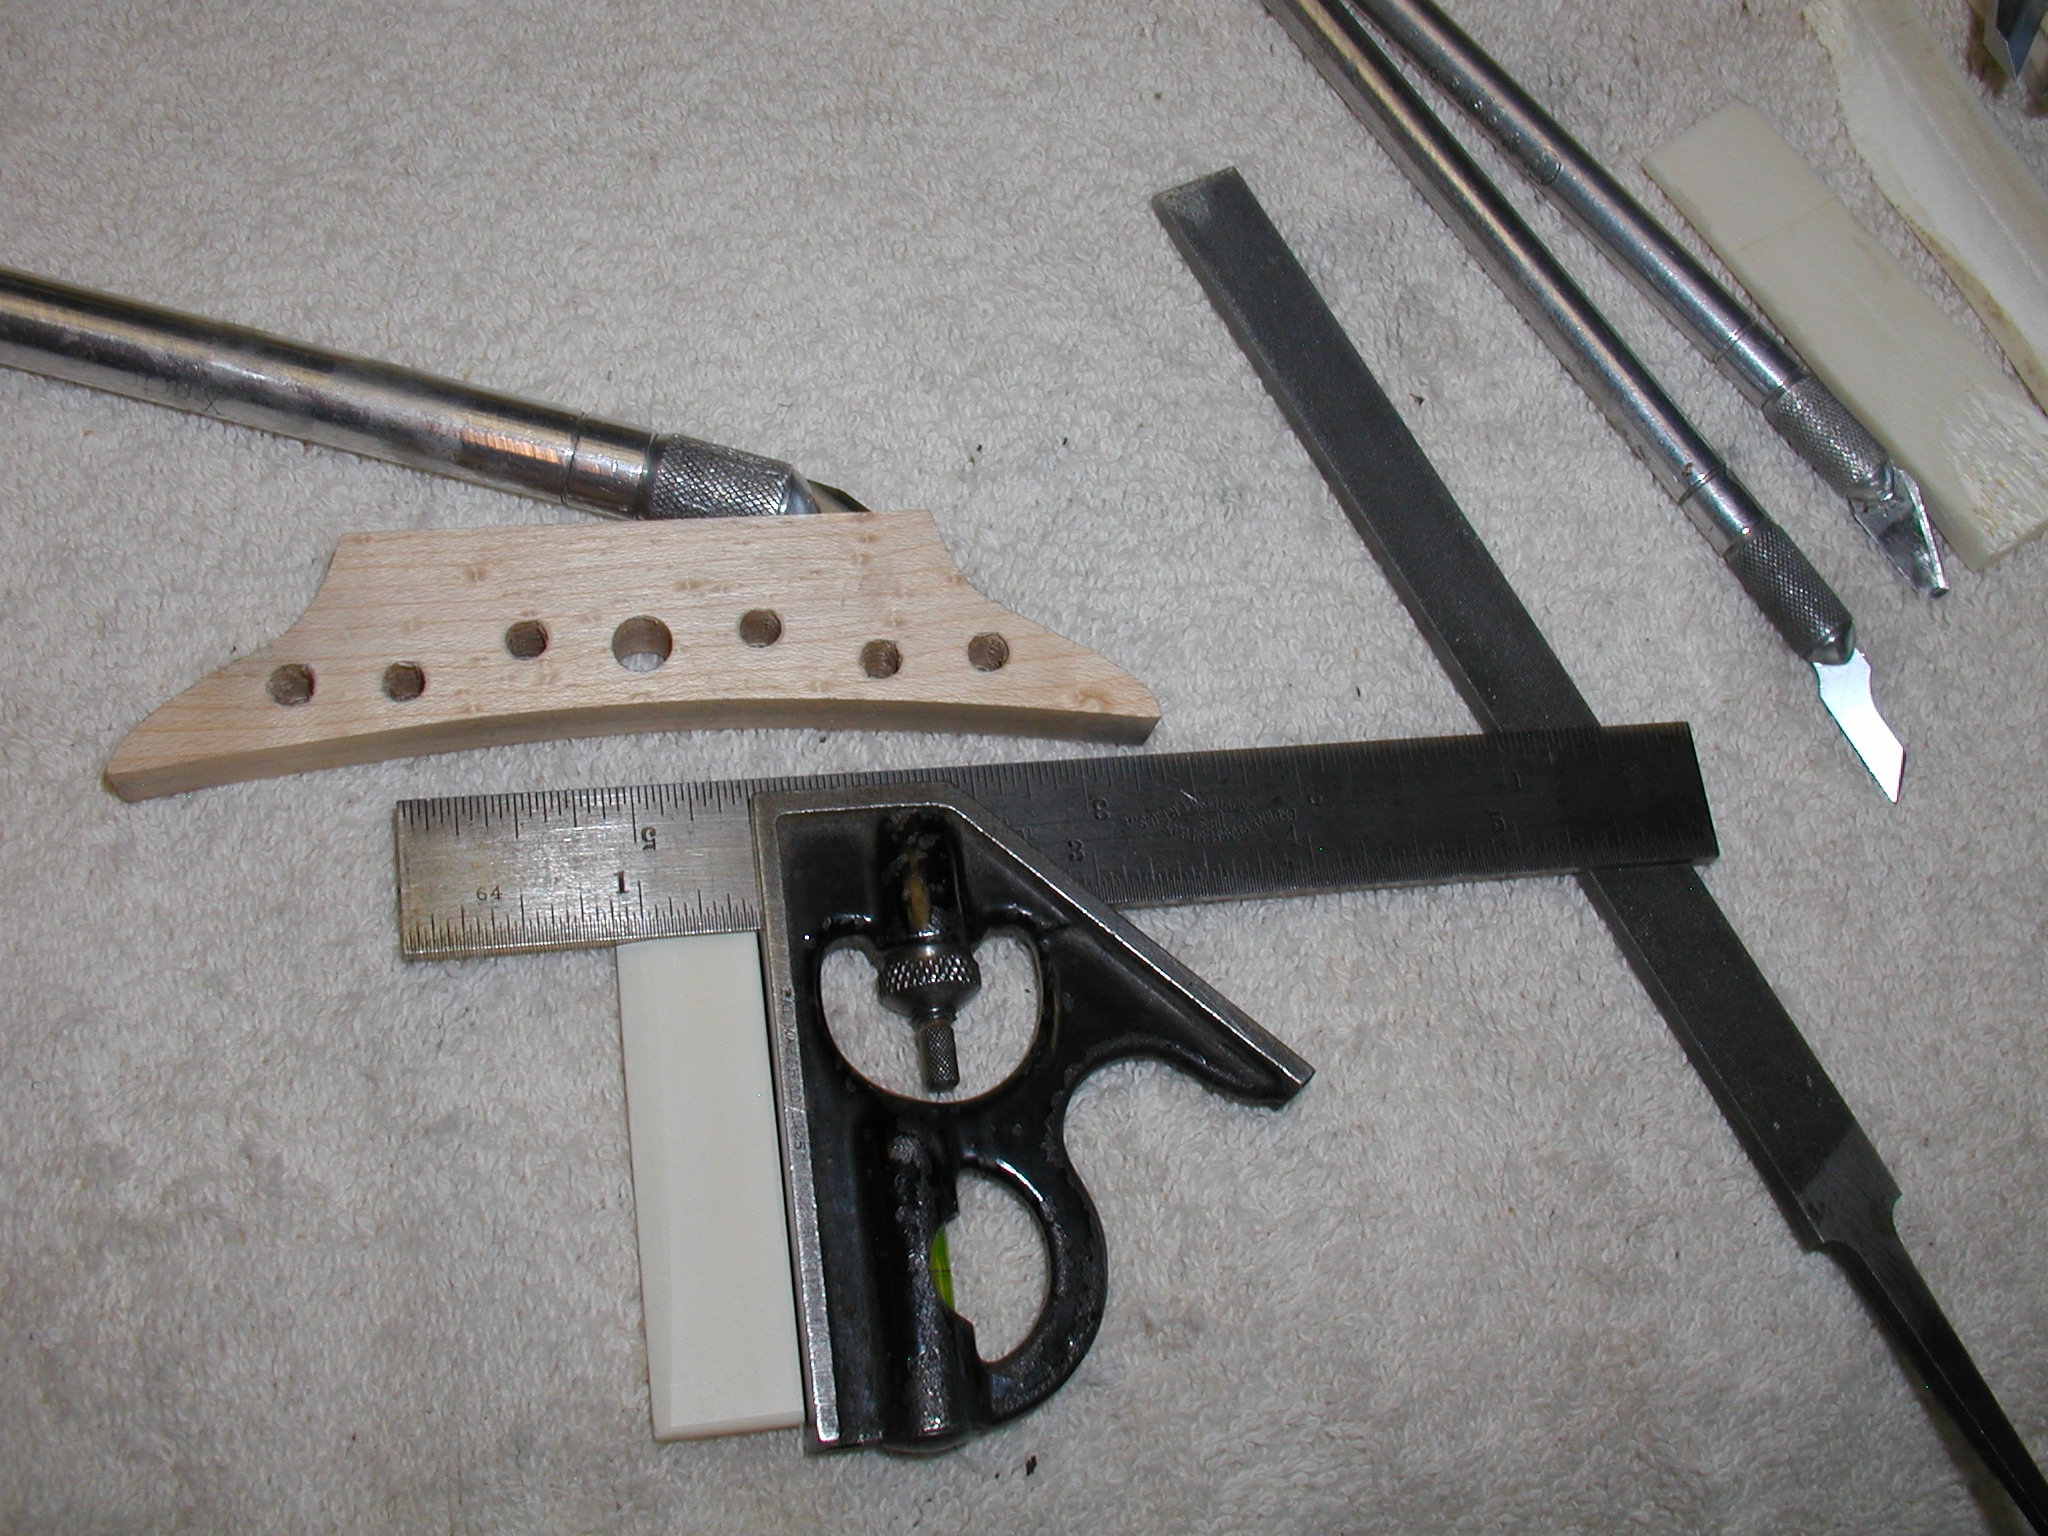
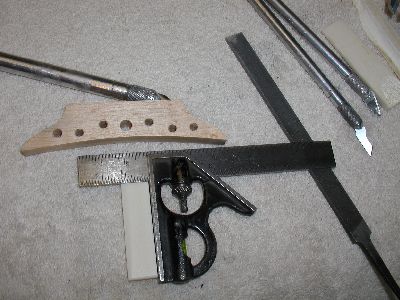
[Note: Images below are thumbnails low resolution images. For full resolution
detailed images double click on any thumbnail.]
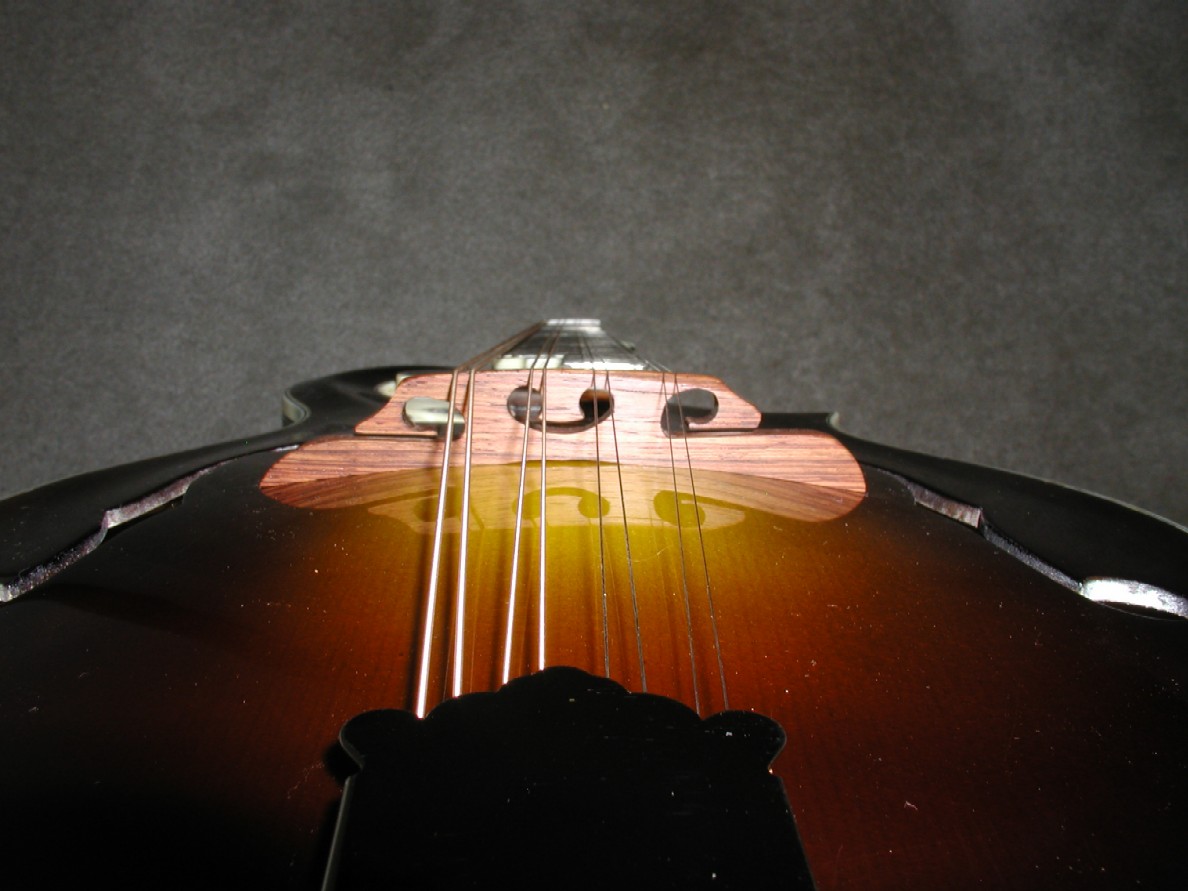
Red Henry Type Mandolin Bridge Construction
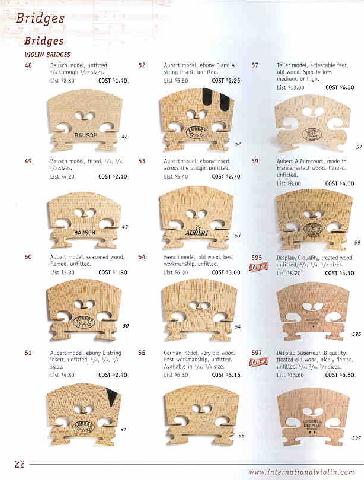 |
I started out by looking at
the current designs of violin bridges with the idea of morphing them into
mandolin bridges. Here is a sample page from the International
Violin Company that shows their products. Also a great company for
other supplies. Notice that the basic design consists of a heart in the
center, some "egg shaped" holes that are cut with a horizontal slit. This
whole thing is designed to be able to not only flex vertically but to
also be able to twist as is needed in an instrument that is driven and
has a sound post. This may not be the exact design we want for a mandolin
that it plucked and doesn't have a post. |
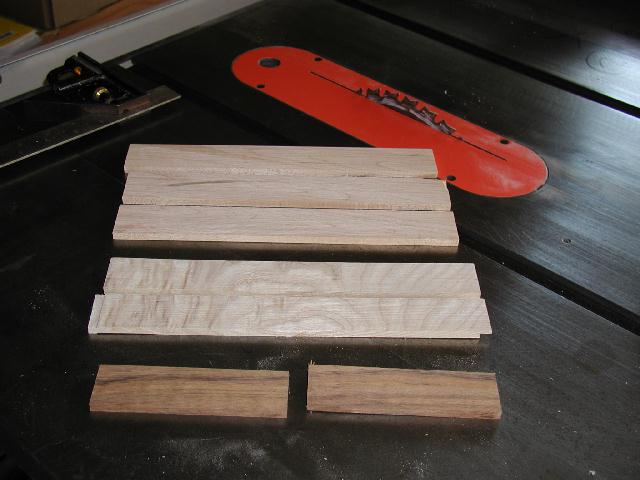 |
Rather than make just one bridge I figured
that I might as well get a technique for making the bridges in larger
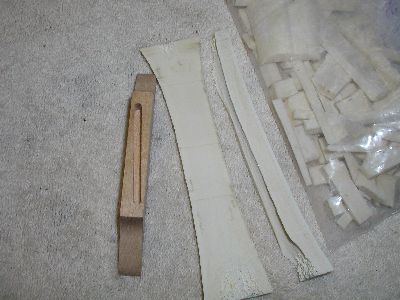
numbers. So I first cut out some blanks of Hard Maple and Shedua, a relative
of Bubinga. These are thicknessed to a little over 1/4". |
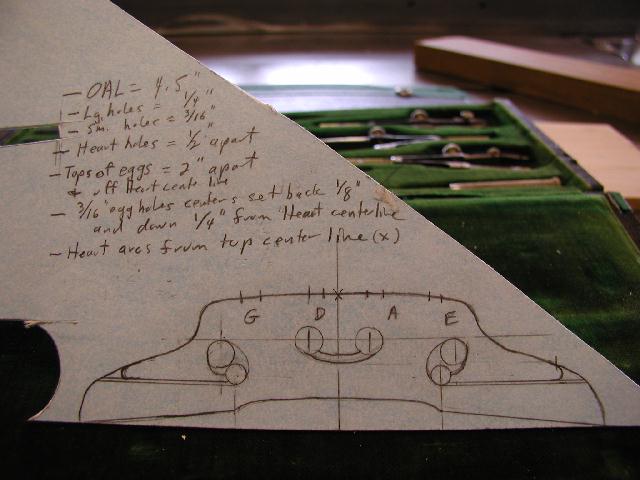 |
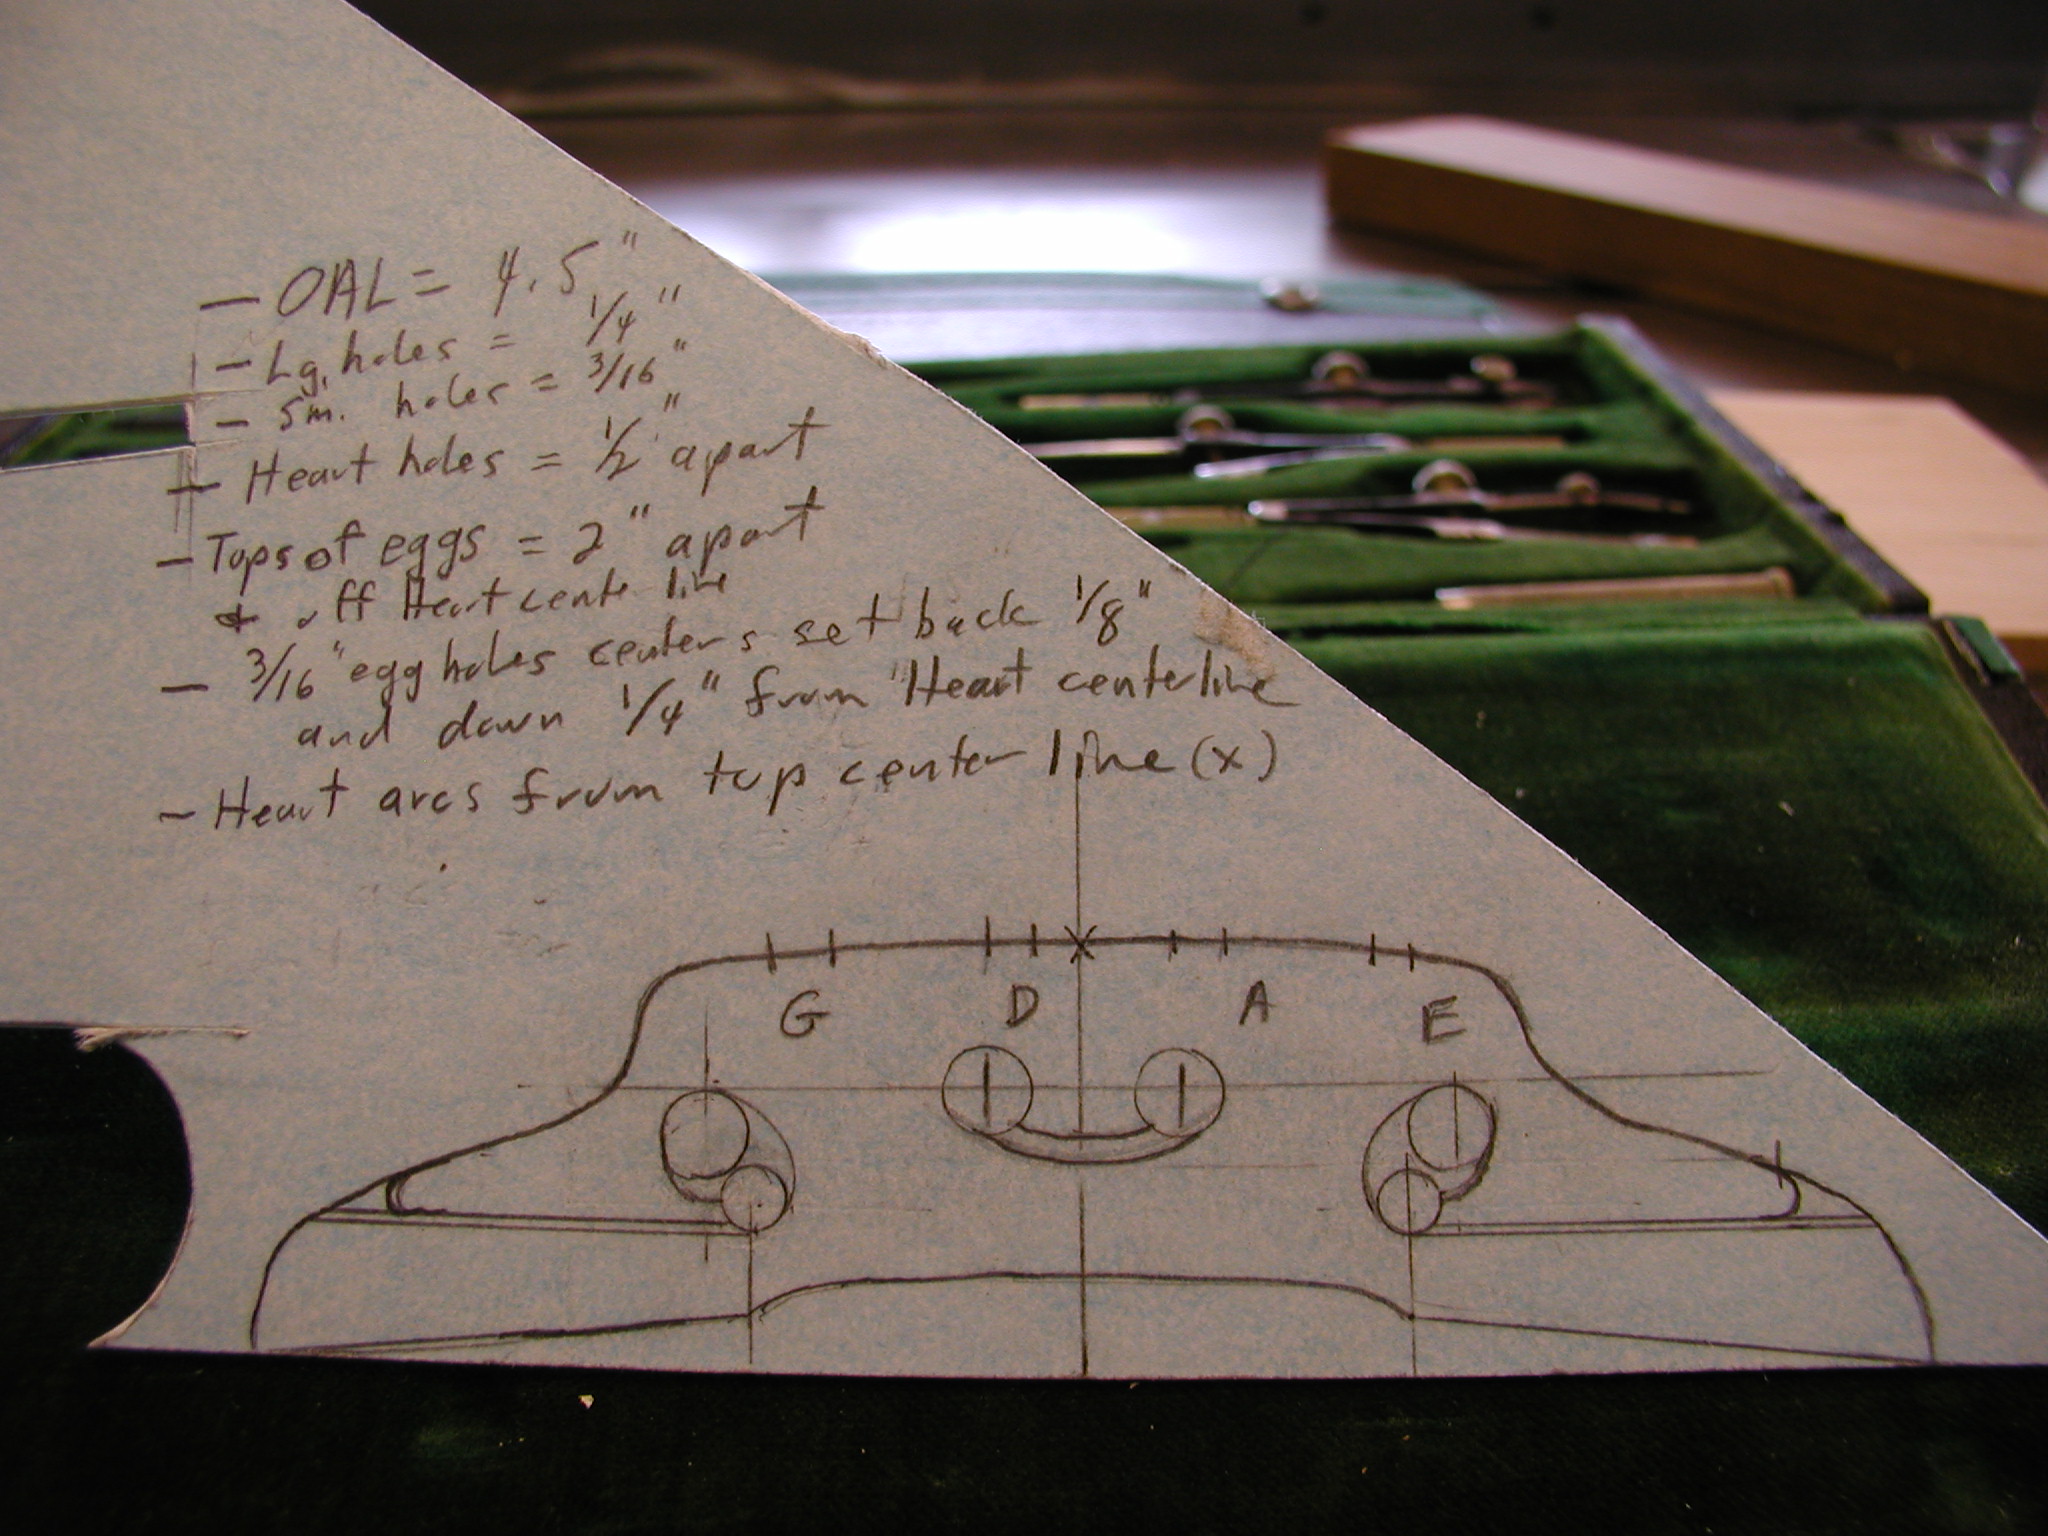
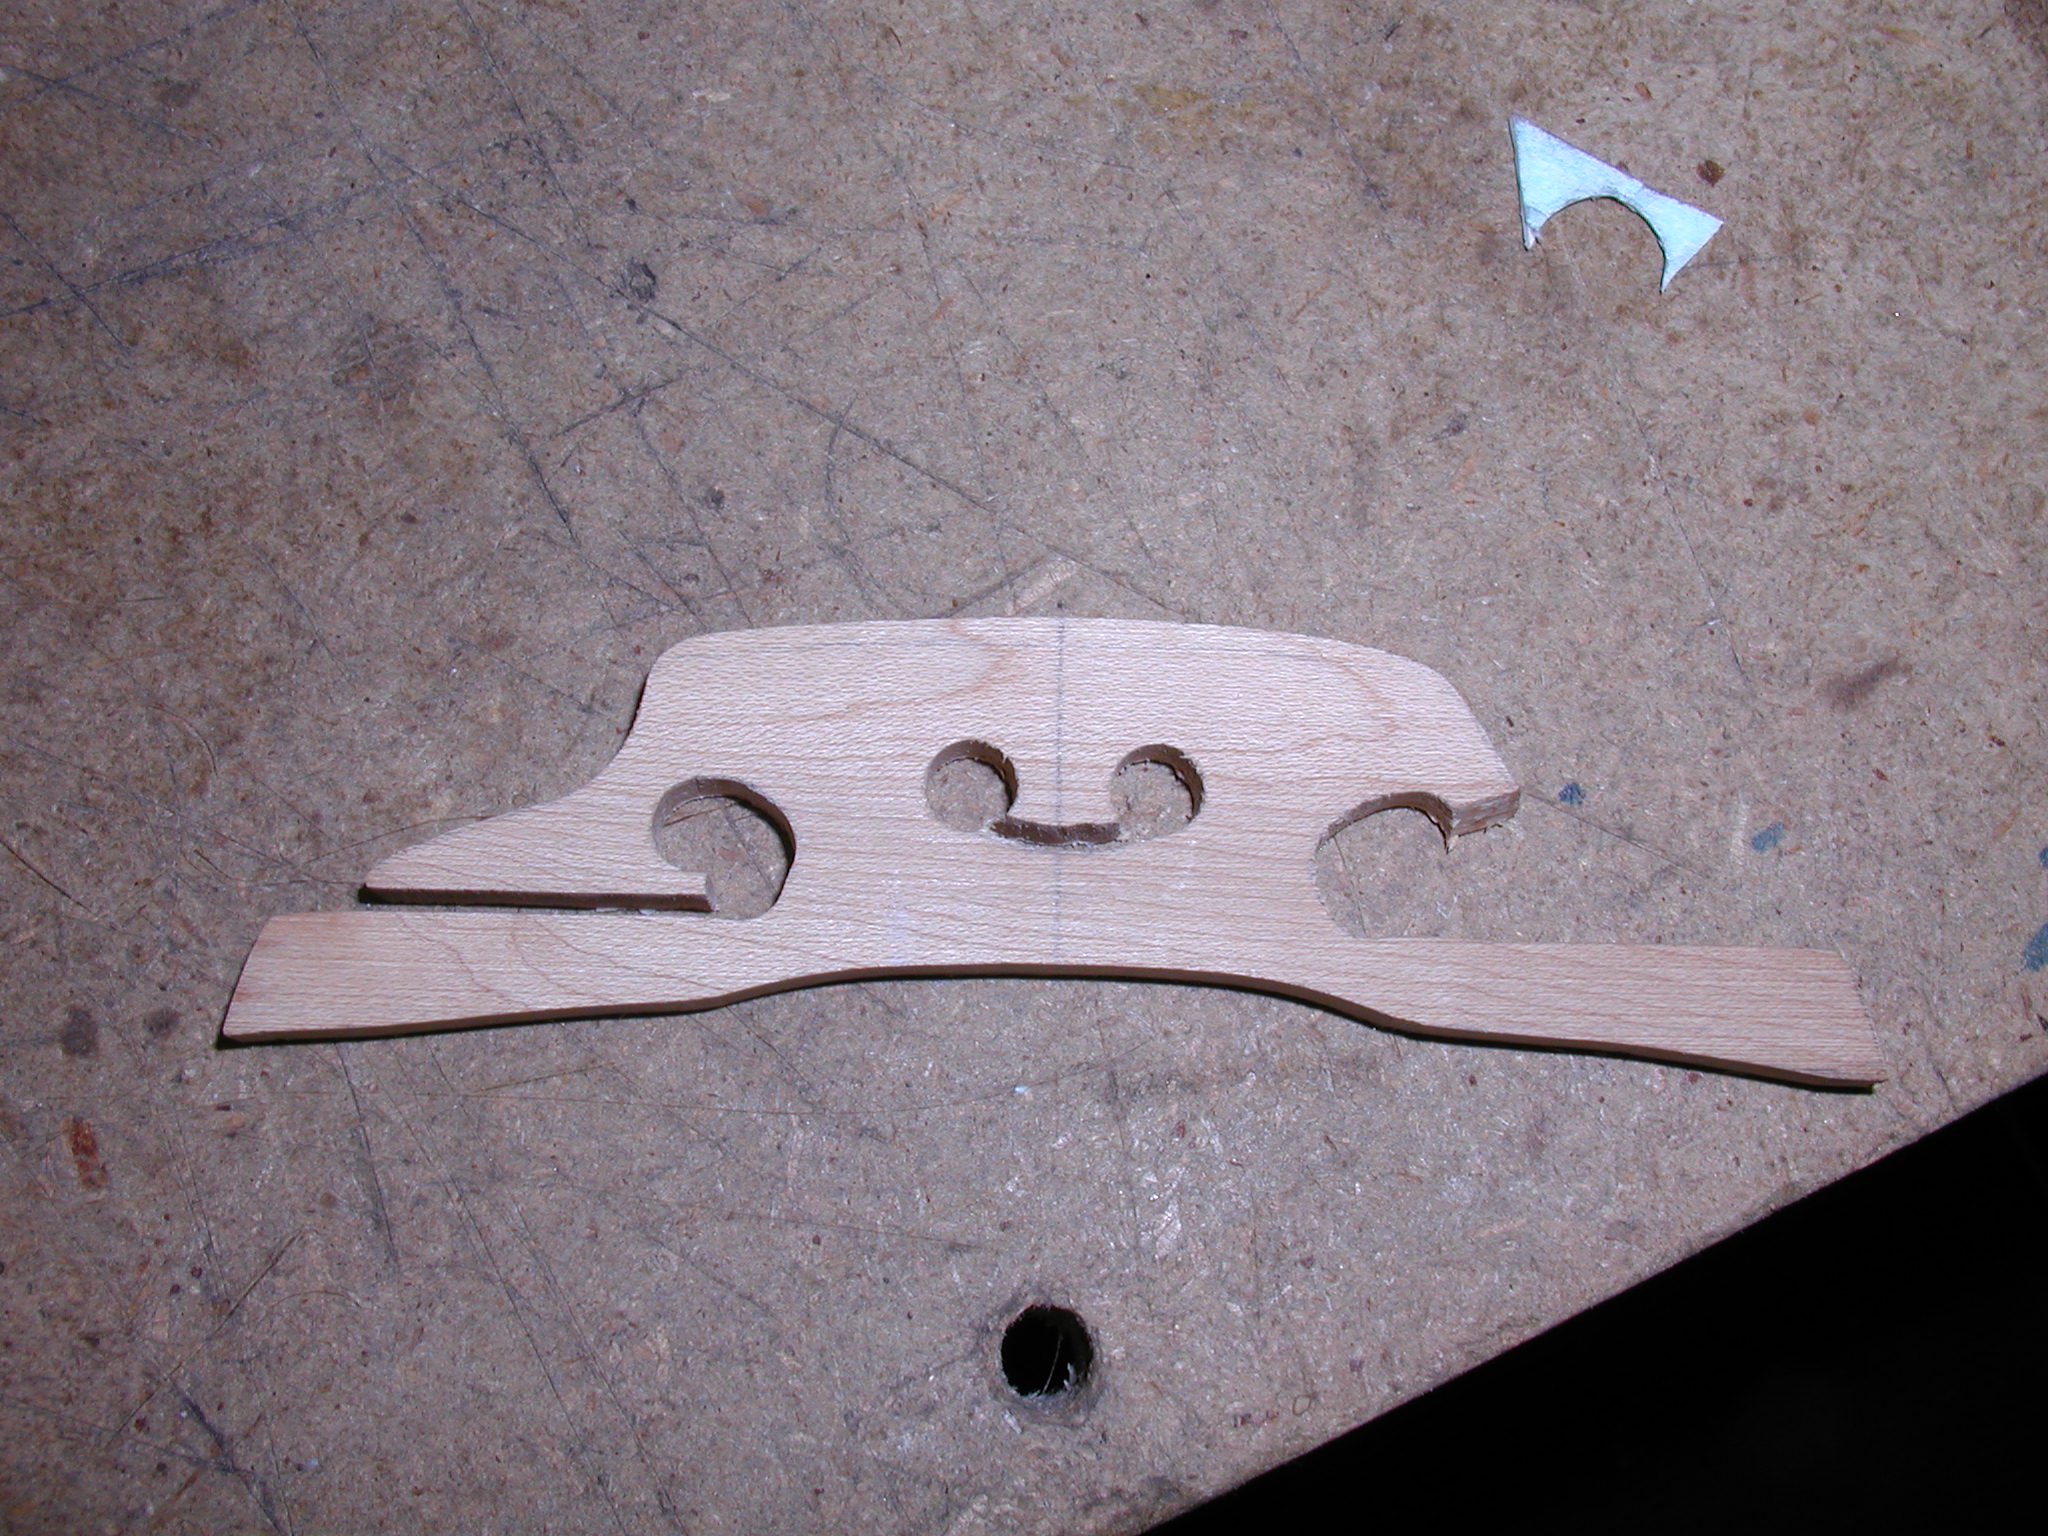
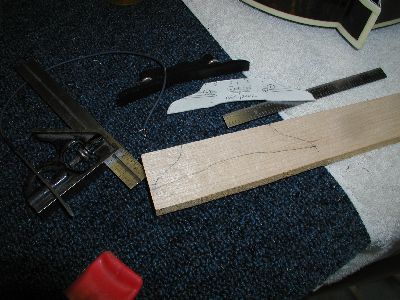
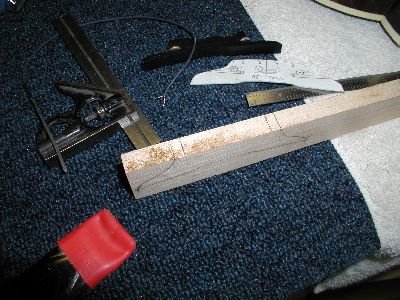
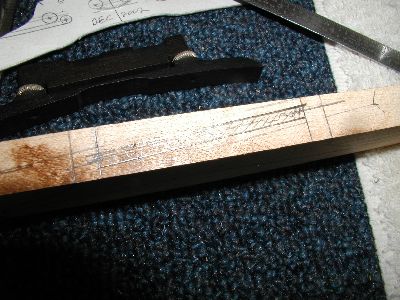
The Plan. Here is my first mutation of
the violin bridge into a mandolin bridge. I didn't bother to try to get
the feet cutaway and I sort of squashed the violin design down and made
it wider. I kept the heart and egg-shaped holes. I'm sure there must be
an official name for those but I call them the eggs. WARNING! Danger Will
Robinson!! Do _not_ use these dimensions they are flawed, see my later
design changes. |
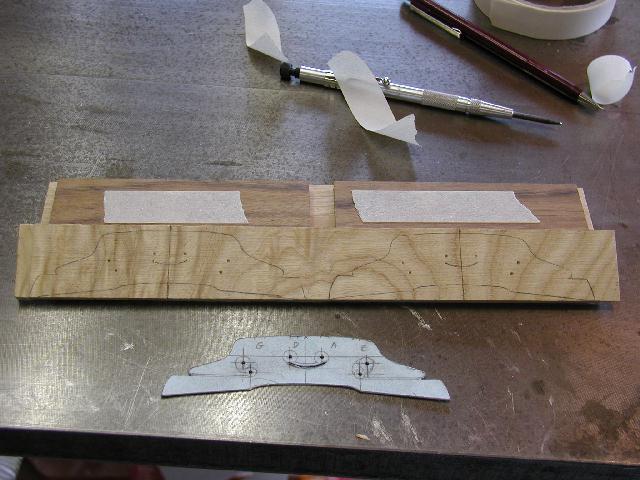 |
Here I've cut out my template and used
it as a pattern to trace on the top piece. Cheery little guys aren't they.
I used a spring loaded center punch to transfer the hole centers and then
highlighted them with the pencil. I then assembled the stack of pieces
with double-stick tape while aligning the bottom edges. |
 |
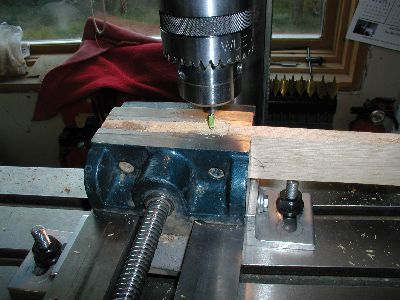
Here I'm drilling out the holes with a
brad point bit. The brad point keys into the punched center marks and
cuts a clean hole. However, with the maple it still wanted to chip out
on the bottom side a bit. In the future I will also include a scrap piece
double stick taped to the bottom of the stack. Alternatively I could drill
a #50 guide hole first and then use the brad point bit from both sides
of the stack. I drilled the small 3/16" holes first and then drilled
the 1/4" holes which just cut into the 3/16" holes in the egg. |
 |
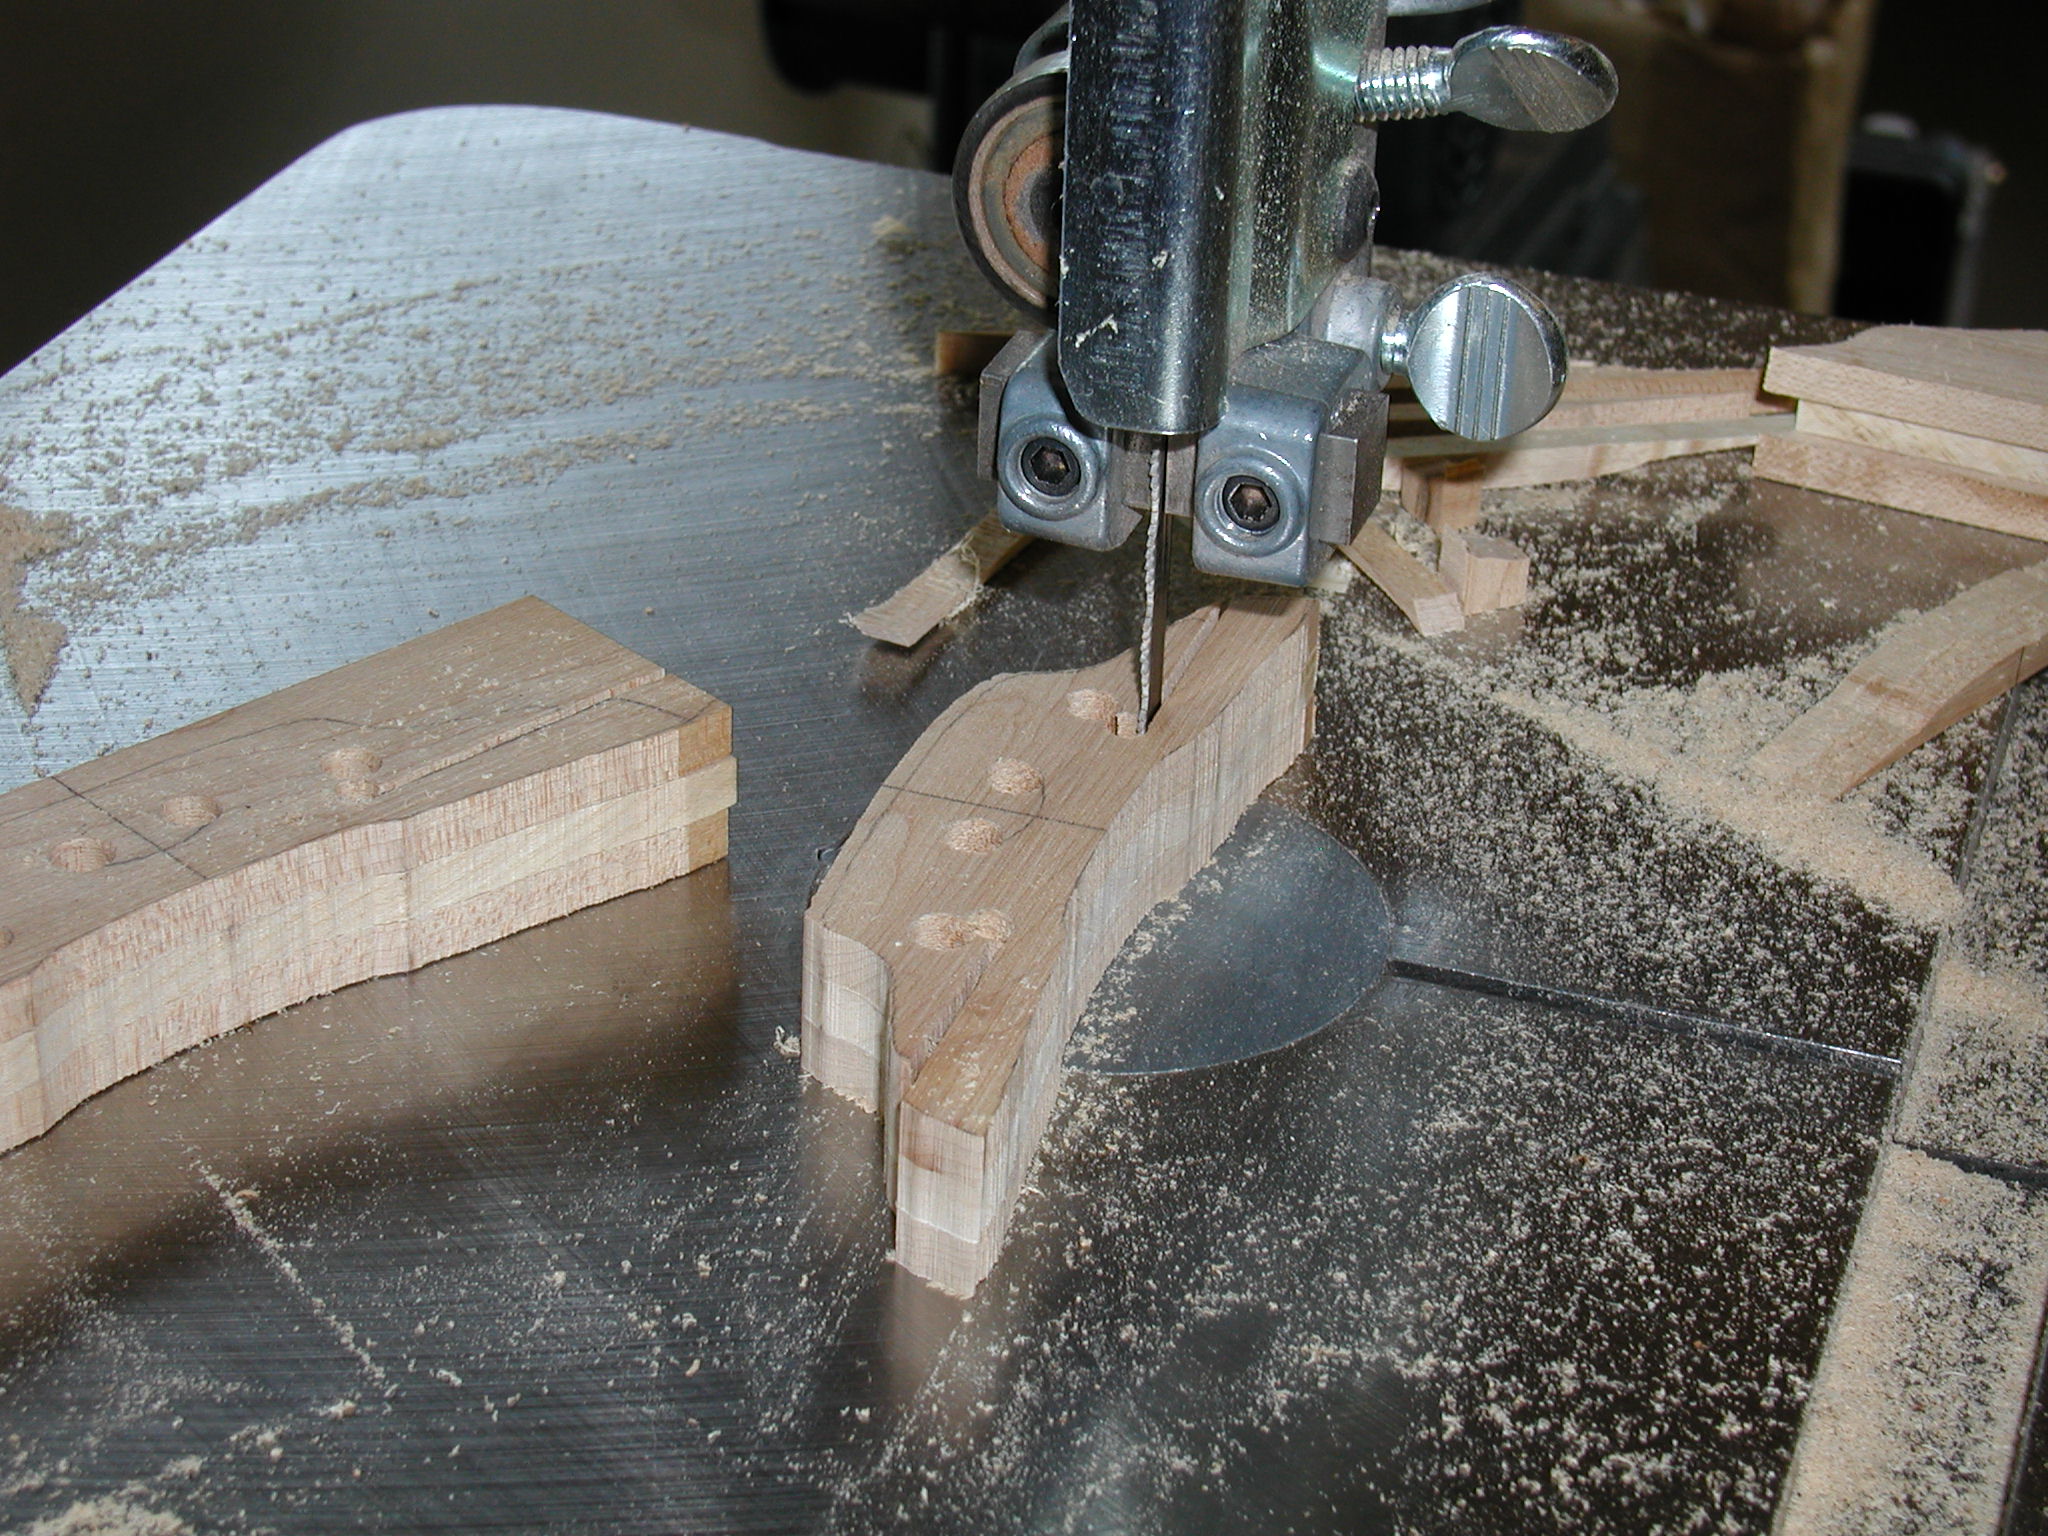
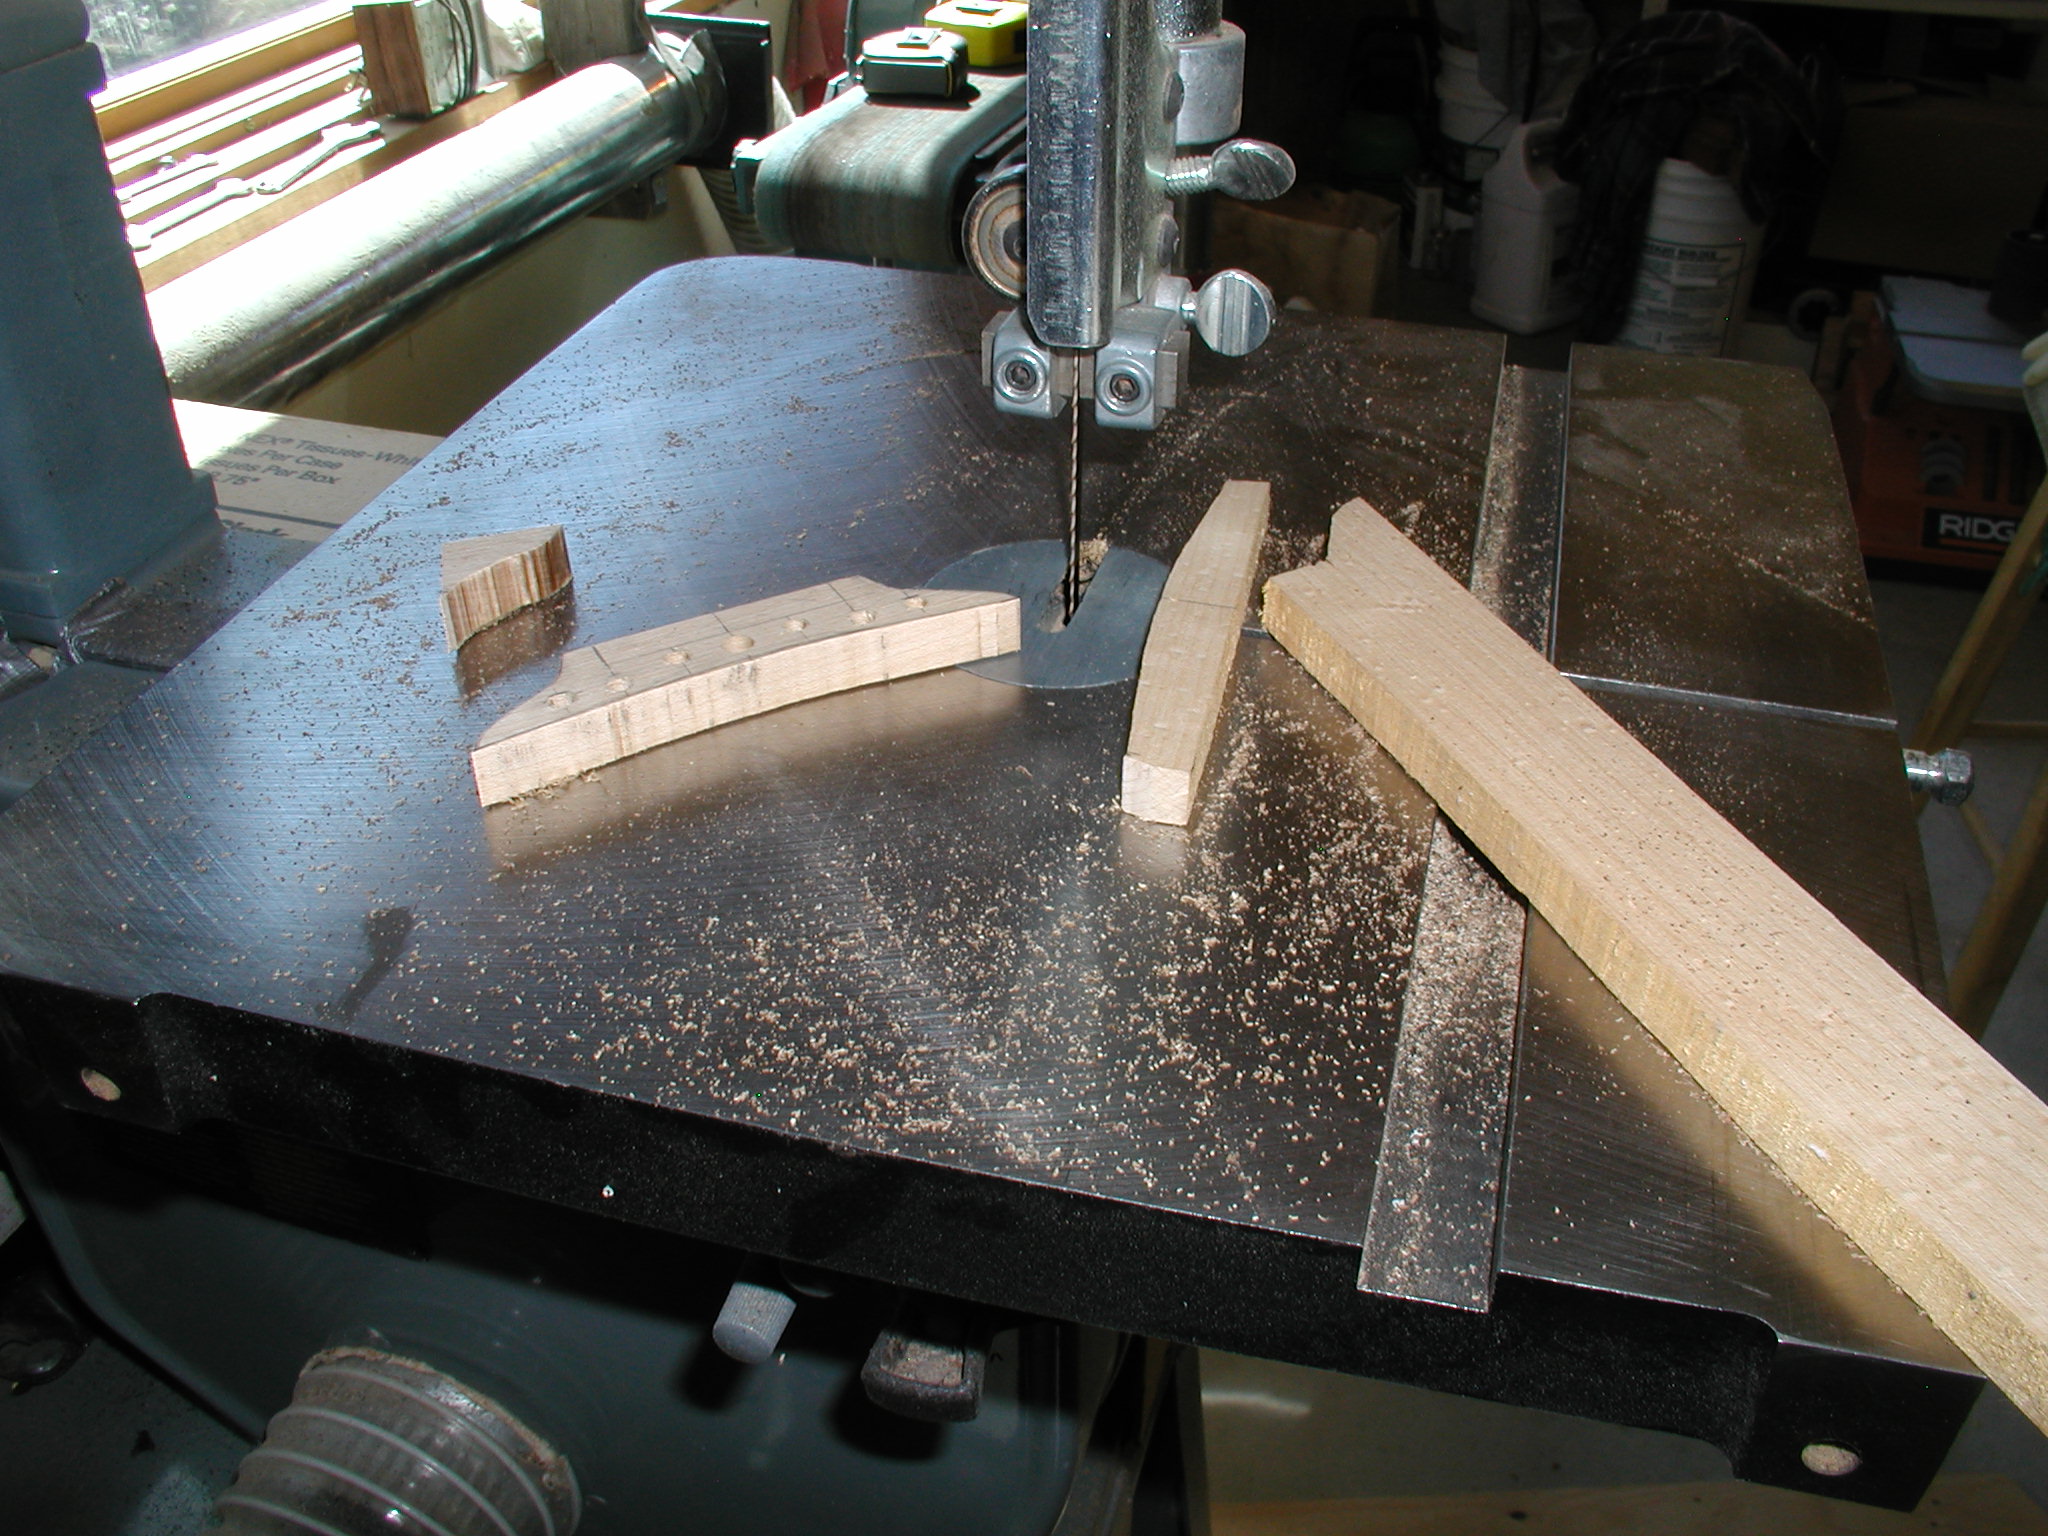
Now I am rough sawing out the bridges.
There is a step skipped where I drew in the line for the horizontal slot.
I just used a straight edge aligned on the side notch areas, This just
touched the bottom of the egg holes. I am sawing to the top and leaving
the line on the bottom. I used a wave-kerf hacksaw type 1/4" blade and
that seemed to give a pretty good cut. My slot lines were a little
wobbly doing it freehand like this. I think in the future I'll make sure
that the line to cut is true to the bottom of the blank. Then I'll cut
out the profile but not the bottom part of the feet. That way I can use
a fence to get the slot lines true and later cut the bottom feet relief. |
 |
I wanted the egg holes to look the same
so I didn't want to just file them out freehand. I made another template
and trued the eggs with a small french curve. I then aligned this on the
drilled holes and drew the curve to cut. |
 |
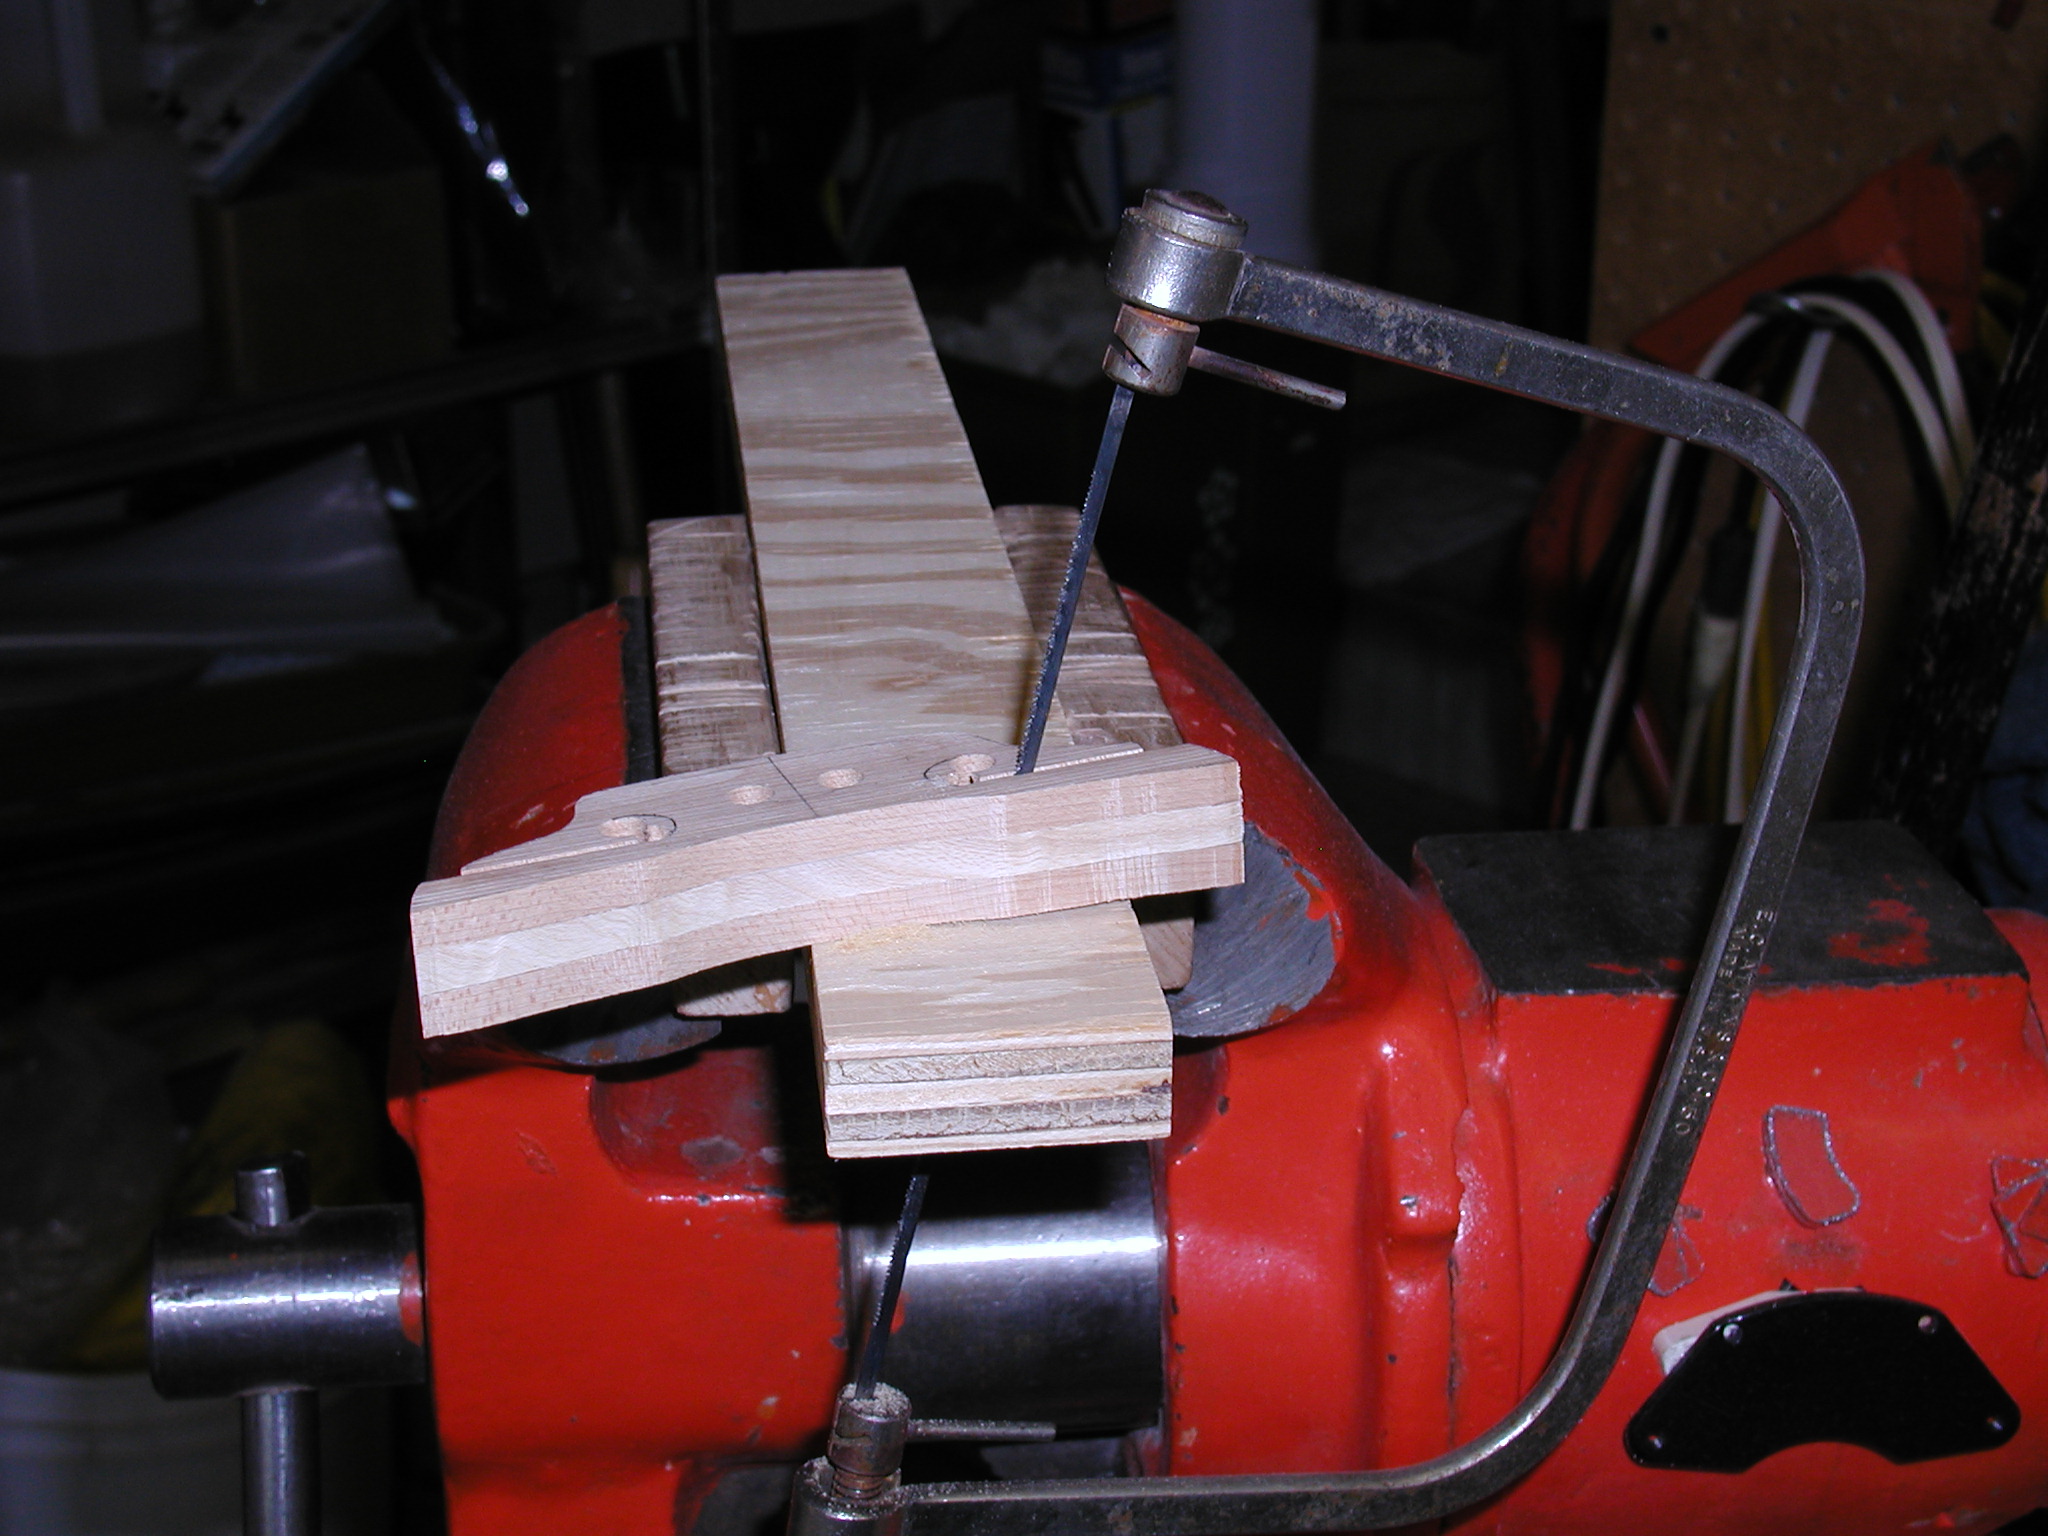
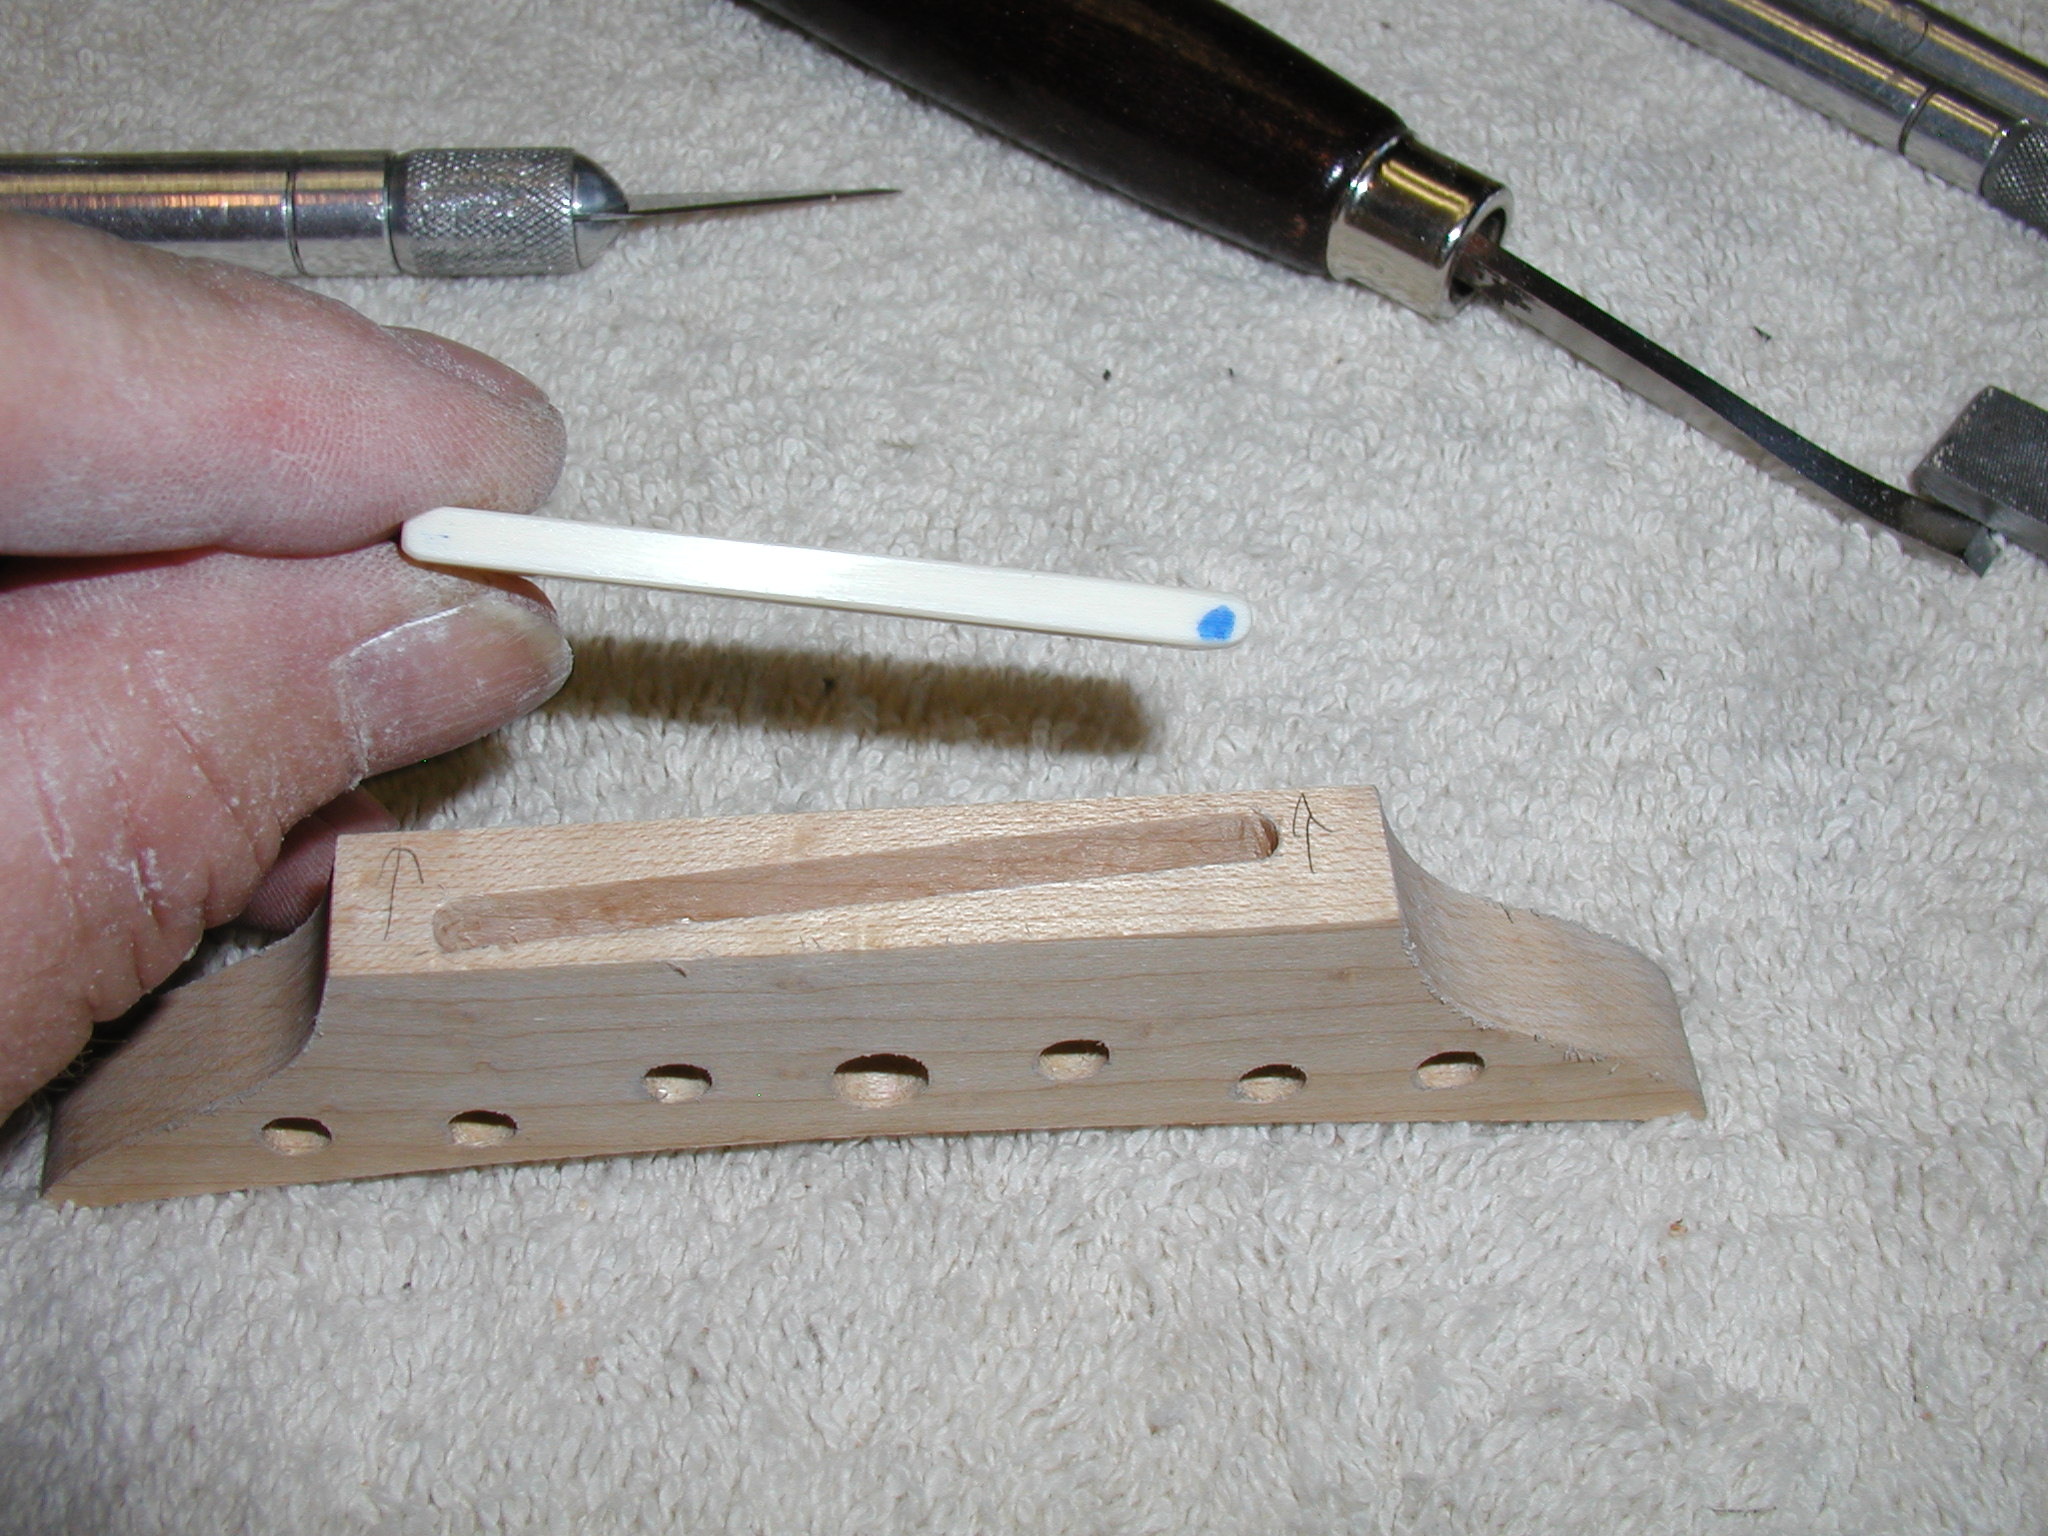
And now cut out the egg profiles and the
slit for the heart. I am using a regular coping saw as a fretsaw. The
teeth cut on the down stroke and I have a piece of wood in the vise that
has a central hole and a slit cut to the hole. This way I can thread the
saw blade into the heart hole, slip the blade through the slit in the
board in the vise and cut it true with even straight down strokes. You
can see that I have already smoothed them some on the belt sander. |
 |
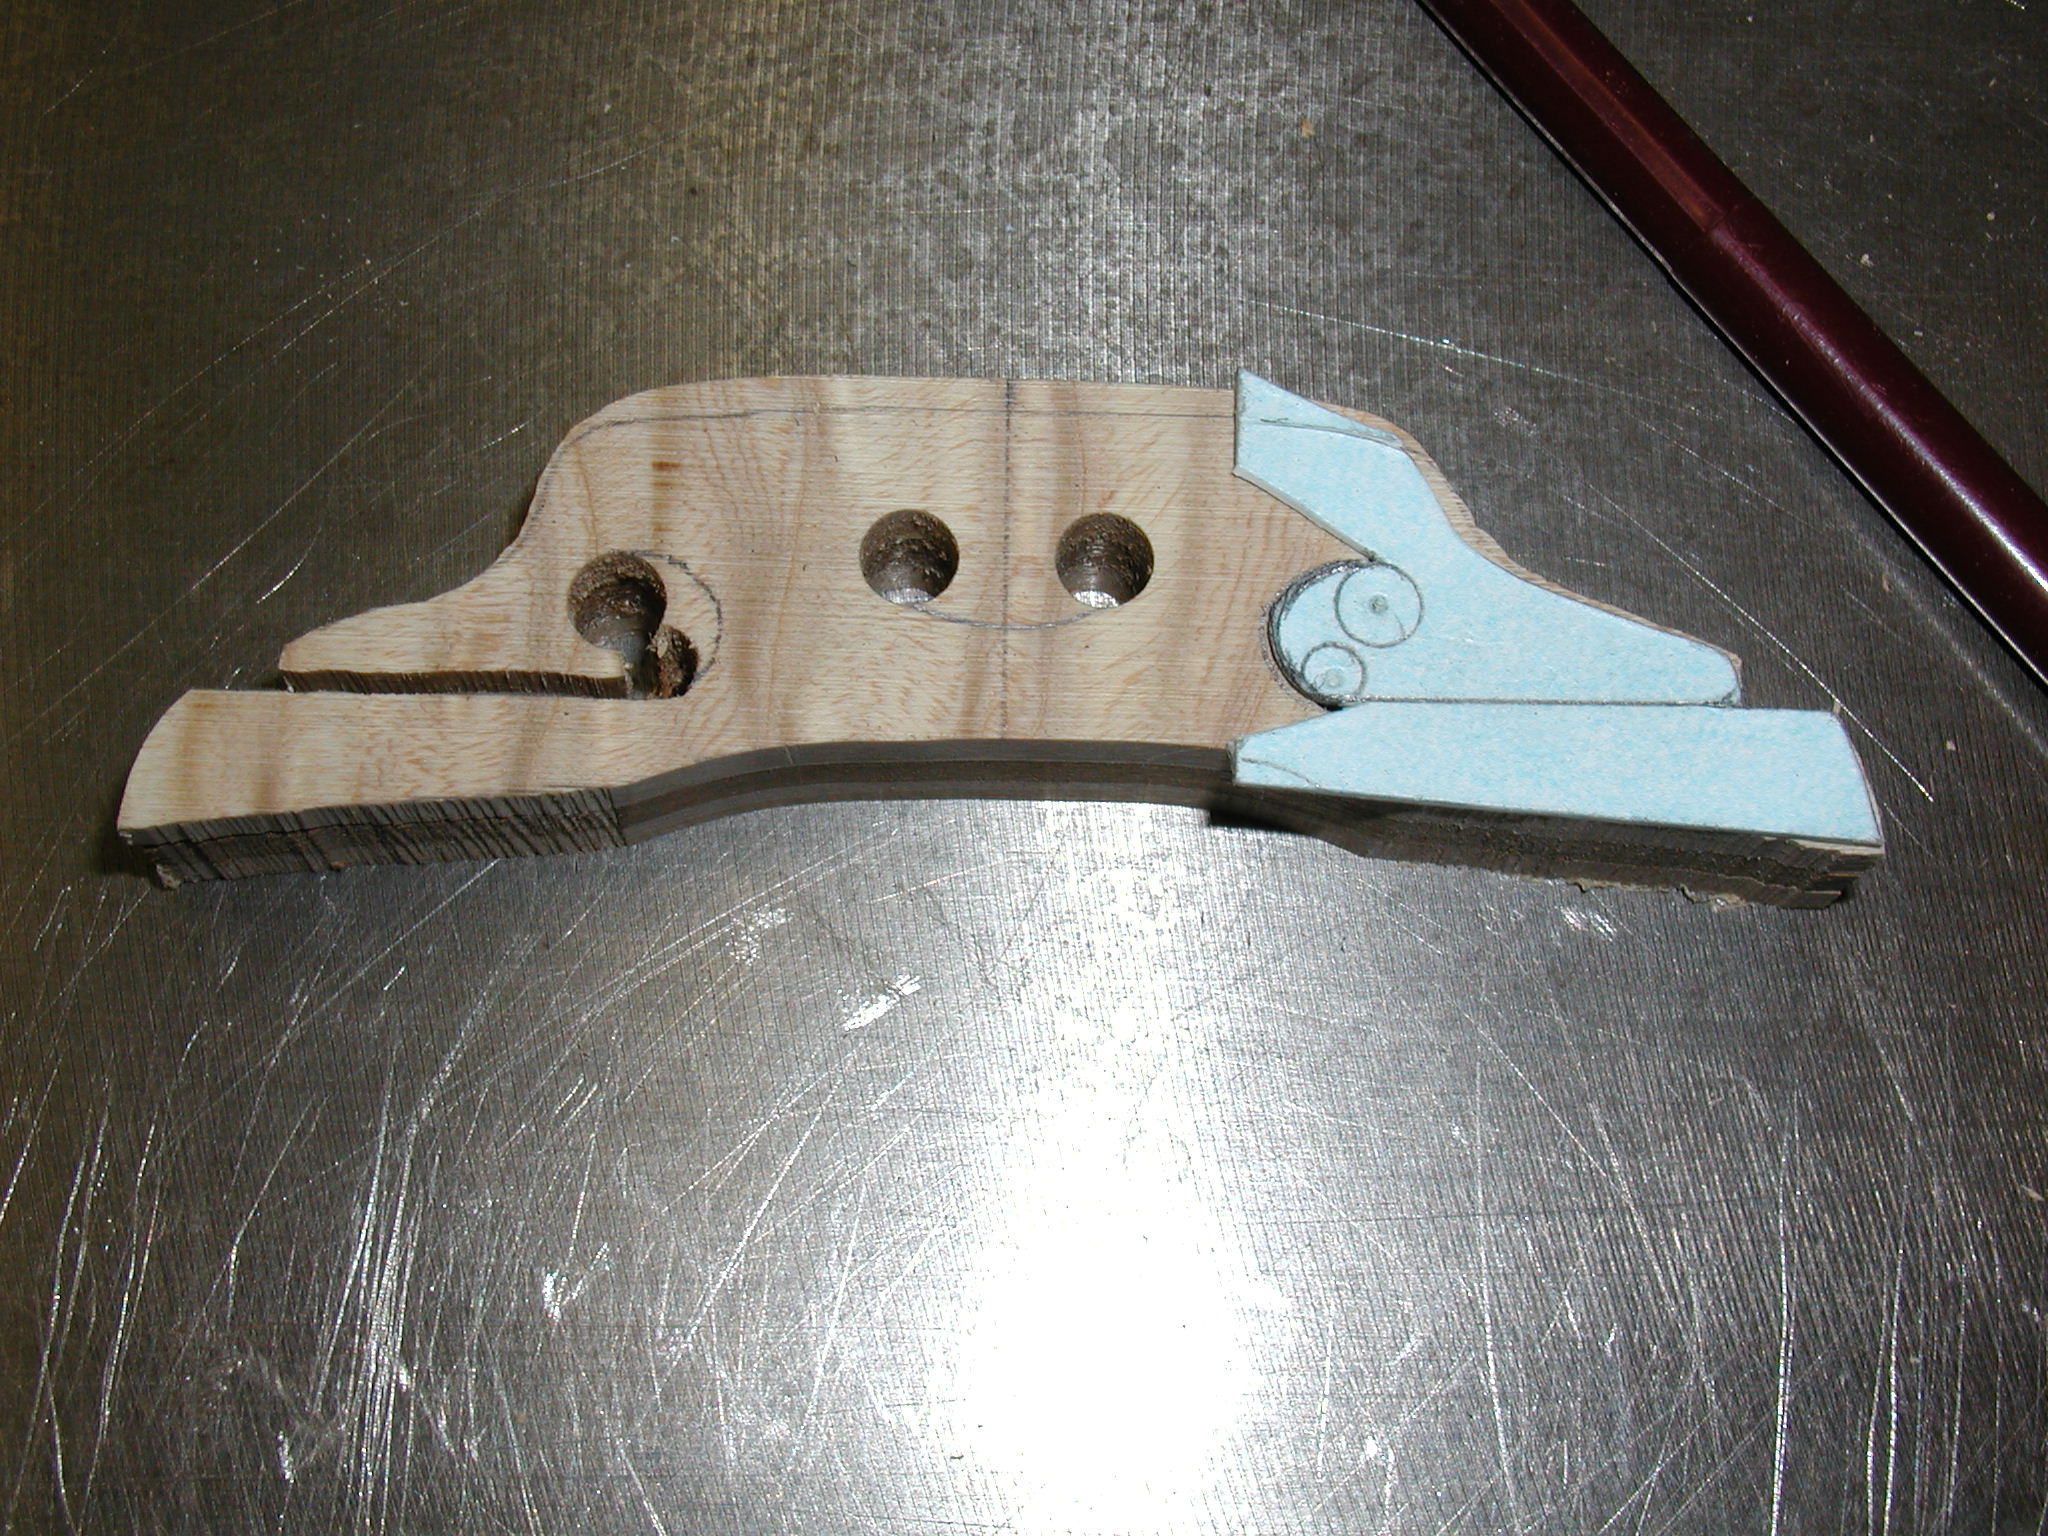
I then separated the individual bridge
pieces. Hmmmmmm, that double stick tape is _strong_! You can't just pry
them up or the wing parts will break off just like this. I had to use
a pallet knife to slip in and slowly ease each bridge free. I could have
also oozed some acetone in there to soften the glue but that makes quite
a mess to clean up after the fact. One might get away with using double
stick drafting tape since its glue is not so strong but the stacks might
come apart in the drill and saw process. Better to just be a bit careful
when taking them apart. Notice that this was one of the slab sawn pieces,
the quartered ones didn't have as much problem. I rough smooth the whole
thing but I don't do a real clean up yet. I want to file and thin it as
part of the tuning process. |
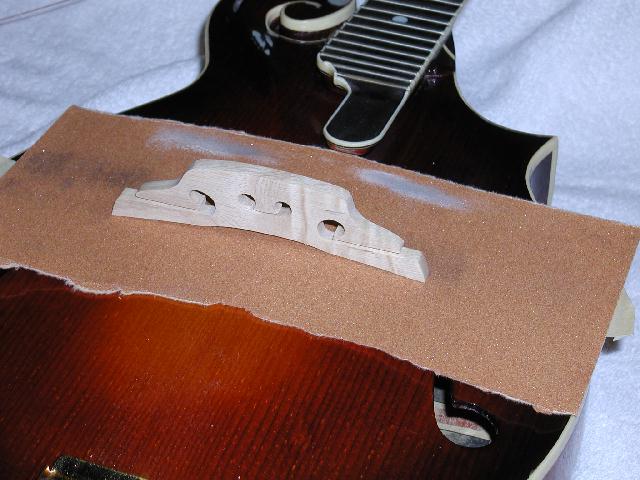 |
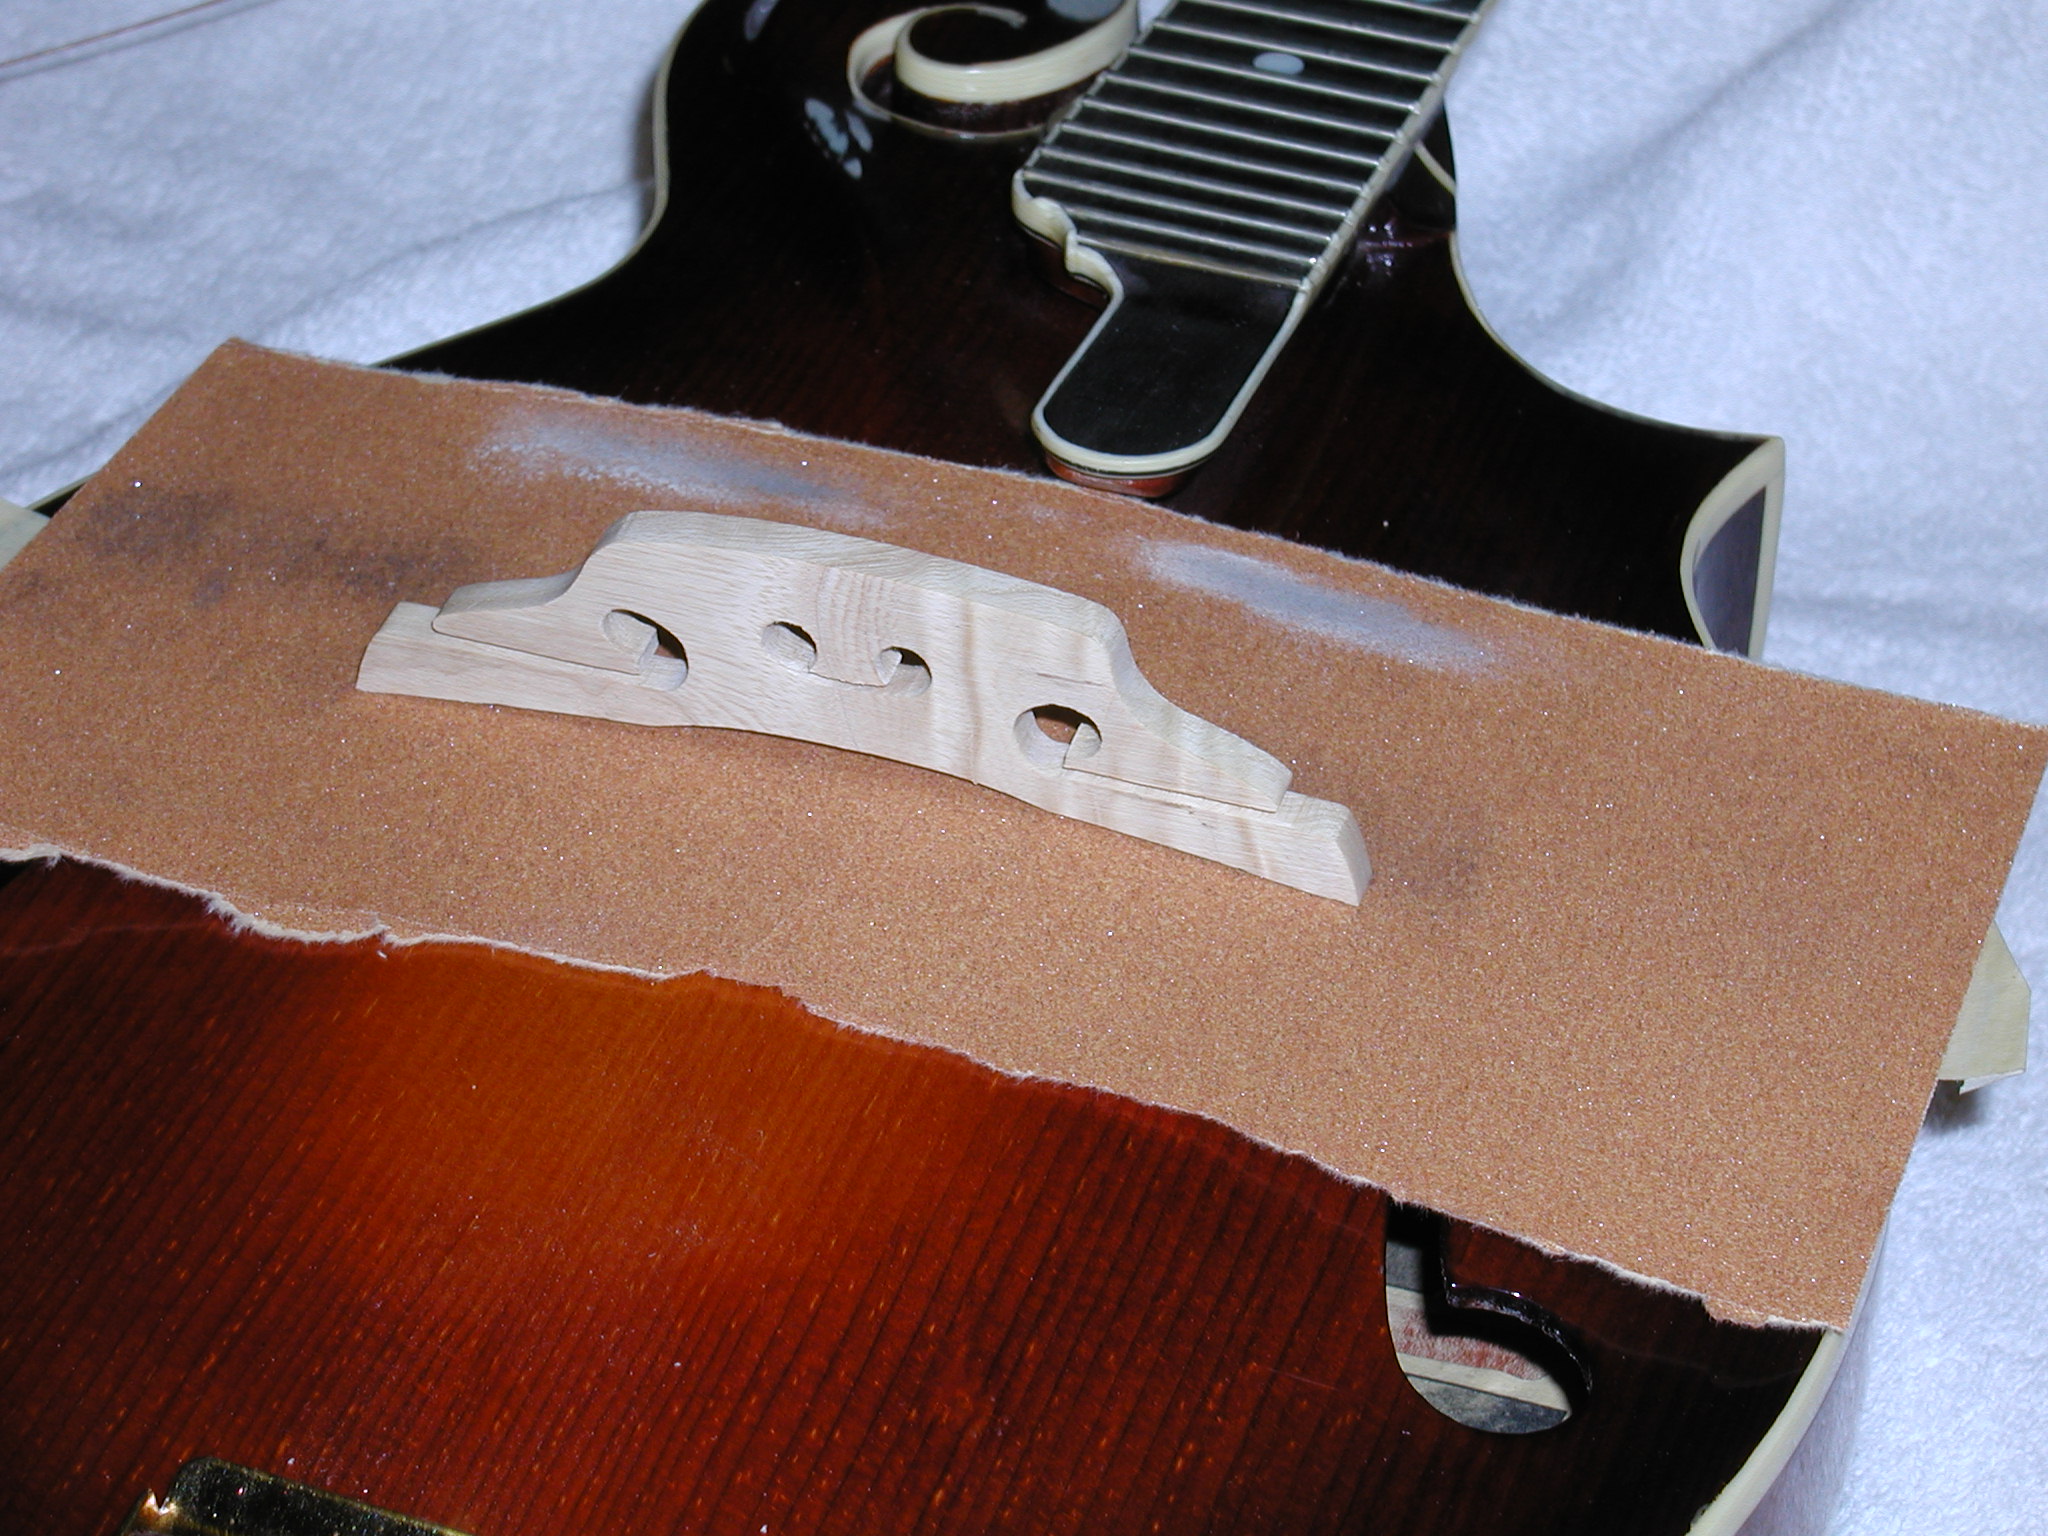
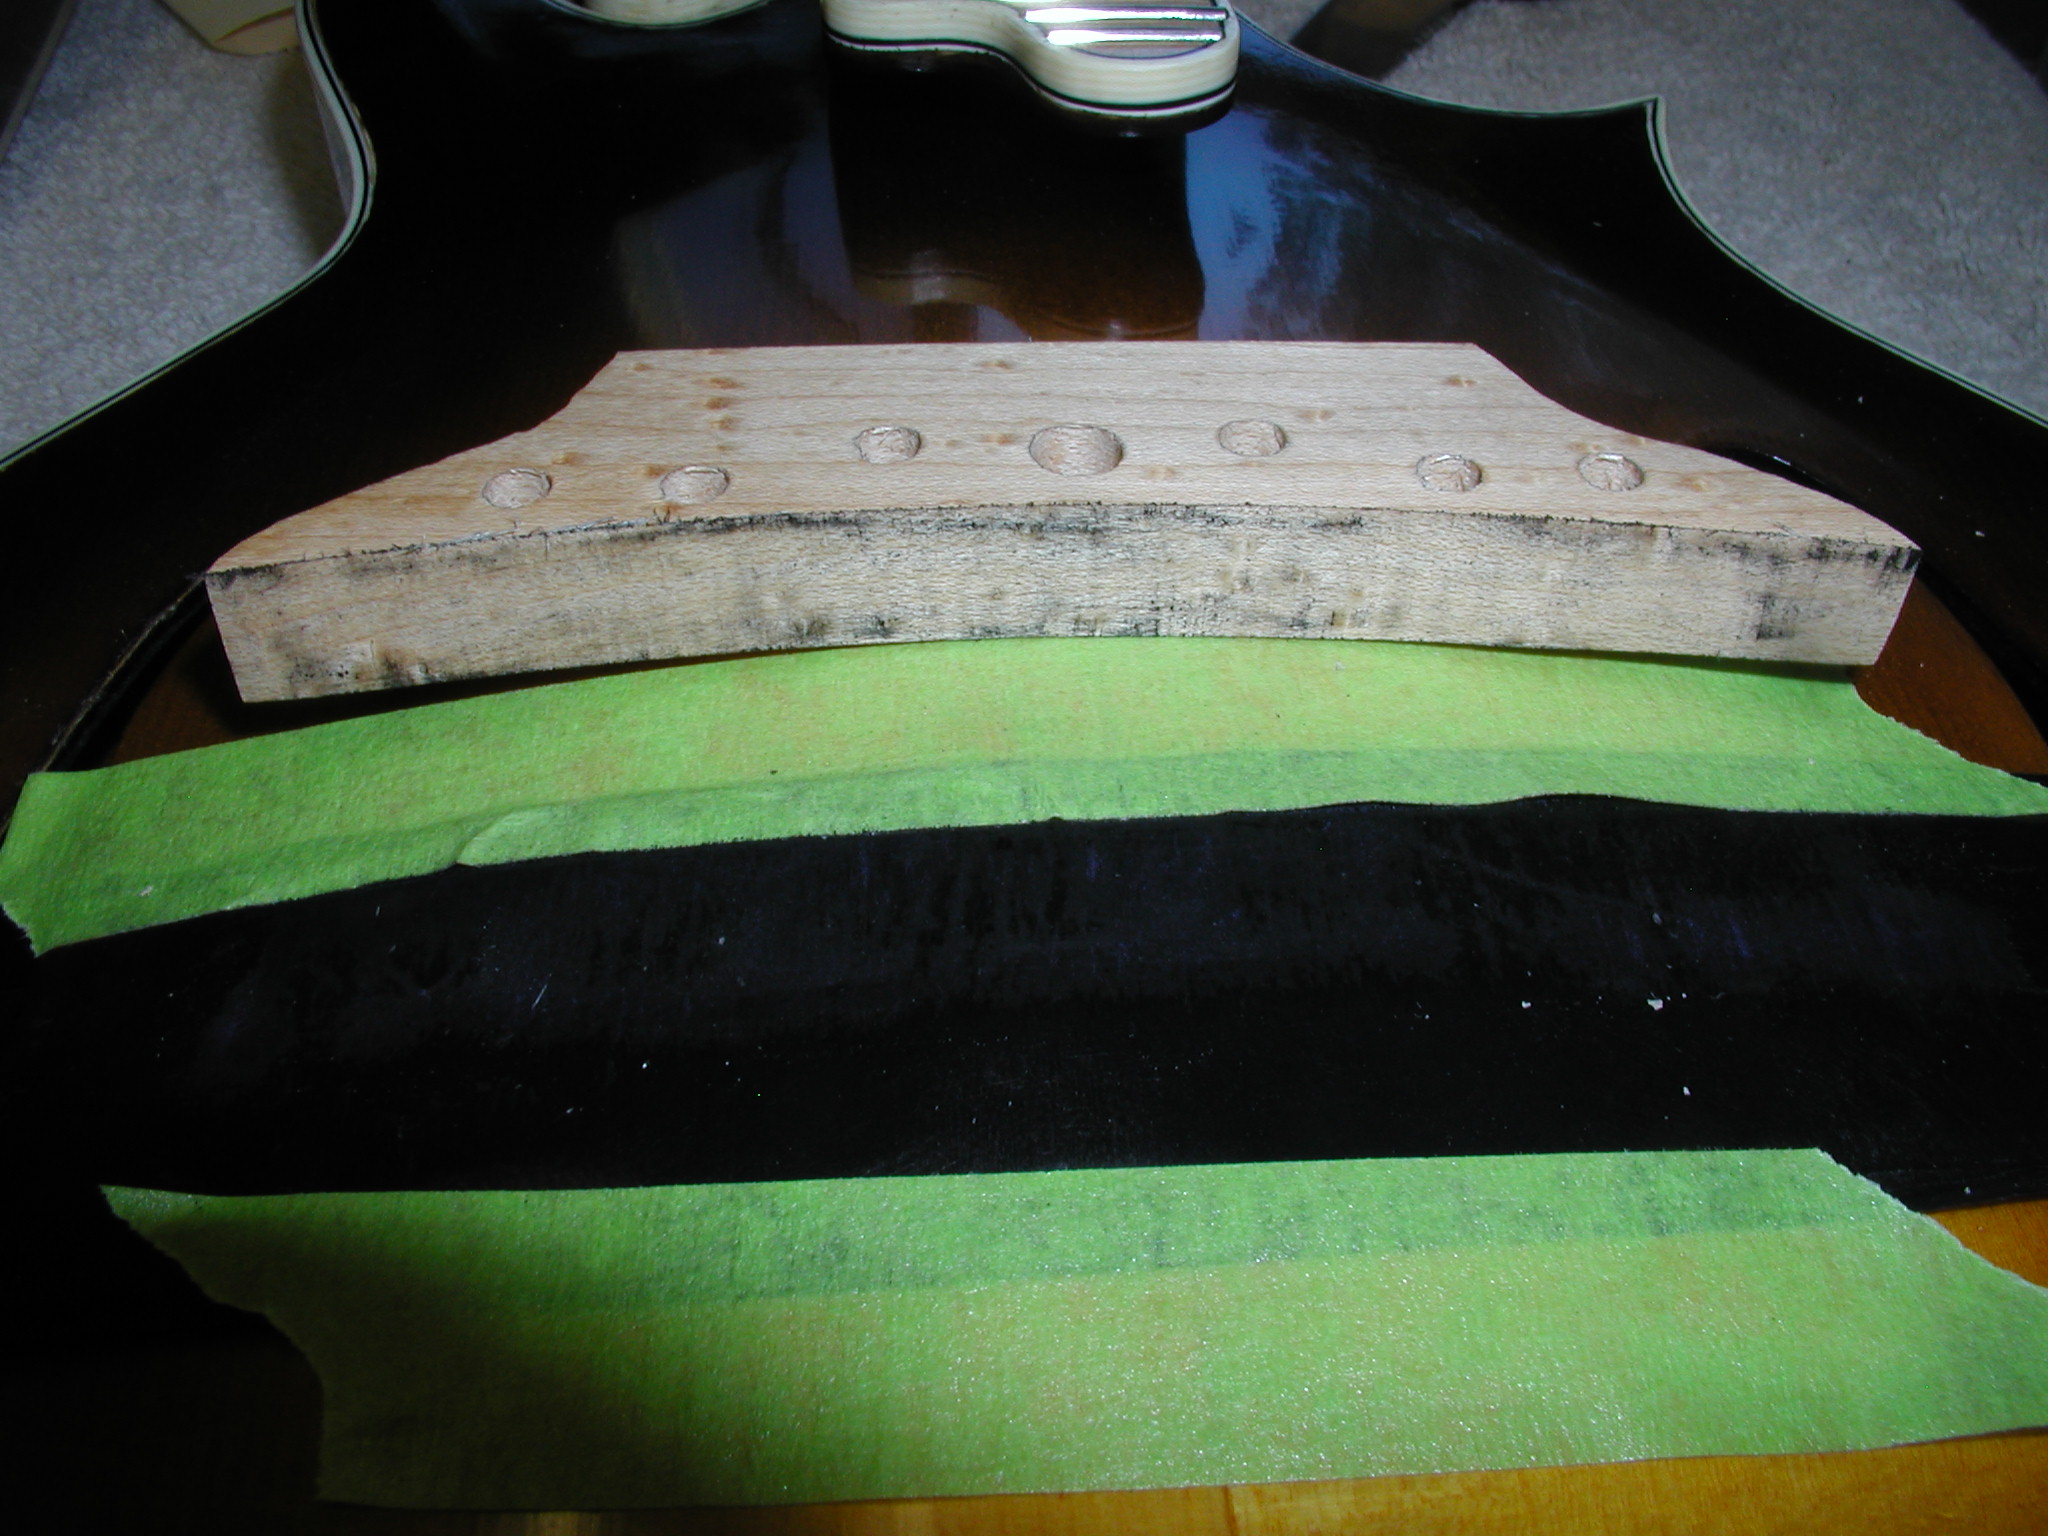
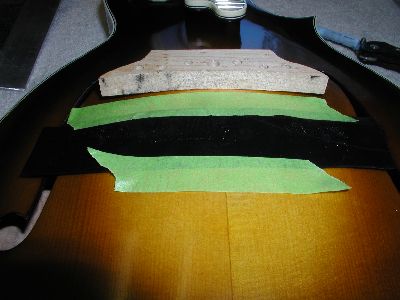
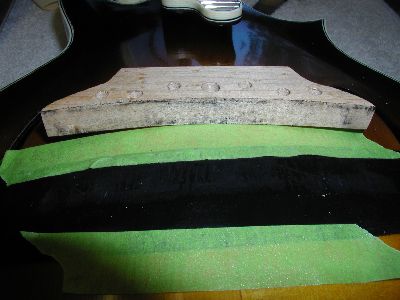
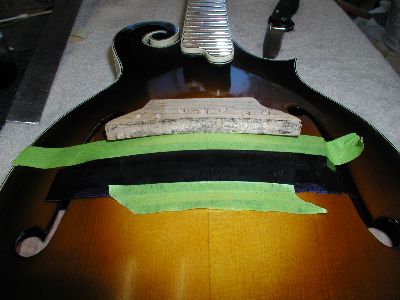
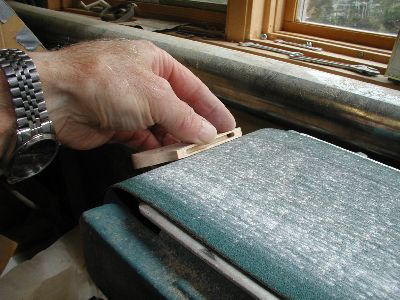
Fitting the feet to the top. There are
several schools of thought on this and both seem to work. Some hold the
bridge and wiggle it along the center line of the body. This way doesn't
have to worry about getting the fit of the top radius but you have a harder
time keeping it exactly aligned in the vertical without getting the bottom
of the feet "rounded" due to letting the bridge tip as you slide back
and forth. Sanding only on the push or the pull stroke helps this. I use
the side-to-side method. You can see some tape sticking out under the
sandpaper that indicate the bridge line. It is necessary to only slide
it a short distance, a 1/4" or less or else the tip ends of the feet will
not fit properly. I used 80 grit to rough it in with the side-to-side
and then 120 grit and along the axis to get the final fit. I just scribble
on the bottom with a pencil, take a couple strokes and check the bottom.
I can then use a scraper to shape it faster than the sandpaper. Then "repeat
as above" until the sanding indicates that it is true over the full foot
surface. One last swipe with a scraper to get off any sandpaper fuzz and
it is true. |
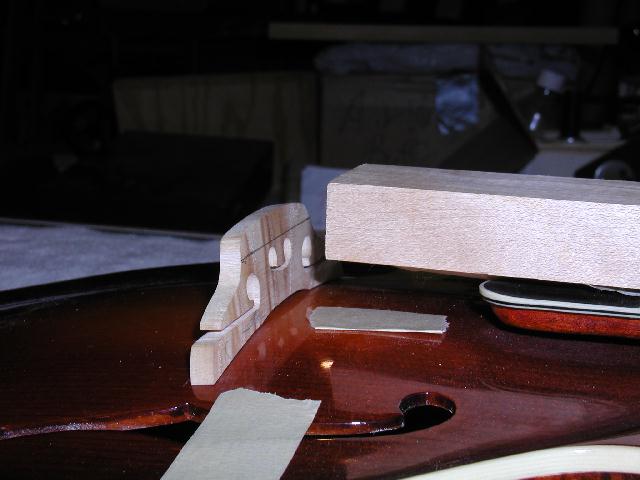 |
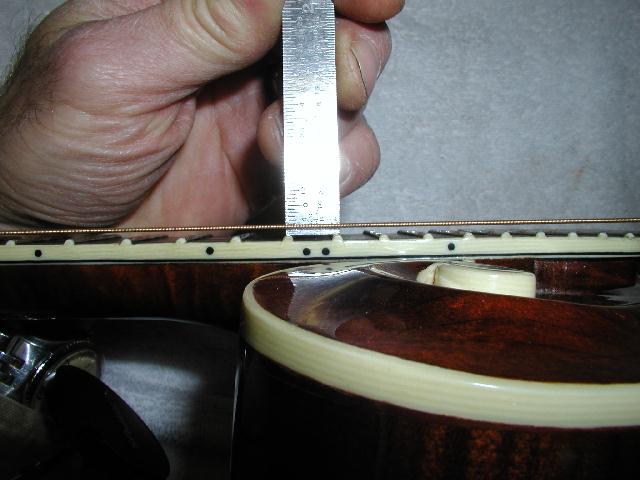
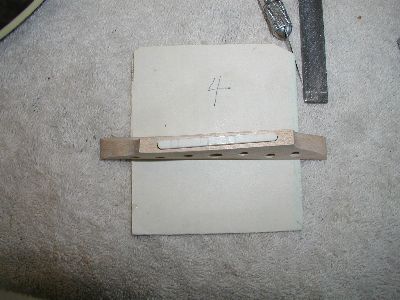
Now that the feet are fit to the top the
next step is to trim the top of the bridge down to set the action height.
To do this we need know where the fretboard height is. I use a simple
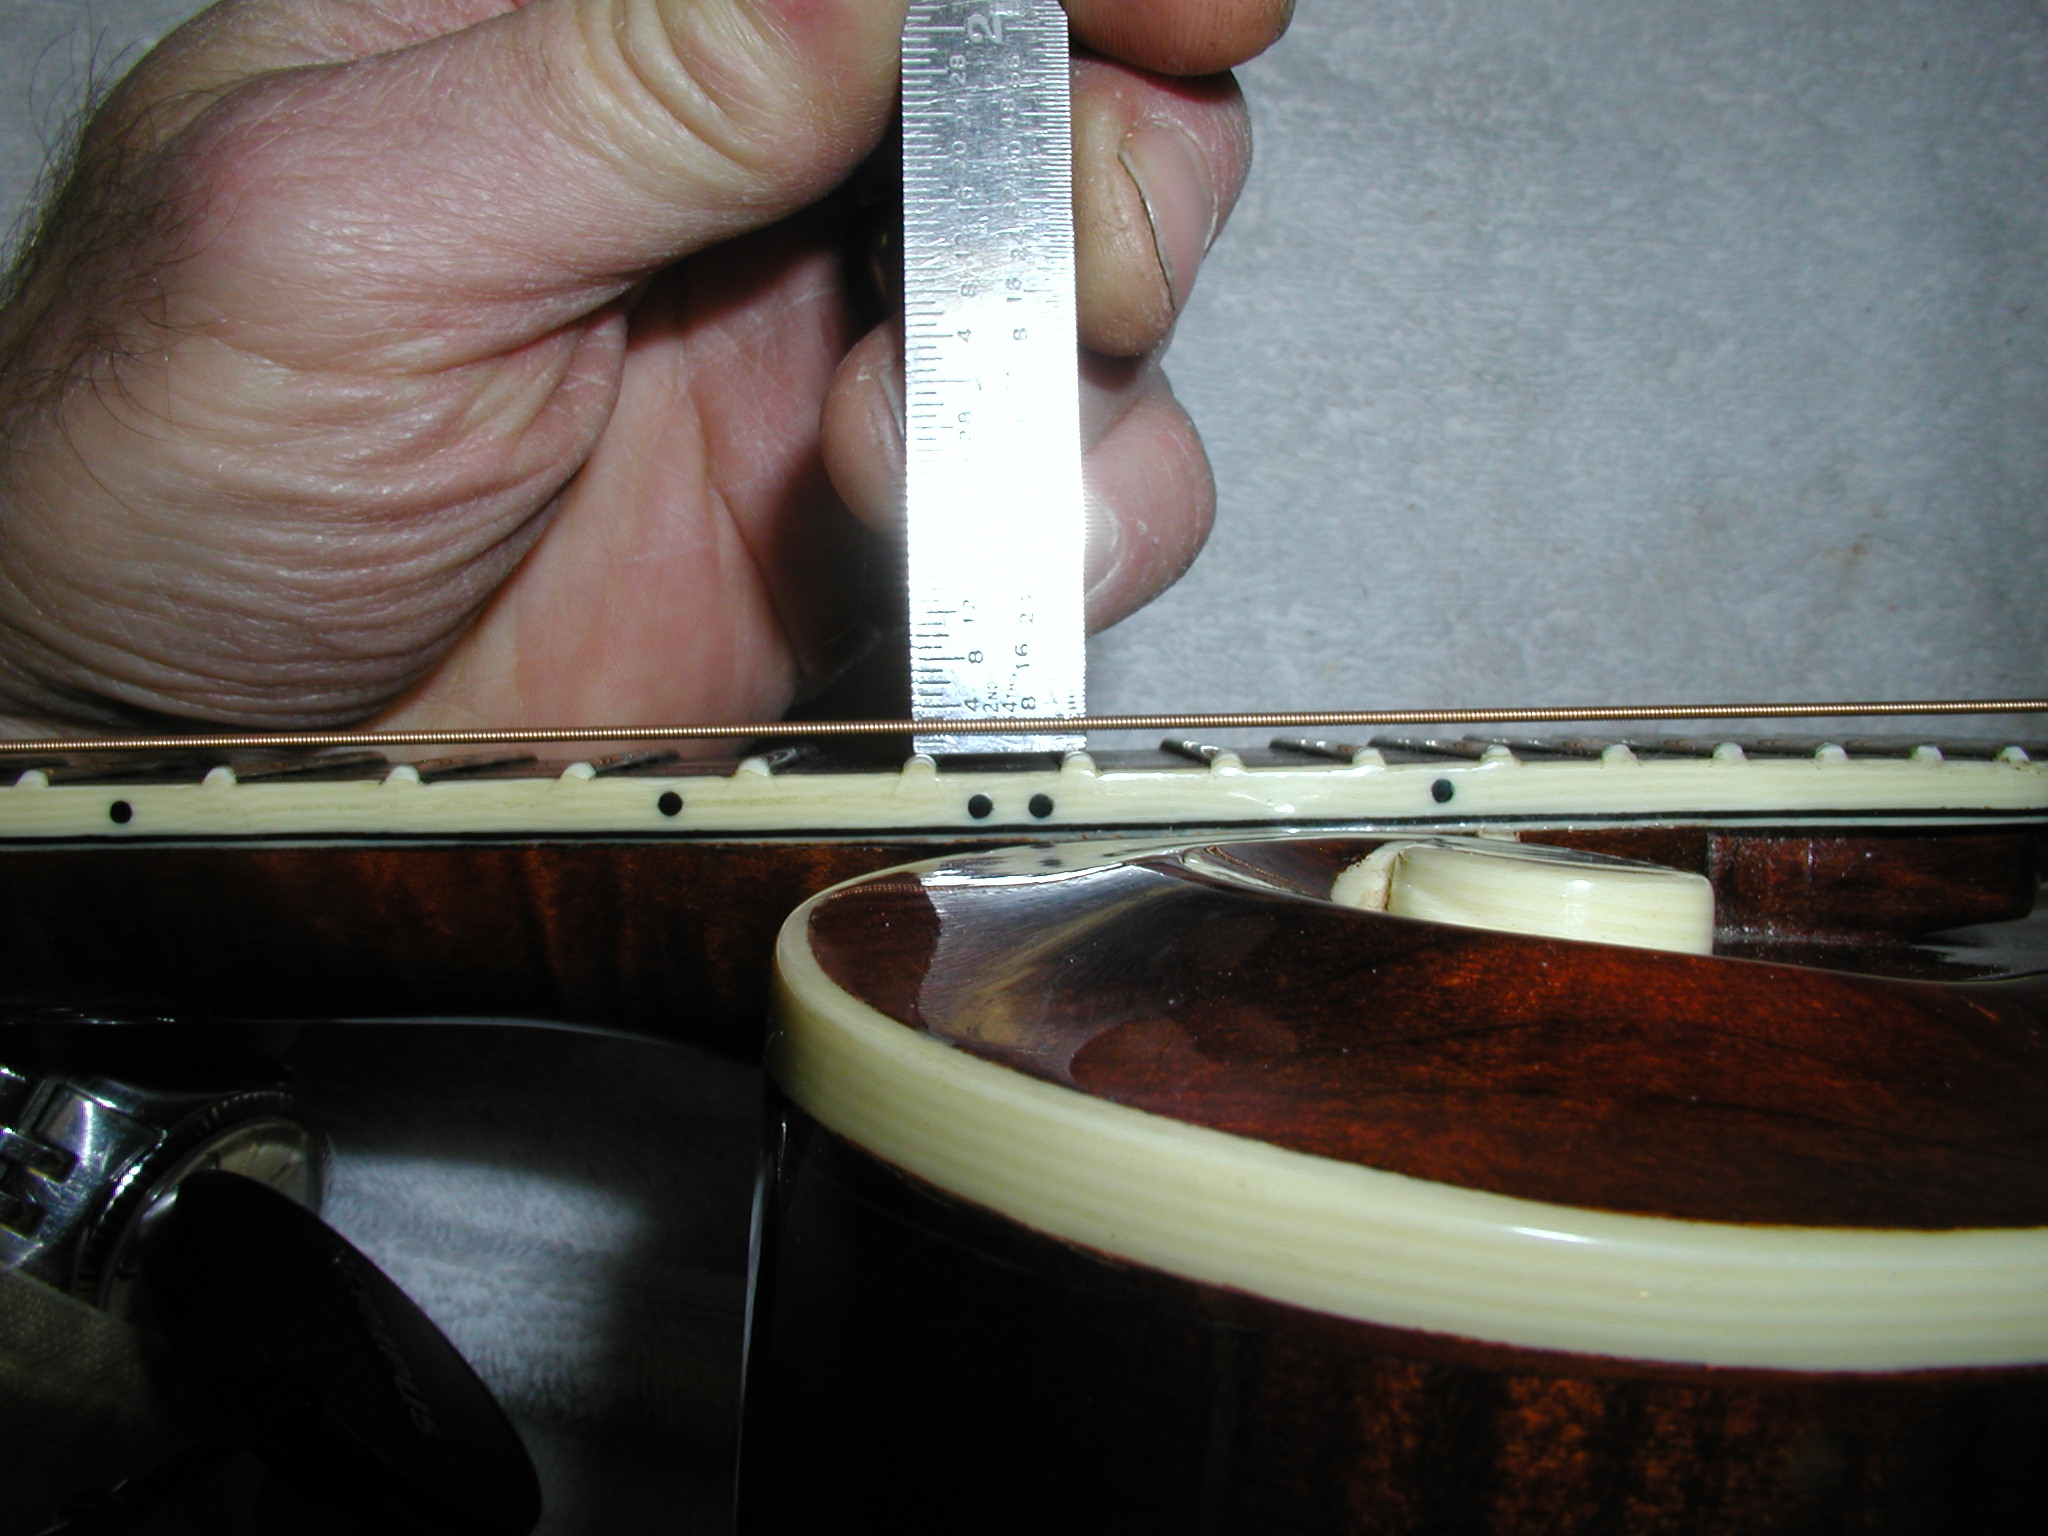
stick of wood with a 1/2-pencil taped to the bottom to strike a line across
the bridge. This marks the height of a line projected from the top of
the frets to the bridge. You need to use a long enough stick that it is
resting on the first frets too in case there is drop-away on the extension
or as in this case the extension is scooped. You really should adjust
the truss rod to get the neck flat too, but that is a bit much for what
we are doing here, the final fit will be done in a later step. |
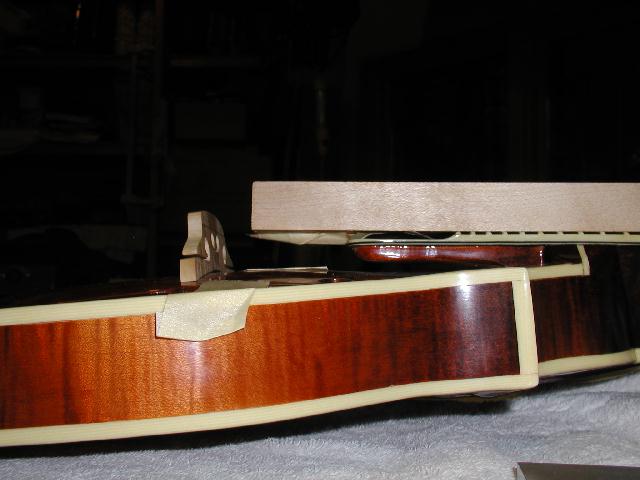 |
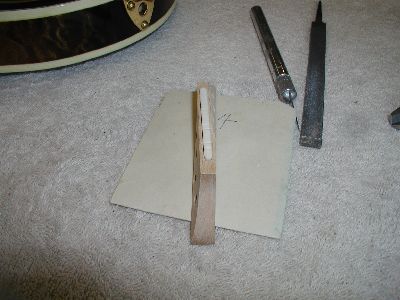
Here is another shot of the marker stick.
Notice that this rig works for both flat and radiused fretboards. Now
that we have the height of the frets we measure up another 3/32" or so
and draw another line following the original. A quick hit on the belt
sander and we have it close enough to start the action and intonation
process. |
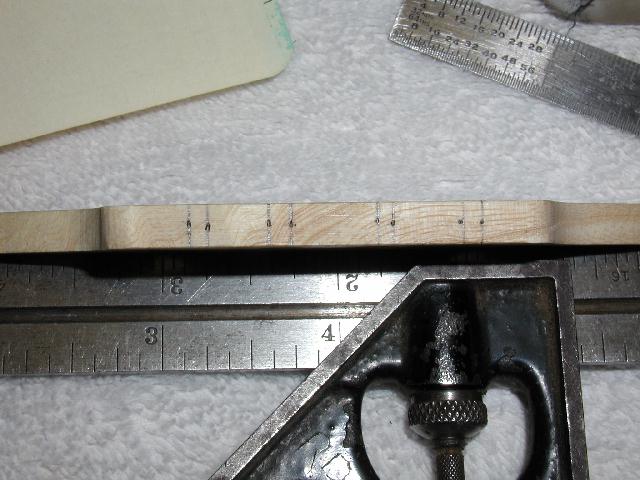 |
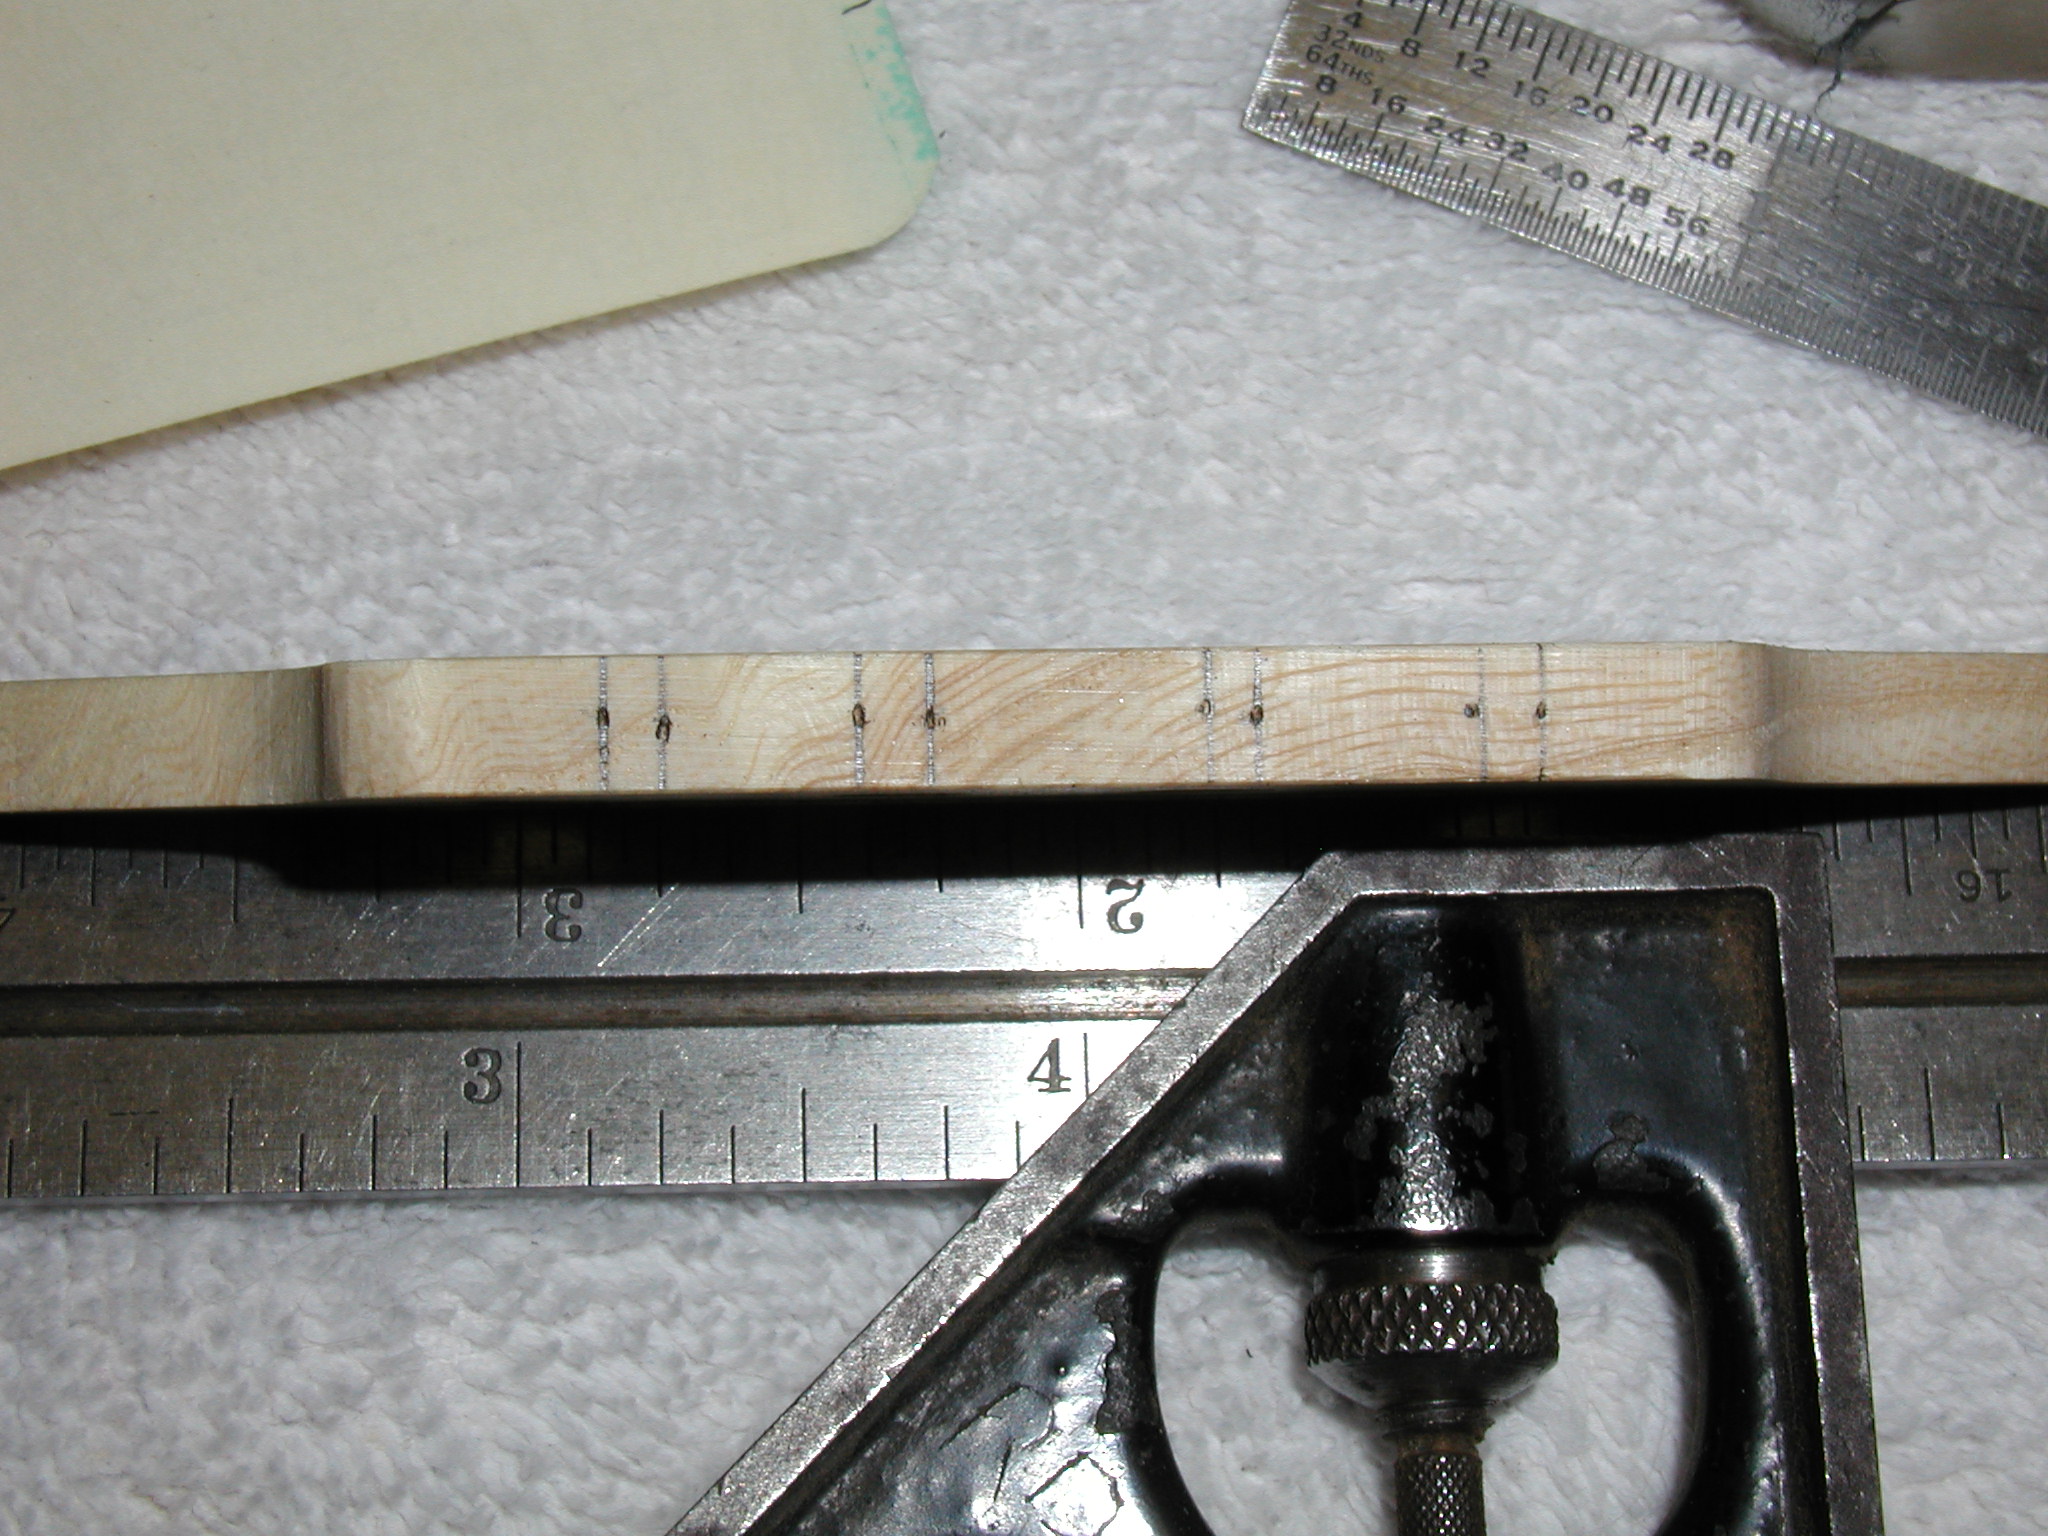
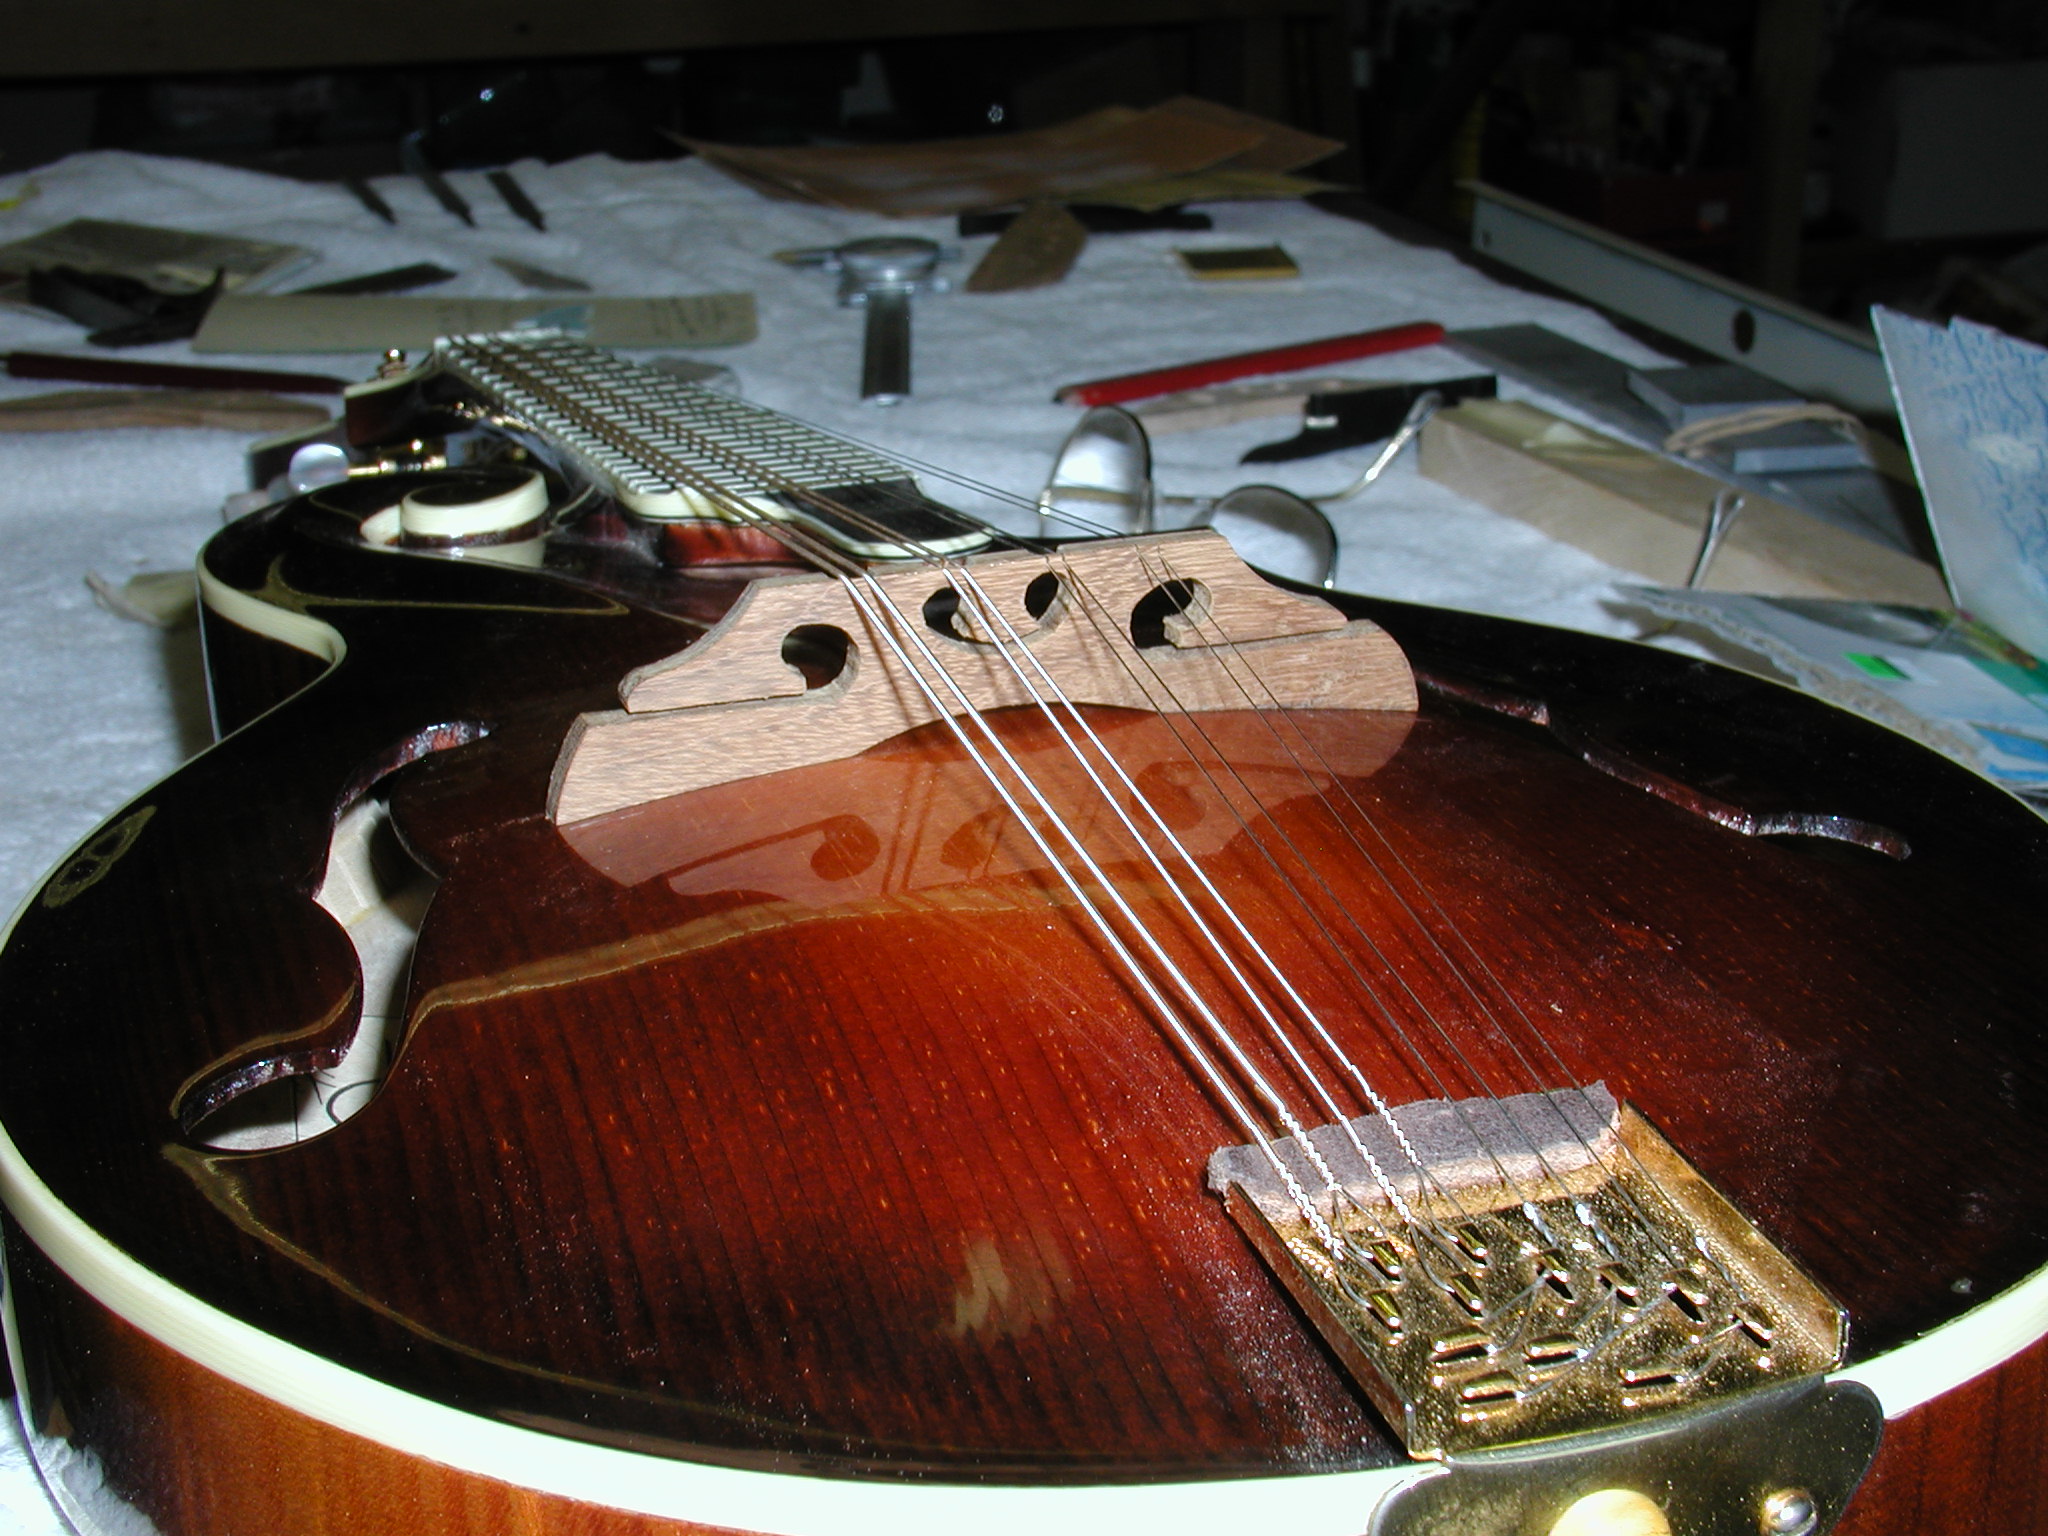
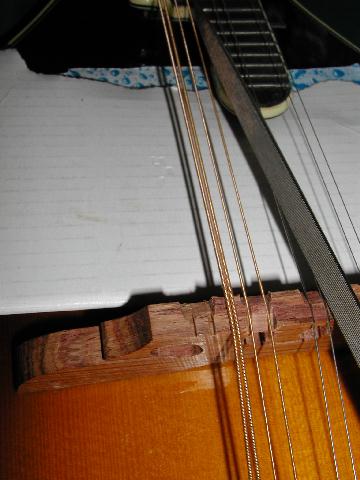
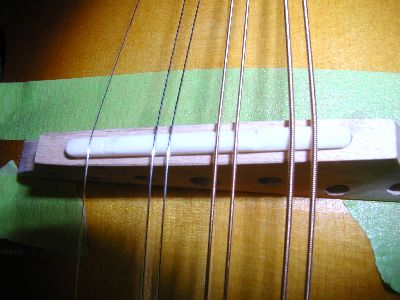
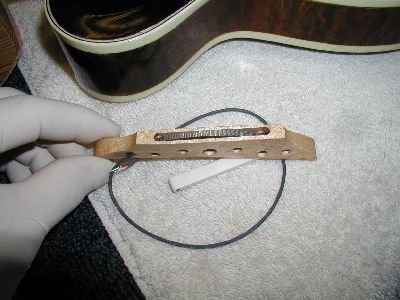
In order to string up we have to make nicks
in the bridge to hold the stings in place. If you have the old bridge
and are pleased with the spacing, just transfer the information to the
new one. If this is a new mandolin or you want to make corrections, just
position the bridge and use a long straight edge trued to each side of
the fretboard to mark the outside limits. Then figure the desired set
back and string pair separations and mark. Use an exacto razor saw or
similar to make the nick just deep enough to hold the strings. String
it up to pitch. |
 |
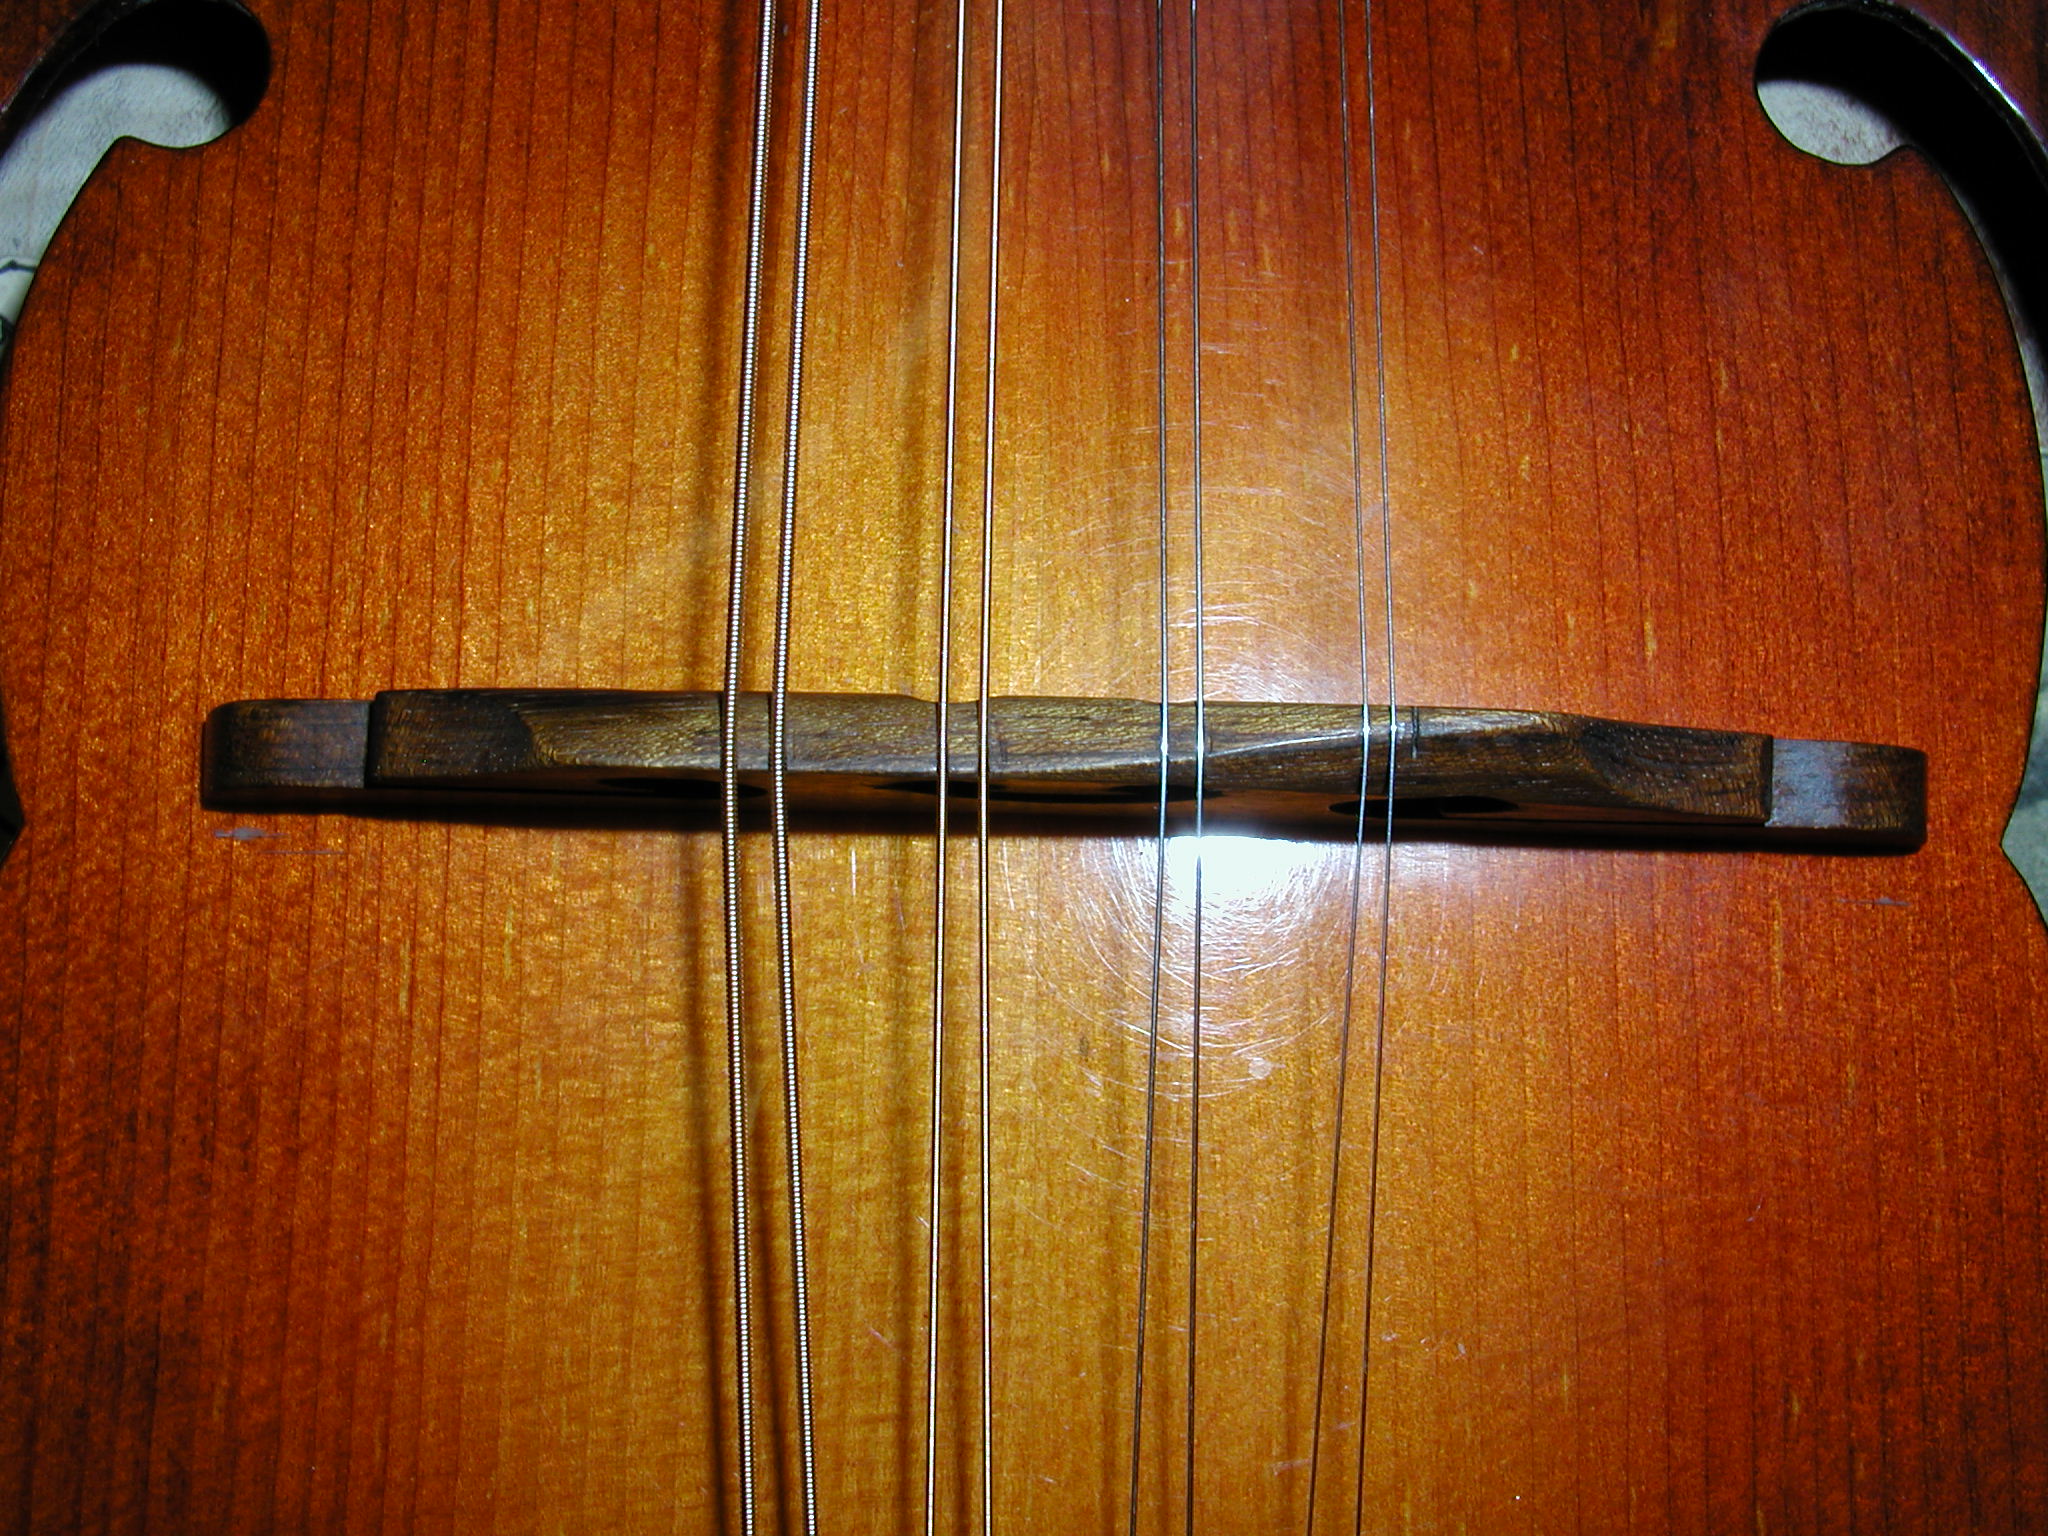
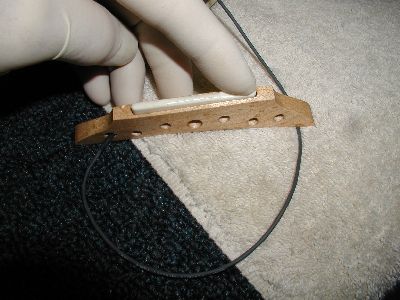
Ugh Oh!!! Lookie dem feet! With string
pressure the cross slit has allowed the feet to wing up on the ends. This
bridge is firewood now. This is why I said earlier in the Plan section
not to use those dimensions. Back to the drawing board. Clearly I need
to leave more meat at the bottom so that the feet are stronger and/or
make the cross slot shorter. I had a stack that I hadn't already drilled
and cut out, so I just moved all the existing layout up 3/32" from the
bottom and repeated the above steps. [See the last section for my current
layout.] |
 |
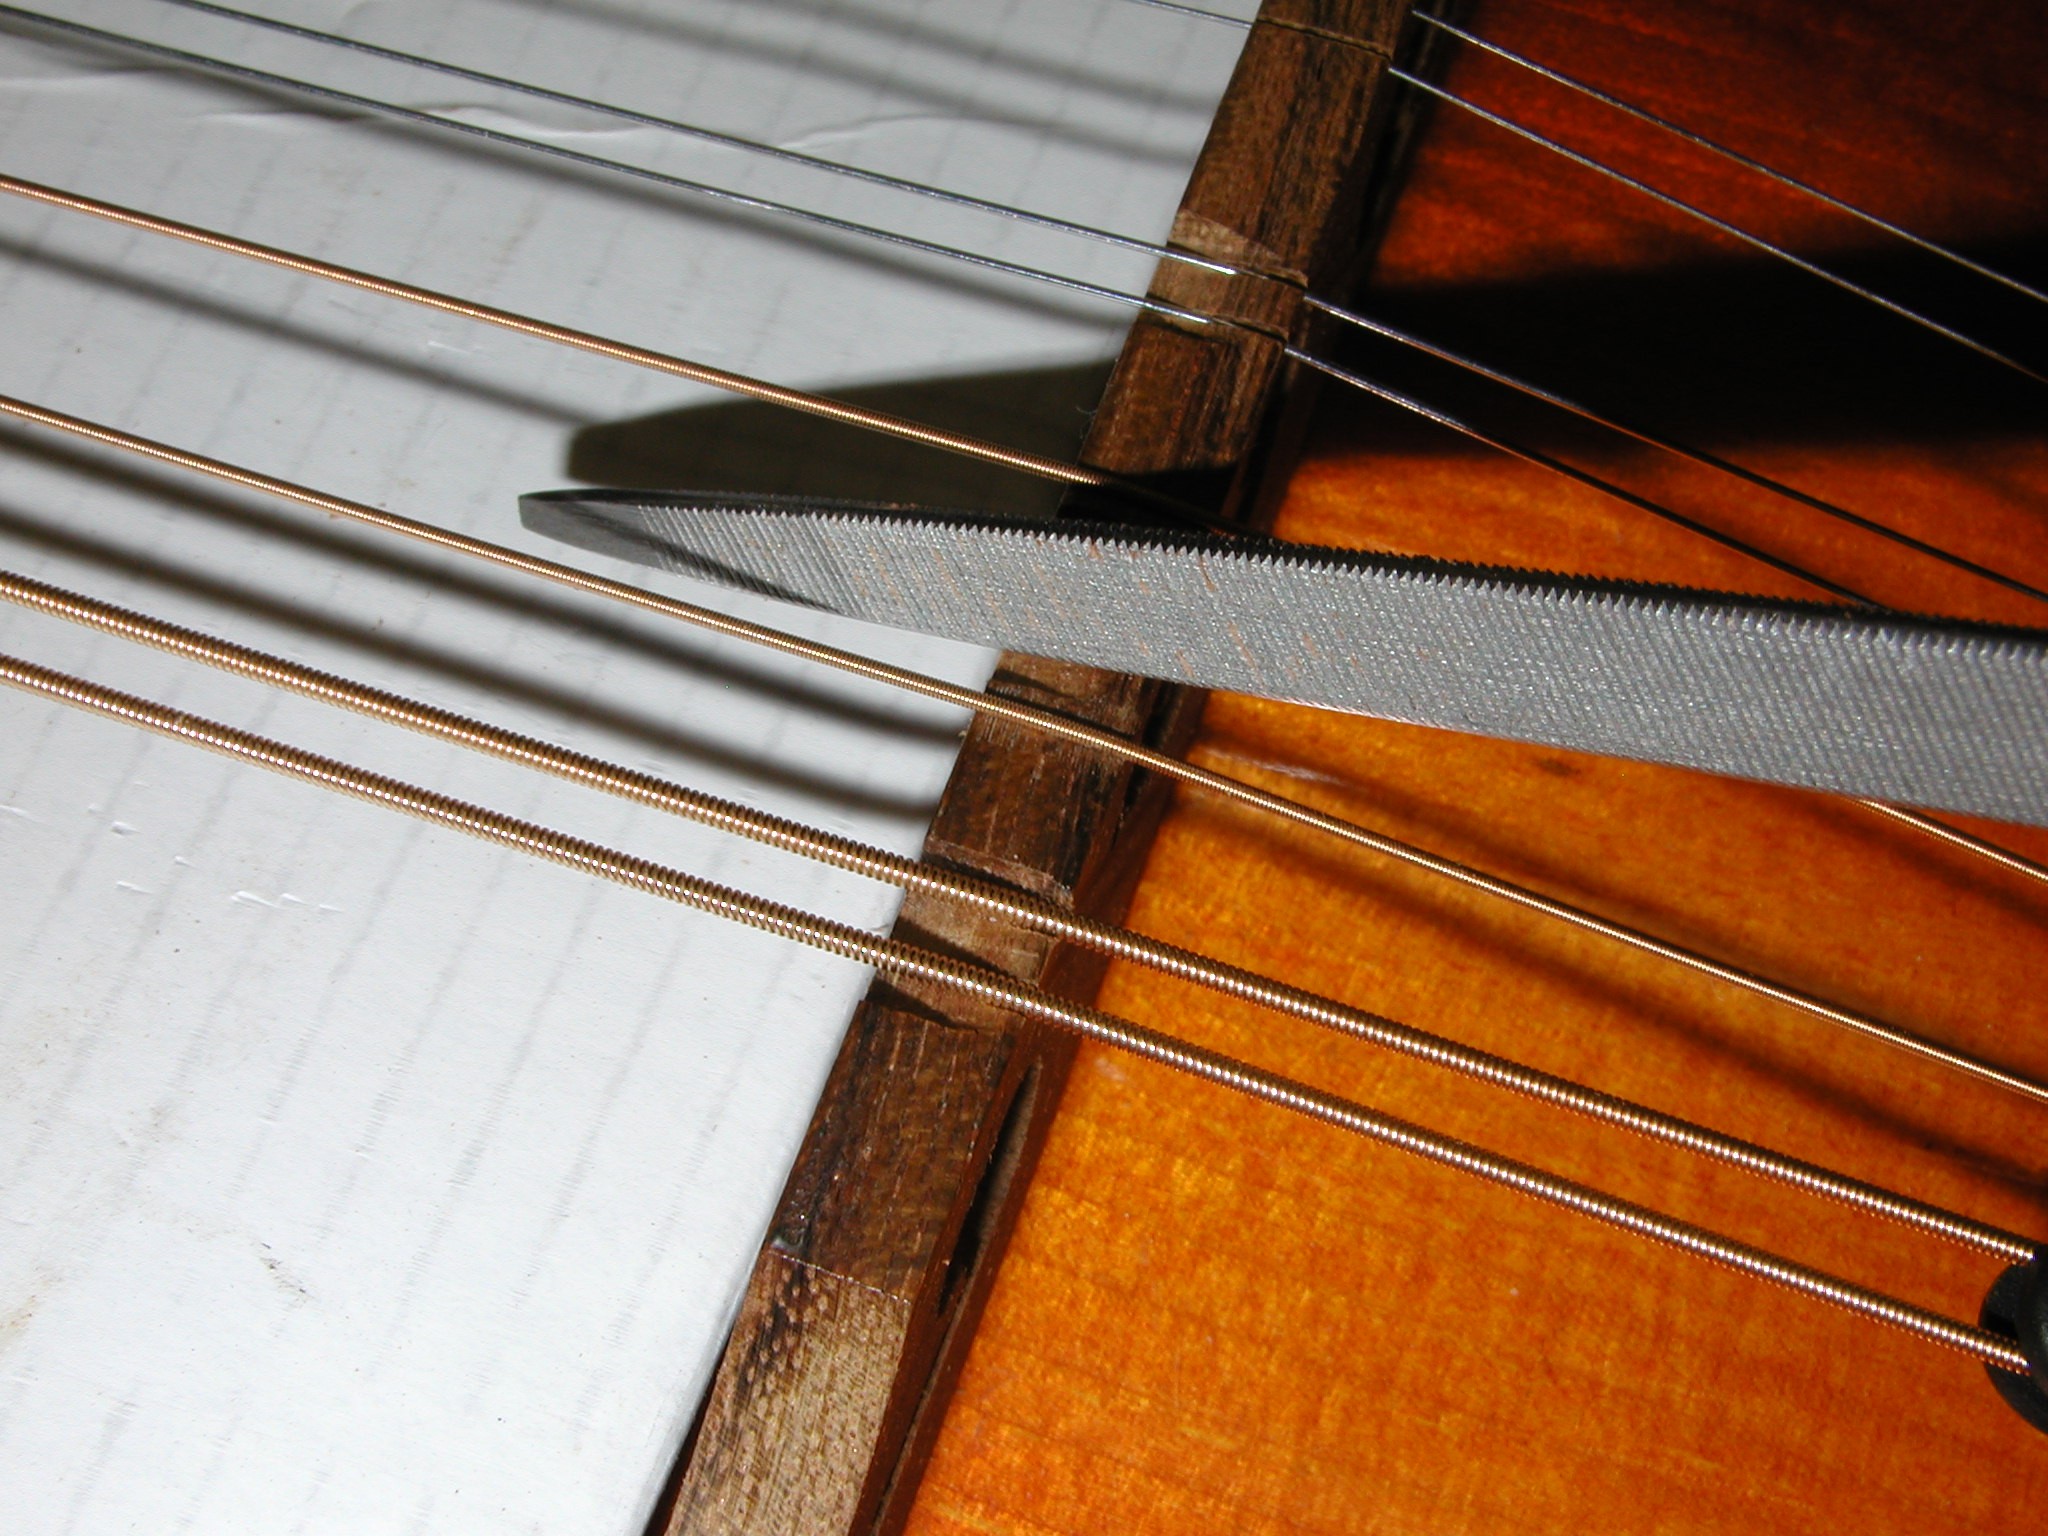
With the box strung to pitch I check the
string height at the 12 or 14th fret. A good average action is about three
or four sixty-fourths of an inch above the 12 fret. Start tall, you can
always lower if you want later. Using a razor saw and nut slotting files
I slowly work each string down to height. I lift the string out, cut a
little, lift it back in place, re-tune and check. This takes a while to
get right. (So why do them lute-in-ators get so much money for a simple
action job?<g>) |
 |
Ok, the action height is right, but the
intonation is still trash. A couple comments on intonation. Your string
gauge, brand, age, orientation to the phases of the moon, etc. will change
the intonation. Decide on a brand and gauge at least and do the intonation
with a new set of strings. The process will kill them, but you want to
start fresh. To set the intonation you need to slowly file away the bridge
material to make the ramps. The break point will set the intonation. You
know from looking at other bridges that the general placement of the breaks
will be Forward, Back, Sort-of-Forward, Way-Back as counted from the high
E pair. Unless you have perfect pitch or perfect interval, use a tuner
that shows cents, preferably one with a sweep needle. Start with
the E string and pluck the open string, then pluck it's harmonic.
These should match. If they are off, slightly re-cut your notch with
a bit more back angle. Now compare the harmonic to the fretted 12th
fret note. It should be sharp. If not, slack the strings a bit, move
the bridge forward and re-tune to pitch until it is a few cents sharp.
You need to start sharp so that you can remove material to move the
break point back and increase the string length. Repeat for each string
till you have all the break points. Remove the bridge and ramp the backsides
at a lesser angle. Leave some meat at the top to support the strings,
especially the wound strings so they don't cut into the bridge wood
too much. |
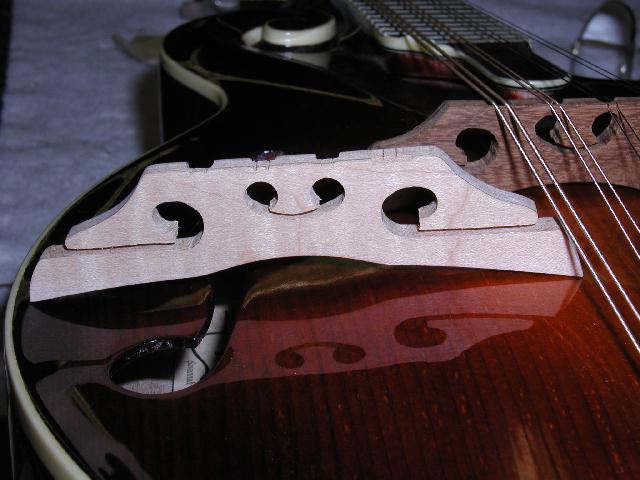 |
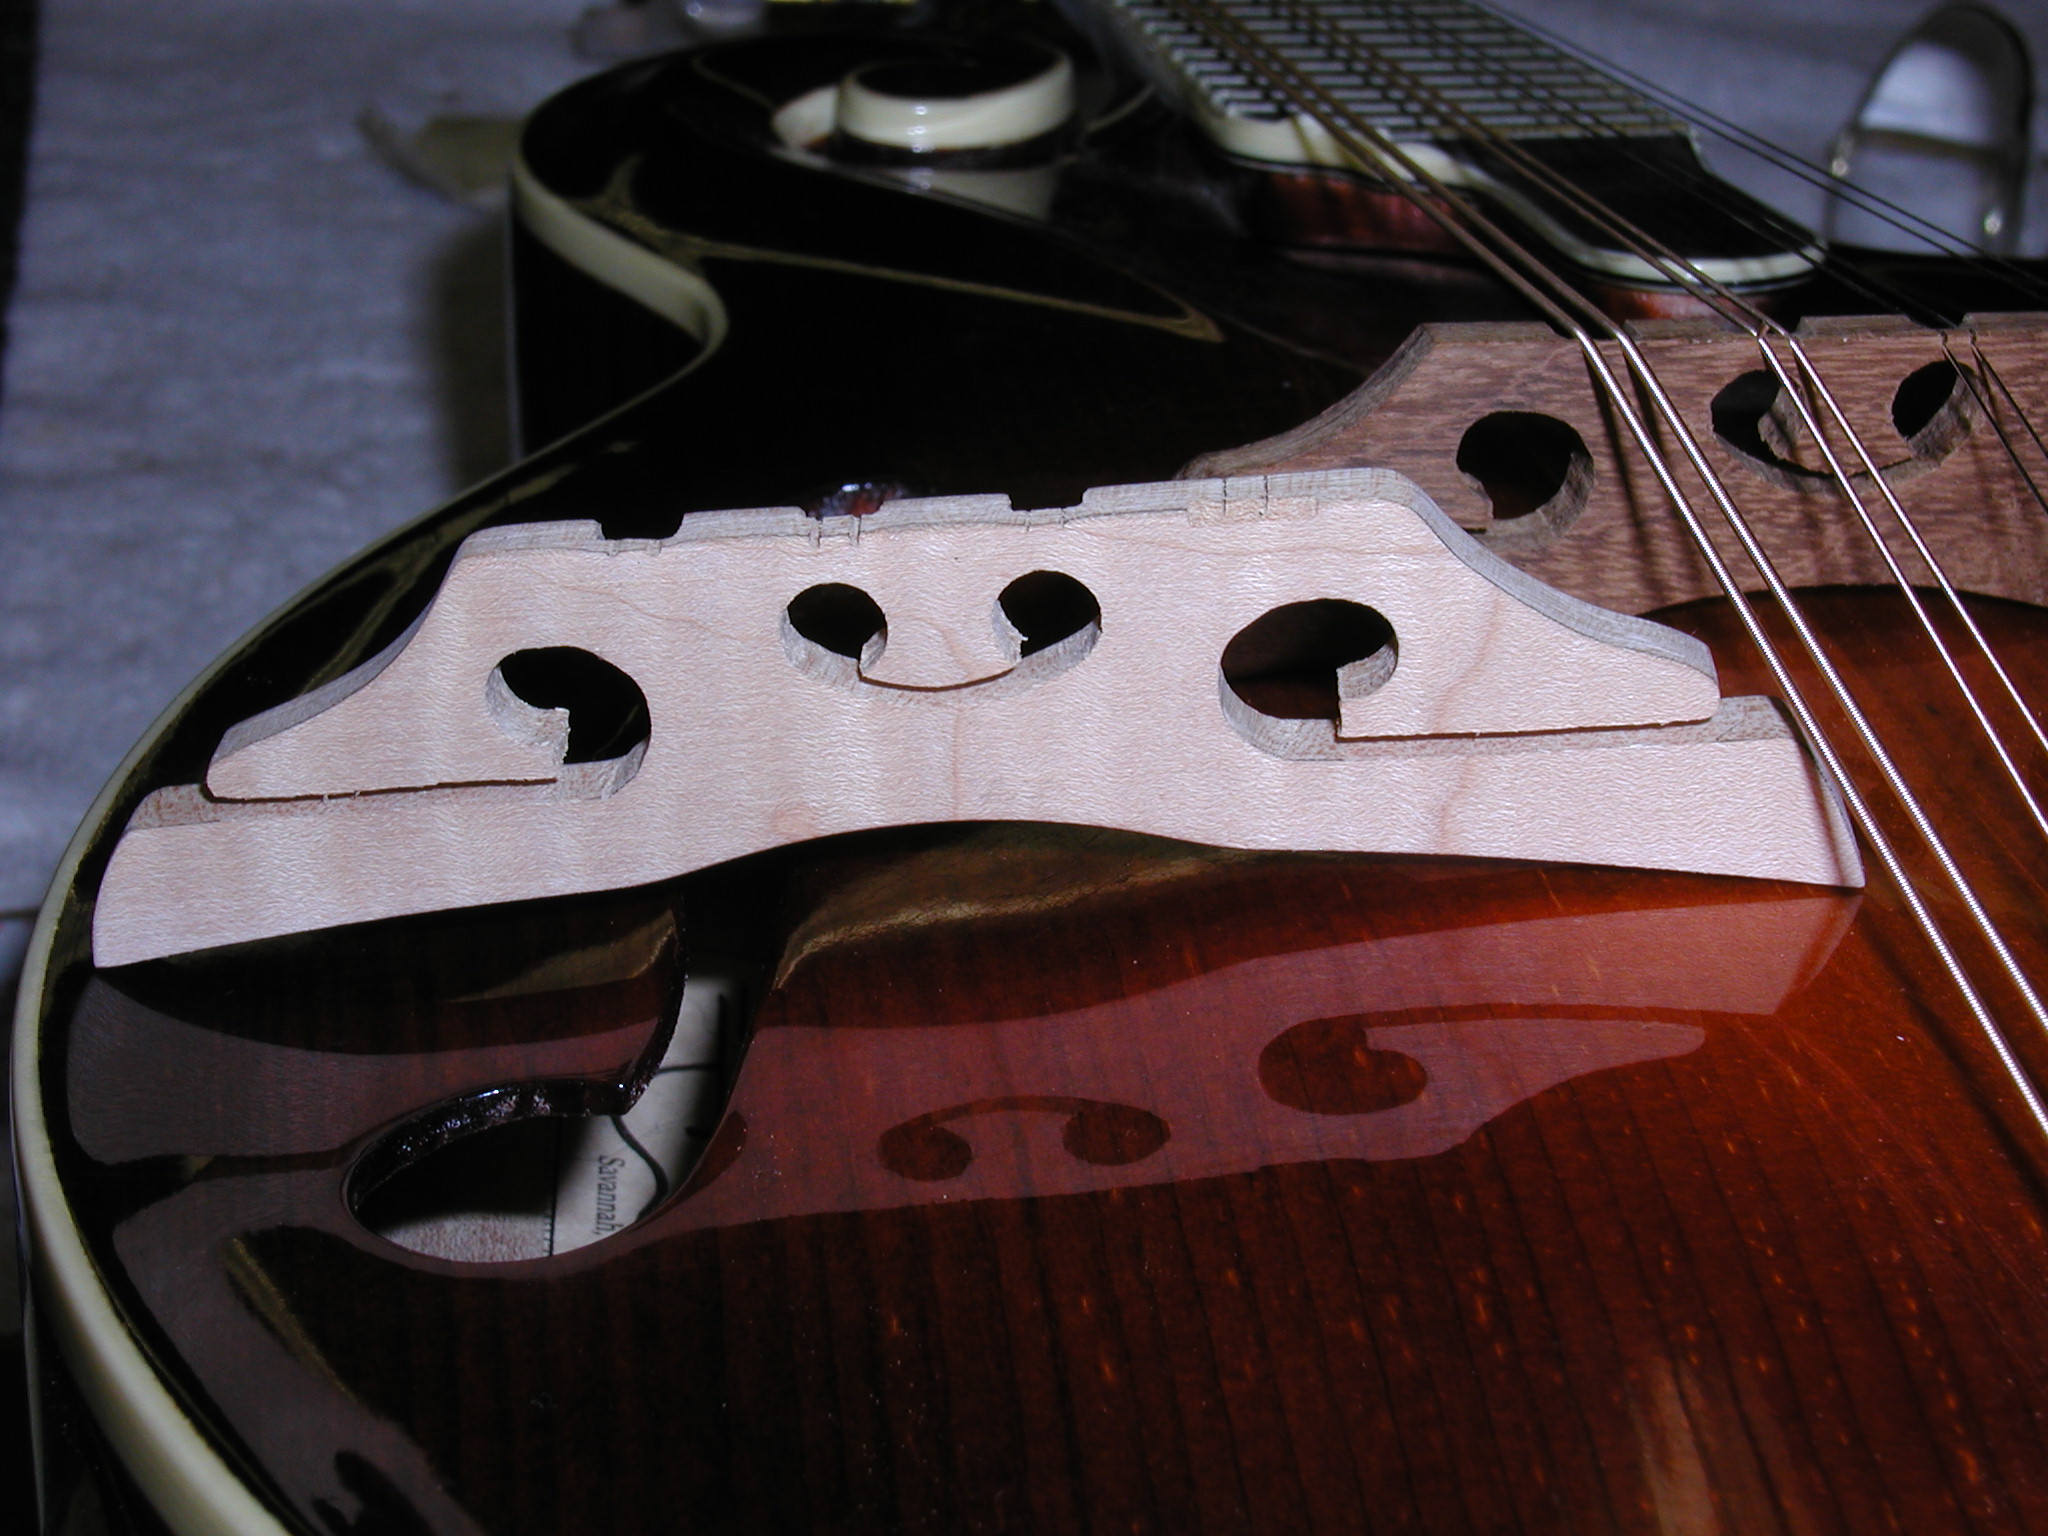
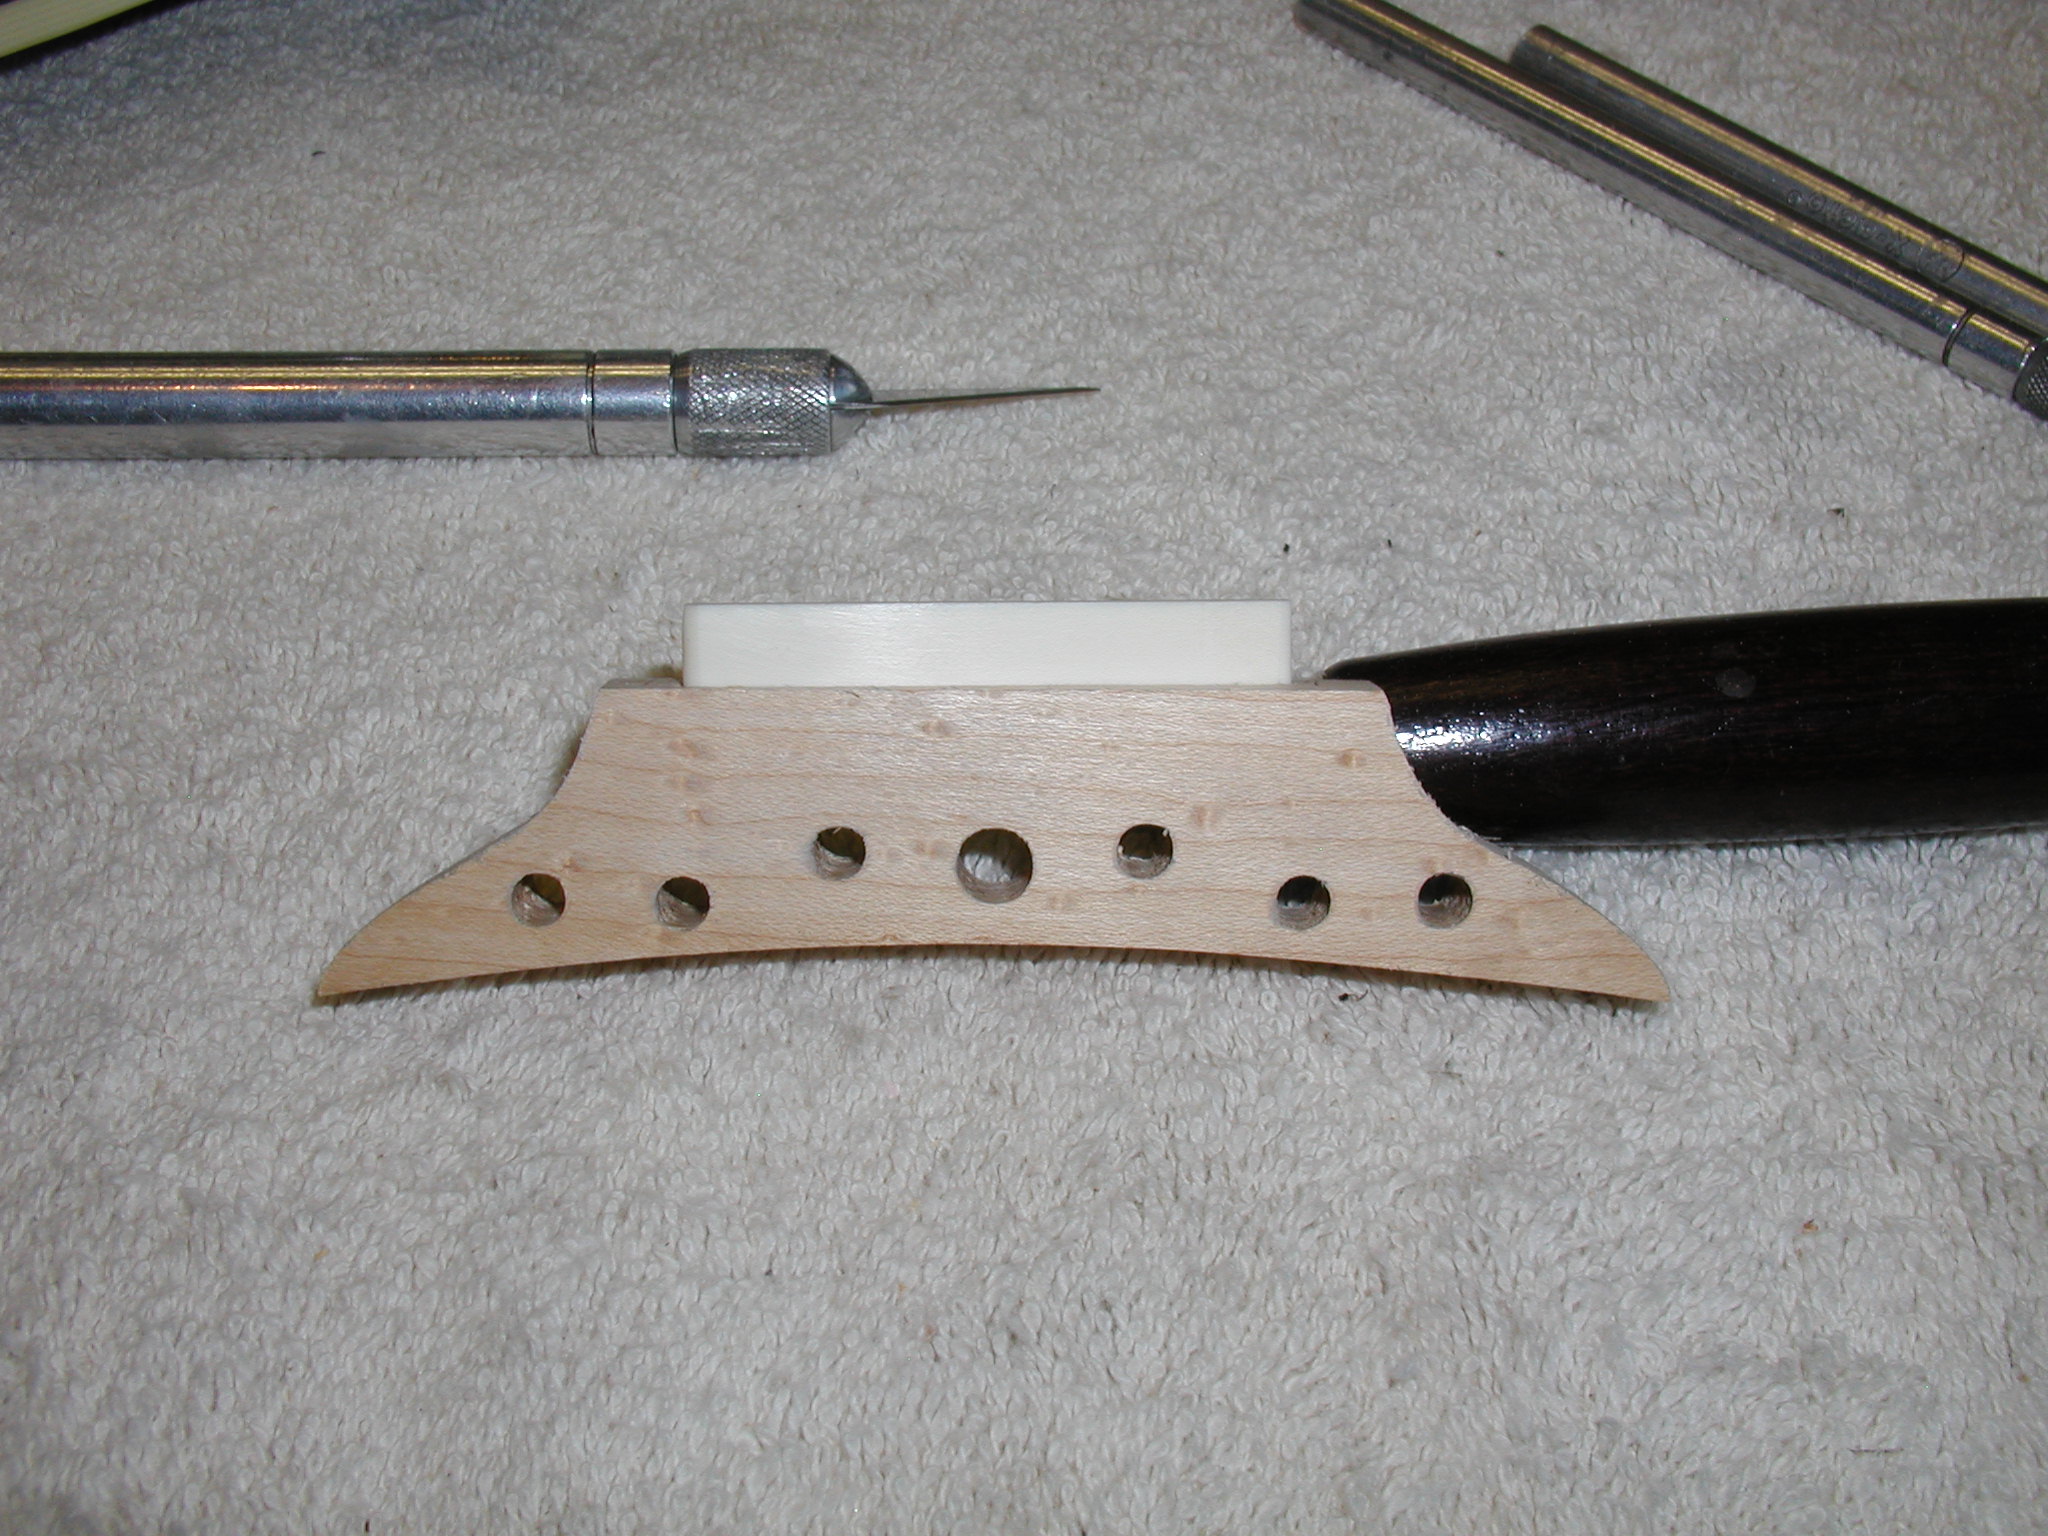
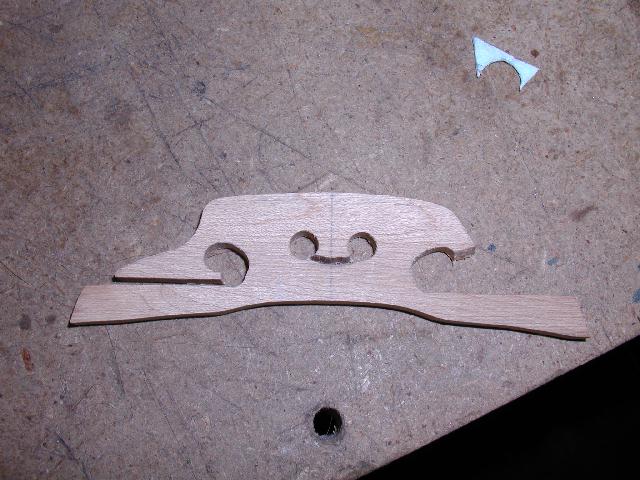
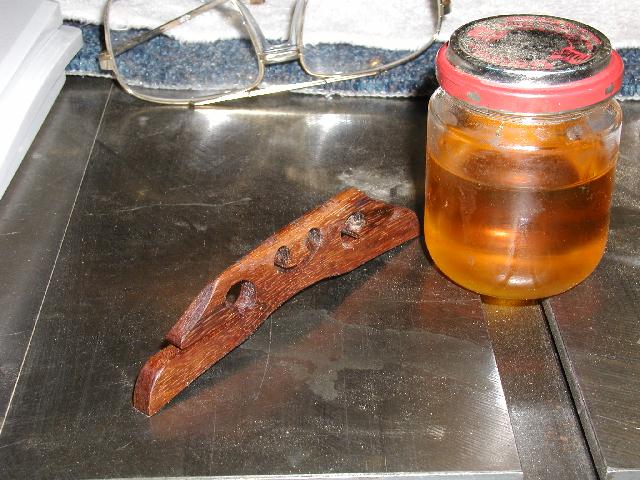
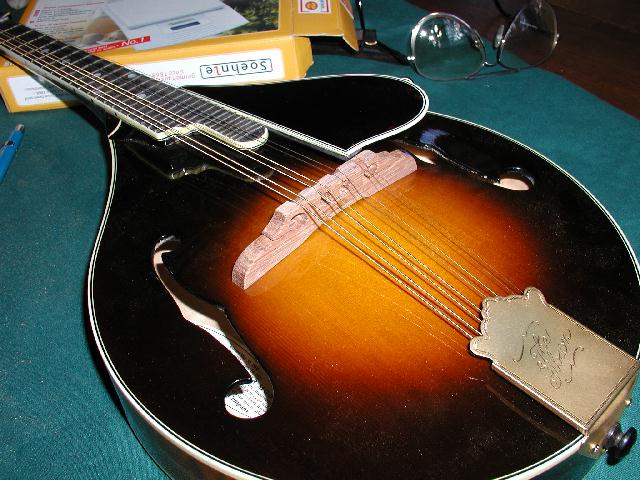
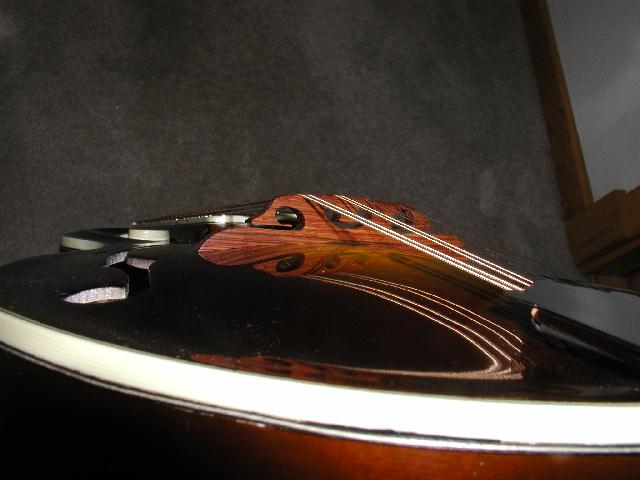
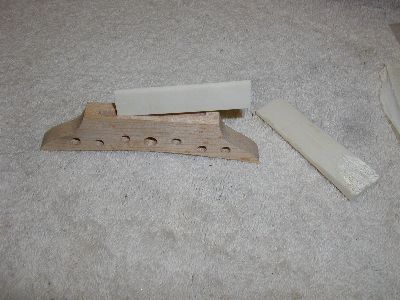
Here is the rough completed maple bridge
sitting free. Notice that the bridge is not yet refined, it still has
rough edges. |
 |
This the same for the shedua. |
 |
Another shot of the shedua. [See the initial
notes below dated 9/30/2002 for Brian's assessment at this stage] |
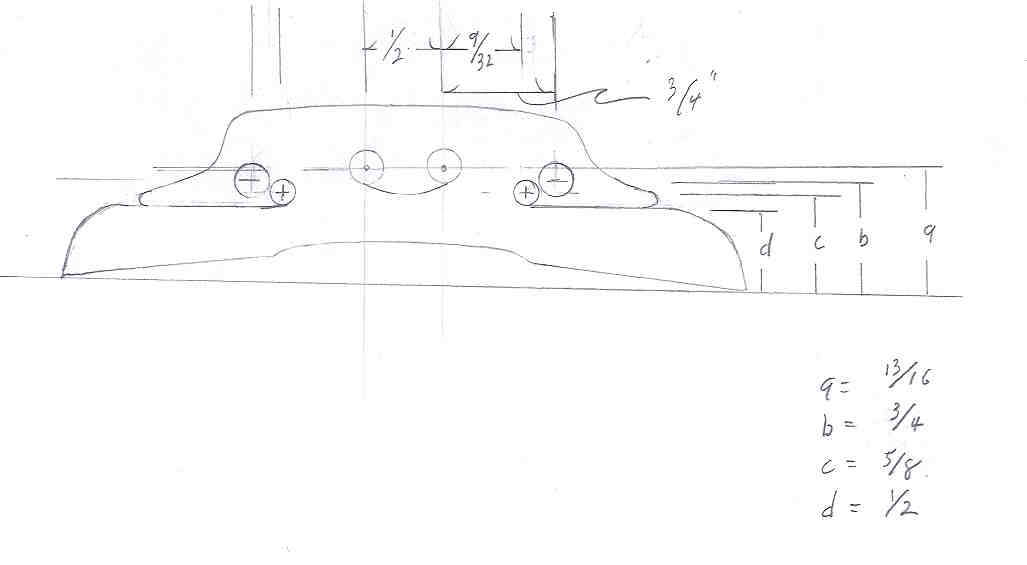 |
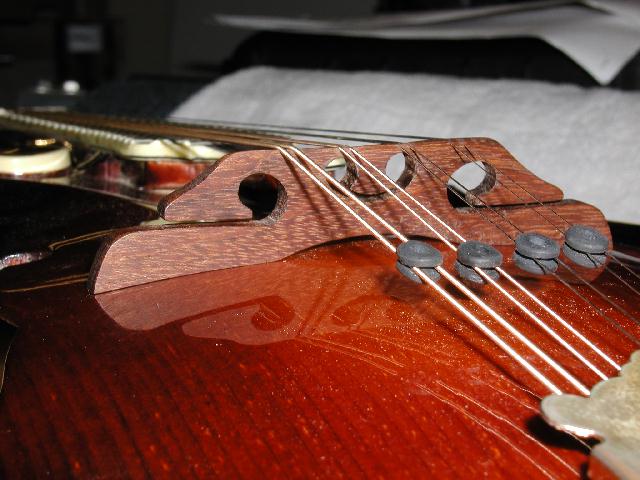
Here is the information on my current version.
This is a project in progress and this information will change over time.
Look at the "Last Modified" date at the top of this page to check for
changes. Notice that I have kept the heart area pretty much the same.
I moved the egg holes up and out a bit but also rotated the smaller
holes for the egg towards the center. This moves all the egg and side
slits up leaving a thicker leg NOTE: This has not yet been tried. Watch
for an update and information later. |
  |
Brian returned the mandolin to me
after several weeks of play. He preferred the Shedua bridge because of
it's more woody sound but was still disappointed with the bass in both.
It just didn't seem to be very punchy on the low G strings. I started
trimming off the end of the bass side wing with a razor saw and this seemed
to bring up the bass a good bit. I kept trimming till I didn't hear a
change. I then tried this on the treble side and noticed a small reduction
in volume of the high E so I didn't remove any more. I then proceeded
to remove mass on the top of the bridge taking off any wood that didn't
need to be there for holding or intonating the strings. I then sanded
out to
600 grit and sealed the wood and finally applied lemon oil as a top protector.
Note that you need to mask off the bottom of the feet when doing any seal
or protection steps. You want raw wood on the bottom so it has a good
grip and fit. |
 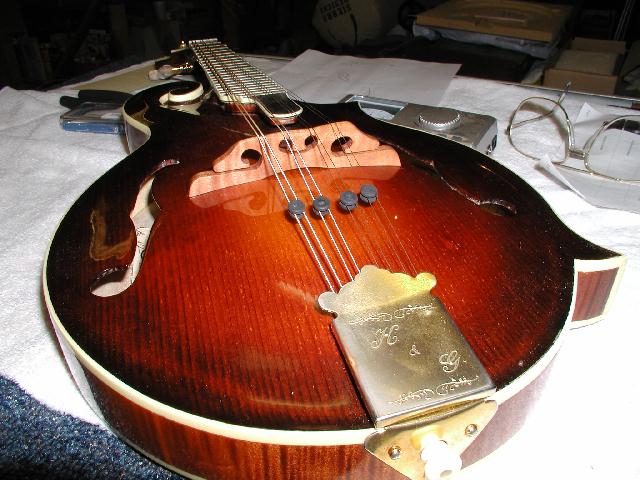 |
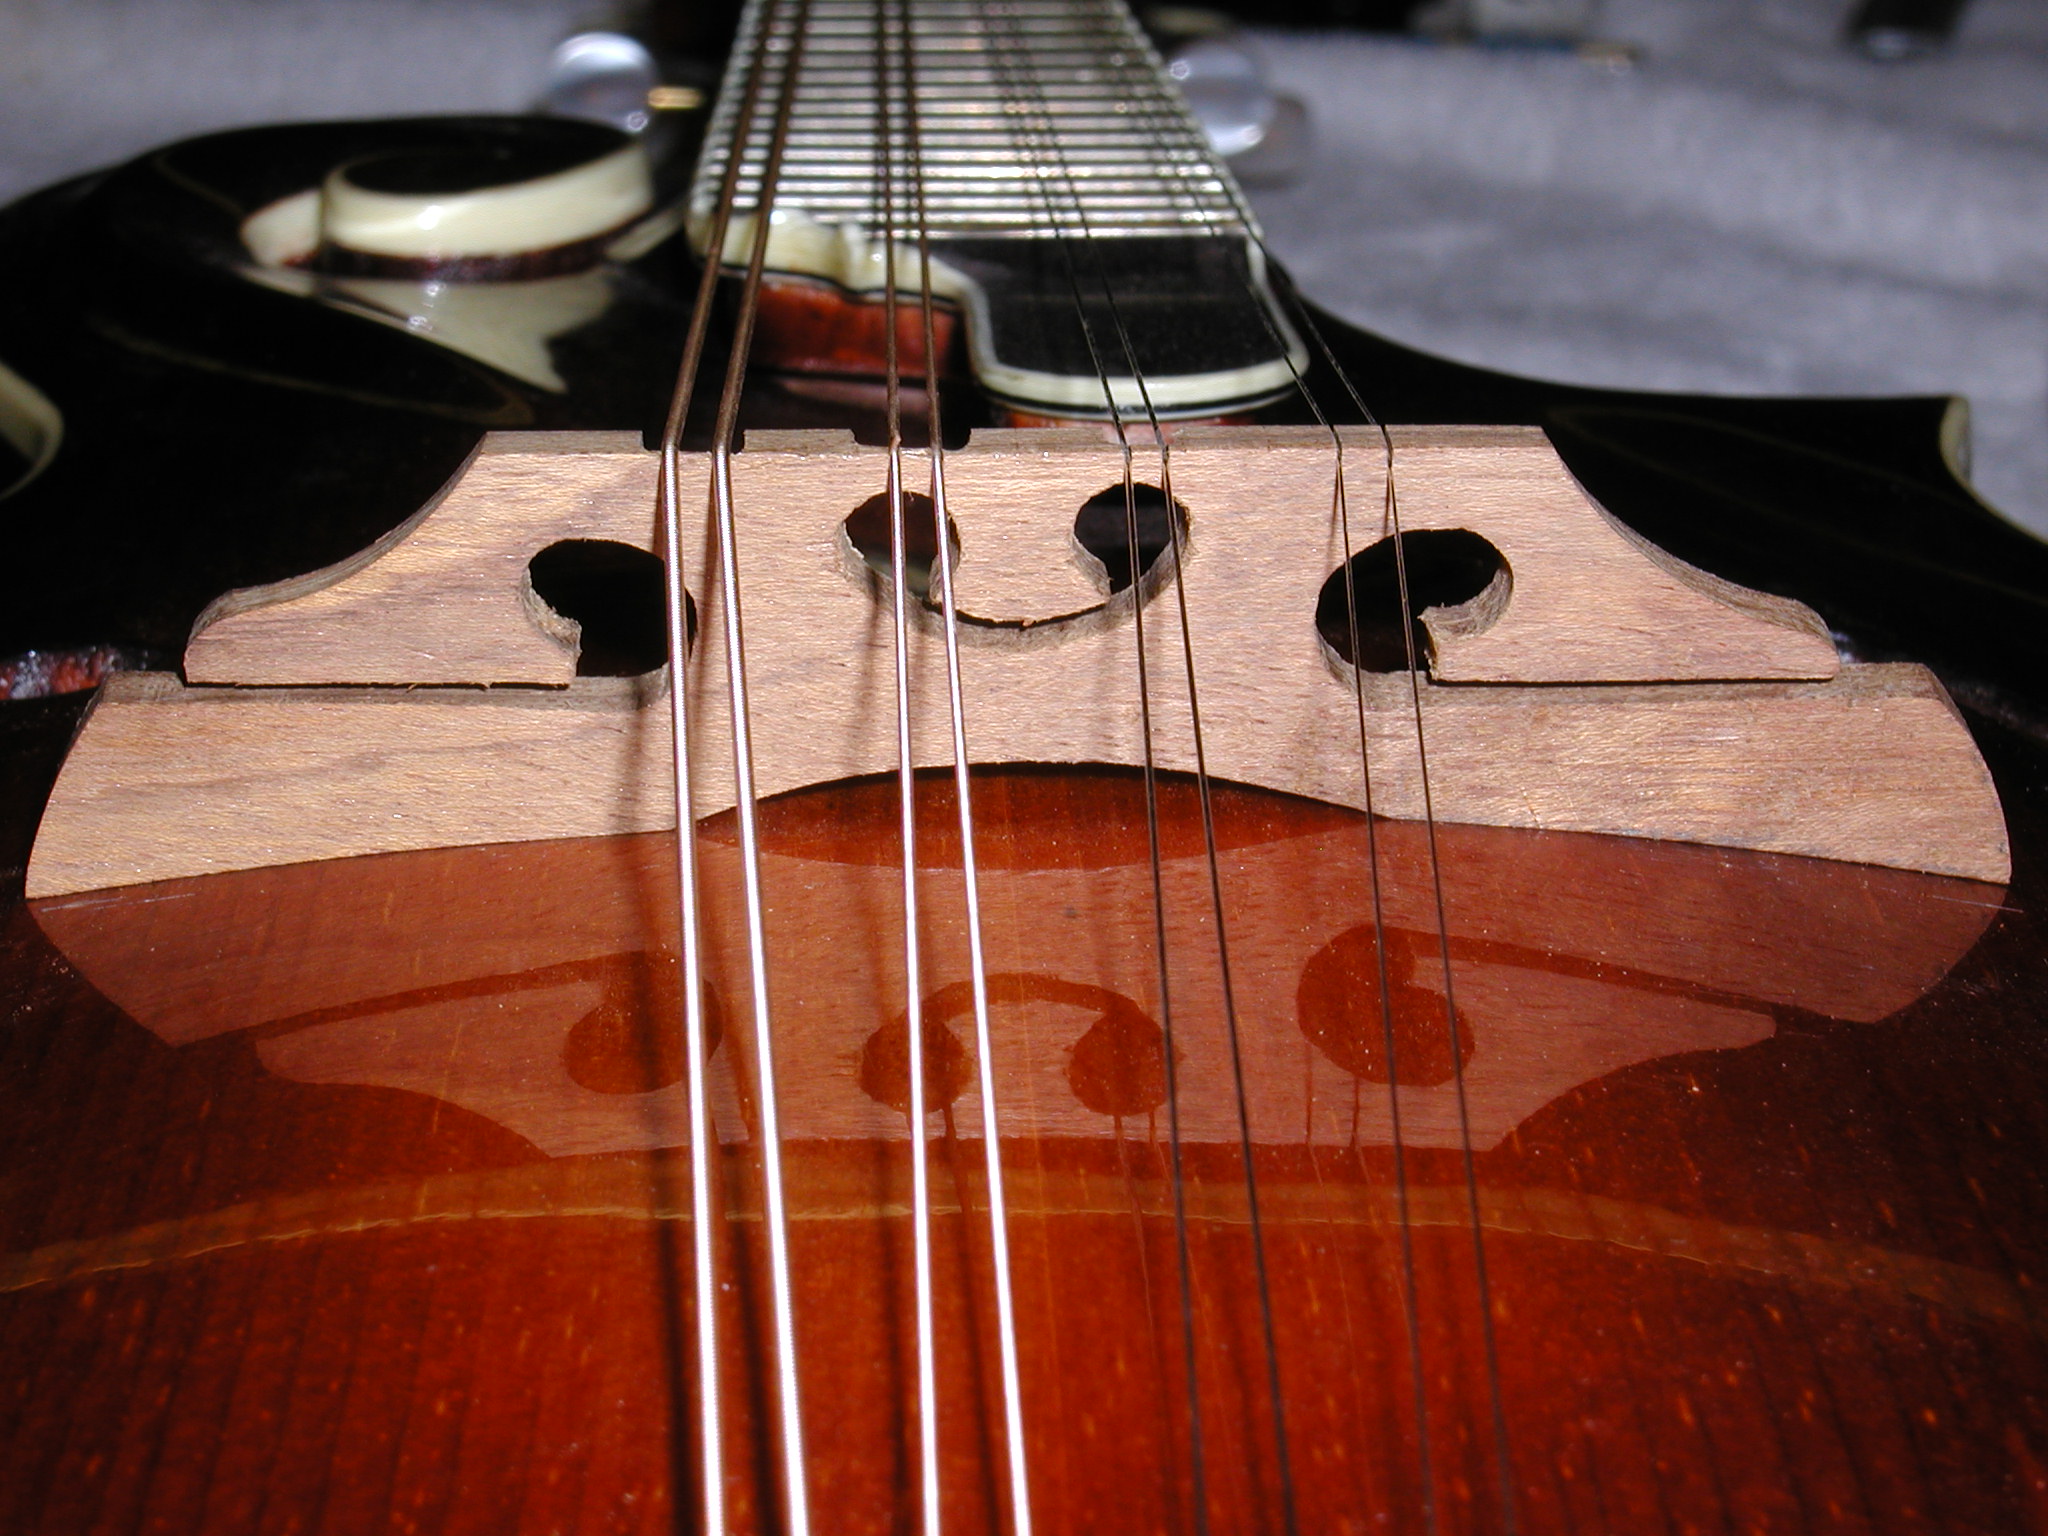
Here are the final bridges, Shedua on the
Left and Maple on the Right. Final weights are 6grams for the Maple and
7 grams for the Shedua. |
Play the heck out of it for a day or so and listen to it as you play. Then
remove the bridge and just clean it with jewelers files and sandpaper but don't
remove much wood. Restring and play again for a while and try to discern any
changes to tone. This will give you a feel for what wood removal will do. Try
modifications by filing the egg holes larger or by making the back side of the
bridge thinner near the top. You may be limited in this by the location of the
bass side strings. Minor dimension changes can make large tonal and volume changes.
I don't have a recipe yet for what area to remove to get what changes, any information
will be appreciated. It may be desirable to cosmetically stain the bridges or
seal them with a carnauba paste wax or other sealer (not on the feet bottoms
though) to help keep it looking clean and new.
NOTES:
9/30/2002
After I did this project up to the rough final stage I gave both bridges
to Brian to test. These were still in the unrefined state so that I could
make changes later if desired. He reported back with the following information.
In his comments the Bridge#1 is the Shedua, Bridge #2 is the Hard Maple.
"In general, I think the clarity and sustain were improved by both
bridges. They both are a bit louder than the adjustable bridge,
as
well. But the changes are not as dramatic as I had expected from
reading Red's descriptions. Neither bridge seemed to fill in
the
missing bottom-end on my mandolin. My mando body doesn't resonate
much
at low frequencies (based on singing into the f-holes), so I fear that
maybe my mando just doesn't have the bottom end for a bridge to bring
out.
...
Here are some more specific comments (Bridge #1 is the first bridge
you
had setup on monday, Bridge #2 is the maple one):
- Both bridges provide much more ring behind the bridge. I have
some
rubber grommets around somewhere, which I need to put on to control
that
a bit.
- Bridge #1 provided greater tone variance as I moved between the "sweet
spot" over the fingerboard extension (Matt Flinner tone) and the bridge
(Mike Marshall tone). This made the instrument a lot more fun
to play
and listen to.
- On Bridge #1 the "sweet spot" seemed to be closer to the nut than
with
the other bridges - almost above the extension.
- On bridge #1, I needed to adjust my double-stop tremolo technique
so
that the pick noise does not overwhelm the tone of the double-stop.
- On bridge #1, the G and D strings had better sustain than the E/A
strings. The E/A strings seemed more dampened.
- The new strings seemed to keep their new ring for twice as long as
usual with Bridge #1. I think this is because the sparkle I usually
associate with fresh strings seems to be brought out by Bridge #1.
- Bridge #2 had more volume than #1. This was noticeable immediately.
- Bridge #2 has a pronounced high frequency peak that gives it a lot
of
punch. This is similar to the adjustable ebony bridge, but more
pronounced.
- Bridge #2 did not have as much tonal variance between the bridge
and
the sweet spot.
- Bridge #2 had more even sustain across all the strings."
10/31/2002
I delivered the two completed bridges to Brian for testing. He has these
final comments on the shedua bridge:
"Perceived changes to the Shedua bridge:
- There is indeed a more well-defined bottom-end - not boomy or muddy,
but a more full-sounding attack on each note with more body. This was a
noticeable improvement from the previous version. This is not the big
resonating bottom-end boom that some mandolins have; it is more of a
clearly defined bottom-end punch that is balanced by the highs on each
individual note.
- Great balance of sparkle and punch when played close to the bridge. I
find myself playing down here a lot more often now, especially for
classical stuff and for bluesy down-stroke Monroe-style playing.
- I think there is less variance in the tone as you move the picking
position between the fretboard position and the bridge position. Part
of this is that the sweet spot moved towards the bridge. What is
interesting is that while it seems like there is now less tonal
variance, I think the range of desirable tone has been extended to cover
the entire playing area from bridge to fretboard. In the initial Shedua
bridge, I played mostly close to the fretboard extension to try to
balance the highs and lows on each note. Now I can play anywhere from
the bridge to the fretboard and get a desirable tone, although obviously
different depending on the position.
- Better balance and more even sustain across all the strings."
Further
Projects and Refinements:
10/20/2002 - The RMMGA Tx3 gathering - Bridge #3
I attended the third rec.music.makers.guitar.acoustic Texas gathering for a
weekend of fun, frolic, and general guitar and music debauchery. A good time
was had by all and as part of one lazy Sunday afternoon Greg Thomas, an RMMGA
and CoMando member, and I set to work on his Gibson AL5. This box already had
very good sound, particularly the bass side so we were just shooting to see
what would happen.
Greg Thomas Project
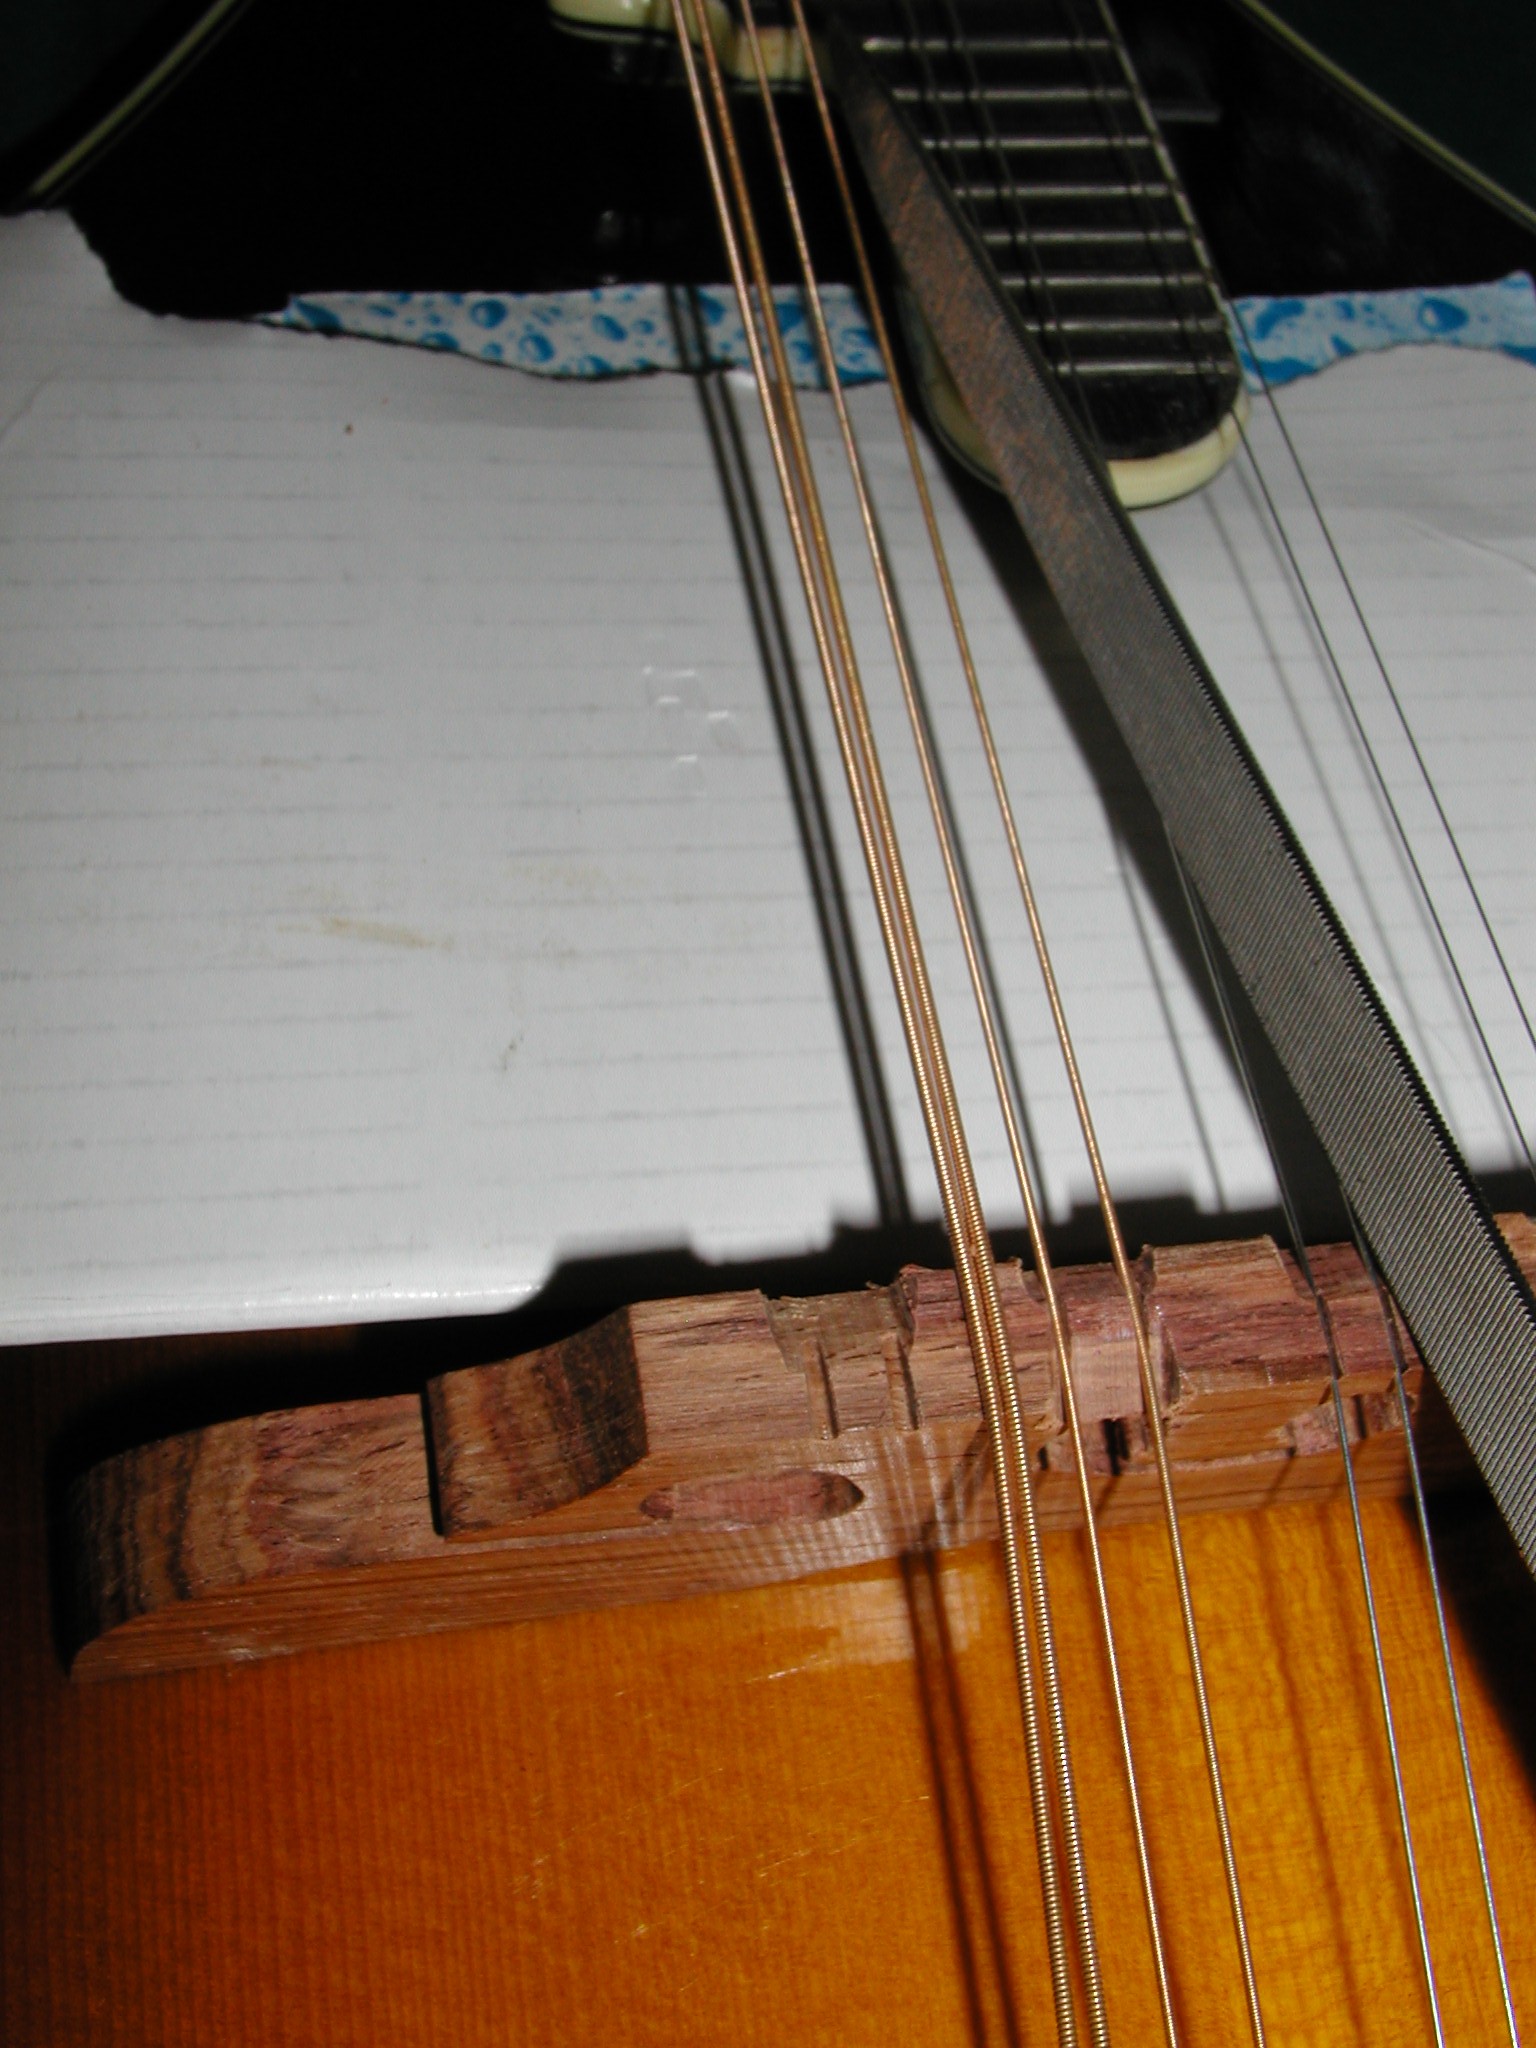
 |
I brought a selection of bridge
blanks and we settled on trying the Honduran Rosewood one. This is the
same stuff that marimba bars are often made of. The blanks that I had
were slab sawn but had very good tap tone. This is the same stuff I use
for my guitar bridge plates. I used my refined template shown in the initial
process above that left more meat on the legs and that in addition to
the very hard nature of the HR made the legs quite firm. Greg's AL5 had
less height at the bridge, something that I didn't notice till I had already
fit the feet, so when I topped off the bridge it was getting pretty close
to the holes drilled. I was able to intonate it w/o cutting into the holes
though (photo at left) so we didn't scrap it. This bridge was also wider
at the feet, about 3/8" but I had tapered it on the fretboard side so
that it ended up about 1/4" at the top. The side towards the tailpiece
was flat and the feet were fit so that the flat side was at 90 degrees
to the top so that the strings break over it evenly. |
 |
Here it is in the rough done stage. Greg
took it at this point to do the initial play-in and evaluation. One thing
we all noticed was that some of the really rich bass was missing. I did
this bridge before I learned about trimming the bass side wing to pull
out the bass. We will see if that holds true for this one when Greg brings
it back for final. |
|
|
|
|
NOTES:
11/23/2002 -The mandolin and bridge were returned to me by Greg and I did the
final trimming and fit and finish as shown above in the final images. The mandolin
was returned to Greg on 12/08/2002 and was generally met with pleasure. Greg has
taken it away to test and will provide final comments at a later date.
11/2003 - No further data has been received from Greg on this project so I'm
closing it out w/o.
KA Project
11/2003 - Bridge #4
This bridge was actually made at about the same time I made the one for Greg
Thomas and uses similar dimensions but I didn't get around to using it till
late in 2003. Karl Atkinson is a very old friend of mine and last year he had
his Really Old Guy 50th birthday. At this time I promised him a mandolin. It
has taken me until his 51st birthday to get around to finishing it in my schedule.
This bridge was designed to go onto a Dunwell Guitar mandolin that is is
a hybrid between
my Silvertip
and
Redbone
in that
it
has an Engelmann
top but Silver Maple back and sides. In the white, this mandolin sounded
a bit bright so I used the shedua for the bridge with the idea that it should
bring out the woody
bass
side of
the
engelmann.
I
also fitted a standard Randy Wood ebony adjustable to this mandolin.
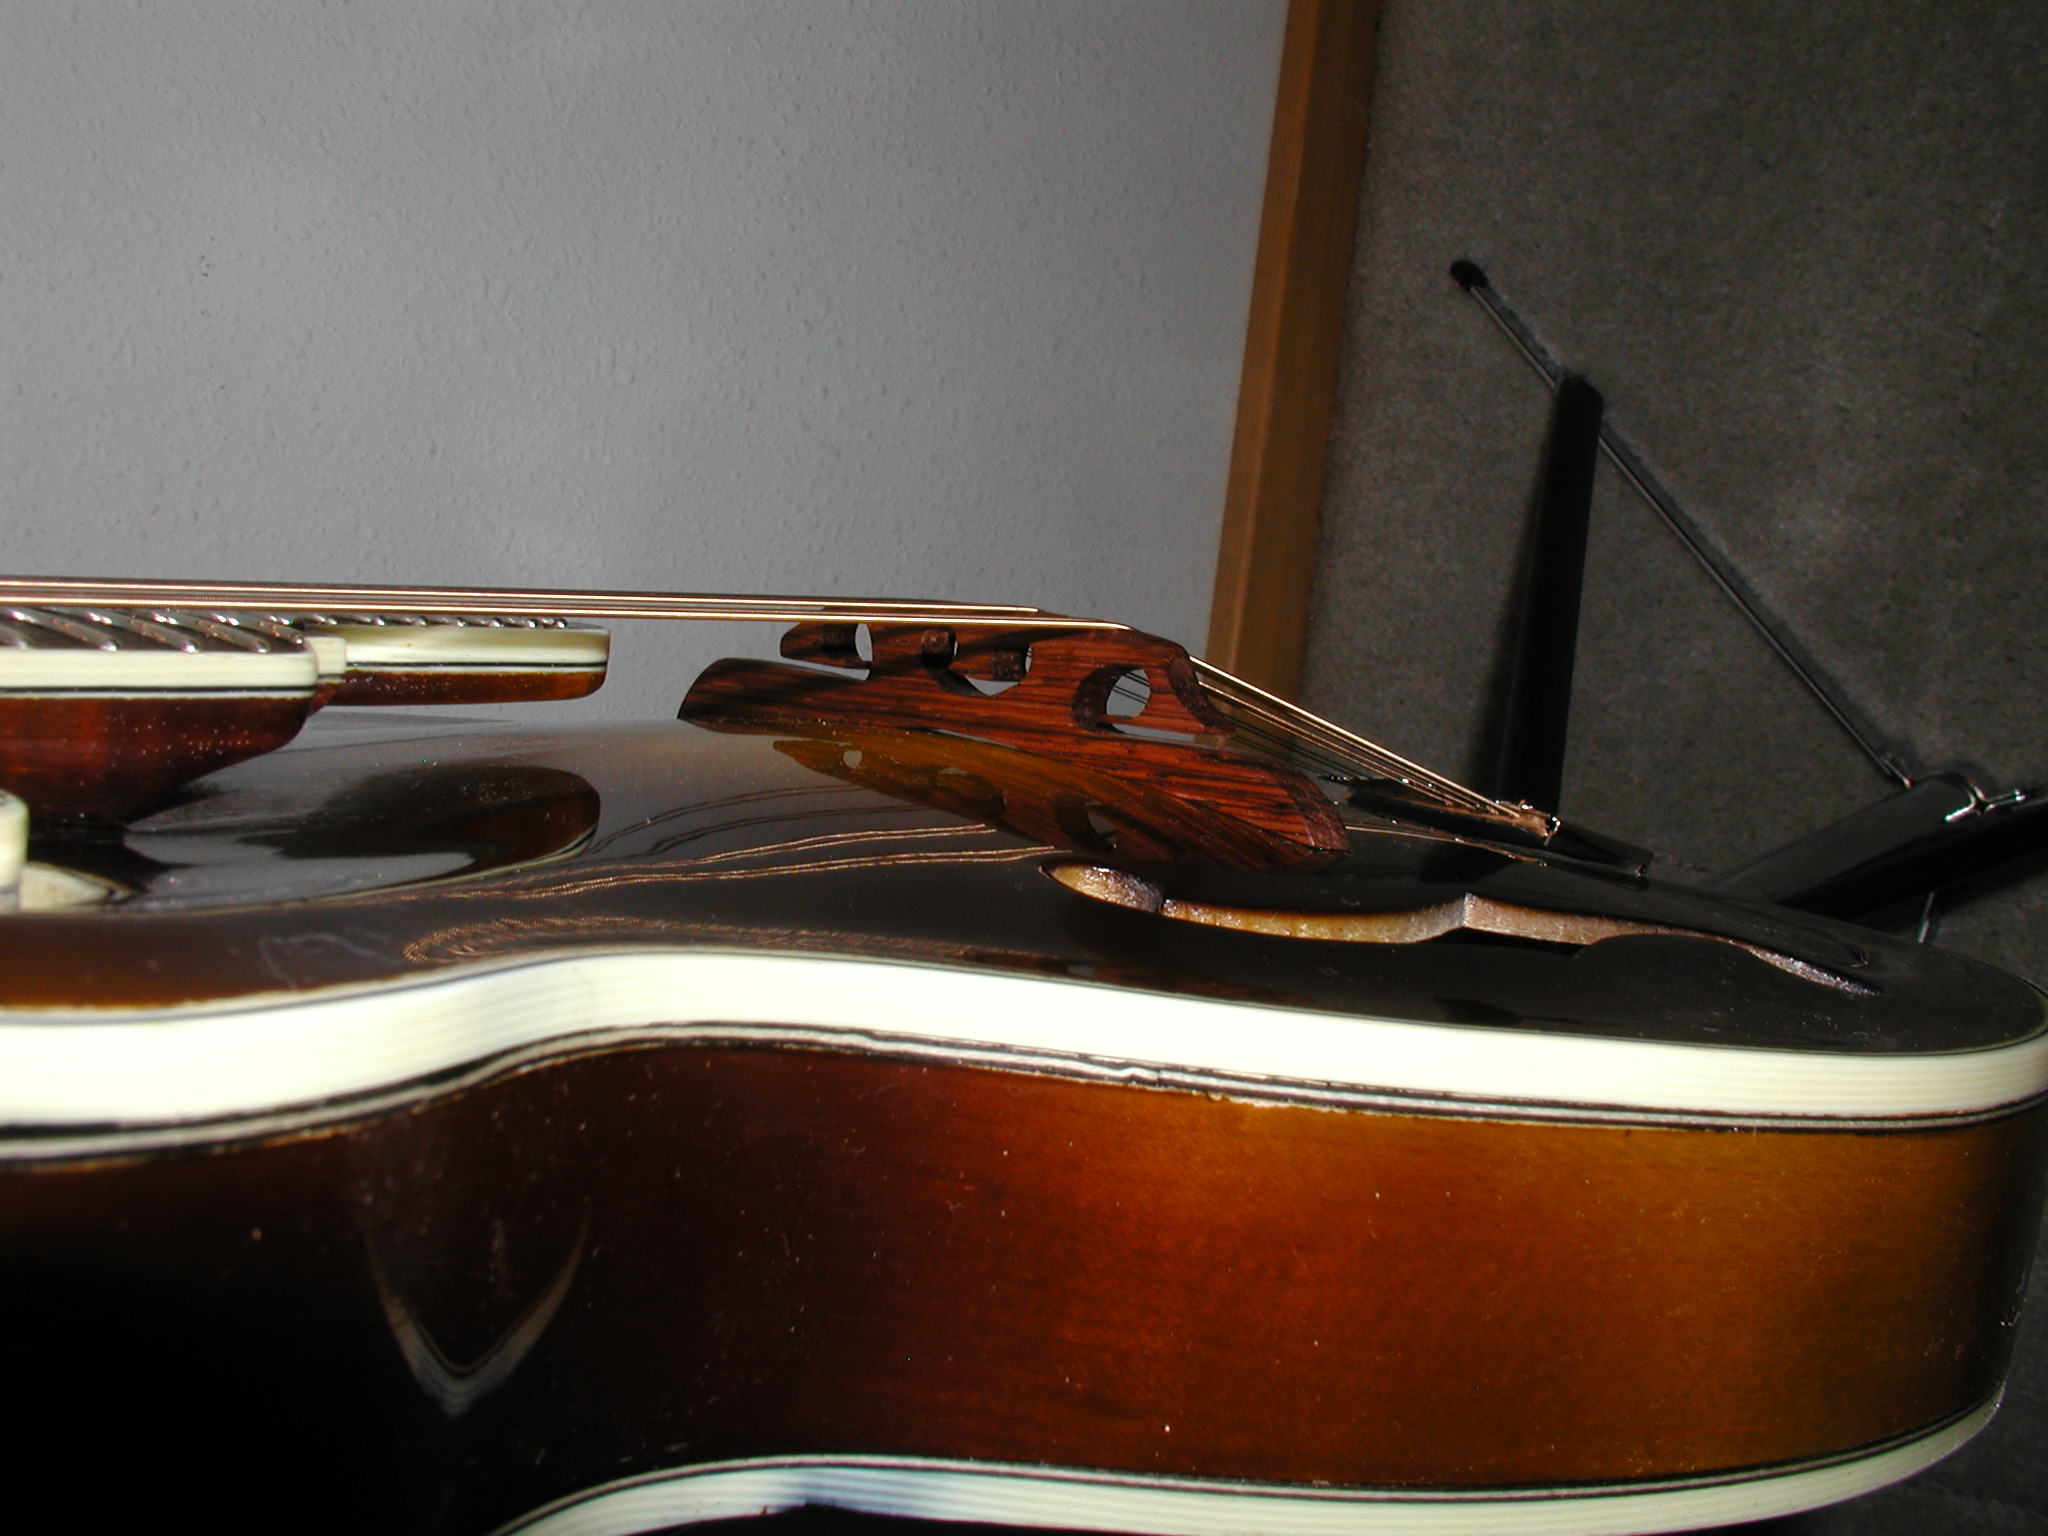
Karl Atkinson Over-The-Hill Project

|
This is a shot from the
Bass side at the waist. |
|
Same but from the tail end. |
 |
Direct from the tailpiece. Notice here
that it is not truly centered in that I have it all shifted just a skosh
to the bass side. This was an experiment in asymmetry to see if that
would improve the bass. As compared to the Randy Wood ebony adjustable
it does
seem to, but it is hard to decide whether that is a function of the shedua
or the shift. |
|
|
|
|
NOTES:
I intend to delivered it to Karl with the shedua bridge in place. My initial
impressions are that it was successful in taming the raw sound in the upper
register and
it gave the bass side a smoothness. The bass is not muffled in that the individual
notes are still clear but they seem to have an expanded envelope of sound such
that after the initial attack the note holds some of its volume before rolling
off to the sustain. This bridge makes the mandolin very loud. The ebony adjustable
seems loud but that is more of a vigorous attack with quick die-back of the
notes which seems more harsh at this point to my ear. Karl plays mostly bluegrass
but also does some performing in his local theater productions so we'll see
if he likes this sound or prefers the ebony. The action is deliberately high
at this point since I expect the top to relax some after finishing and the
resultant expansion. I will expect it back for final bridge adjustment and
final finish buffout.
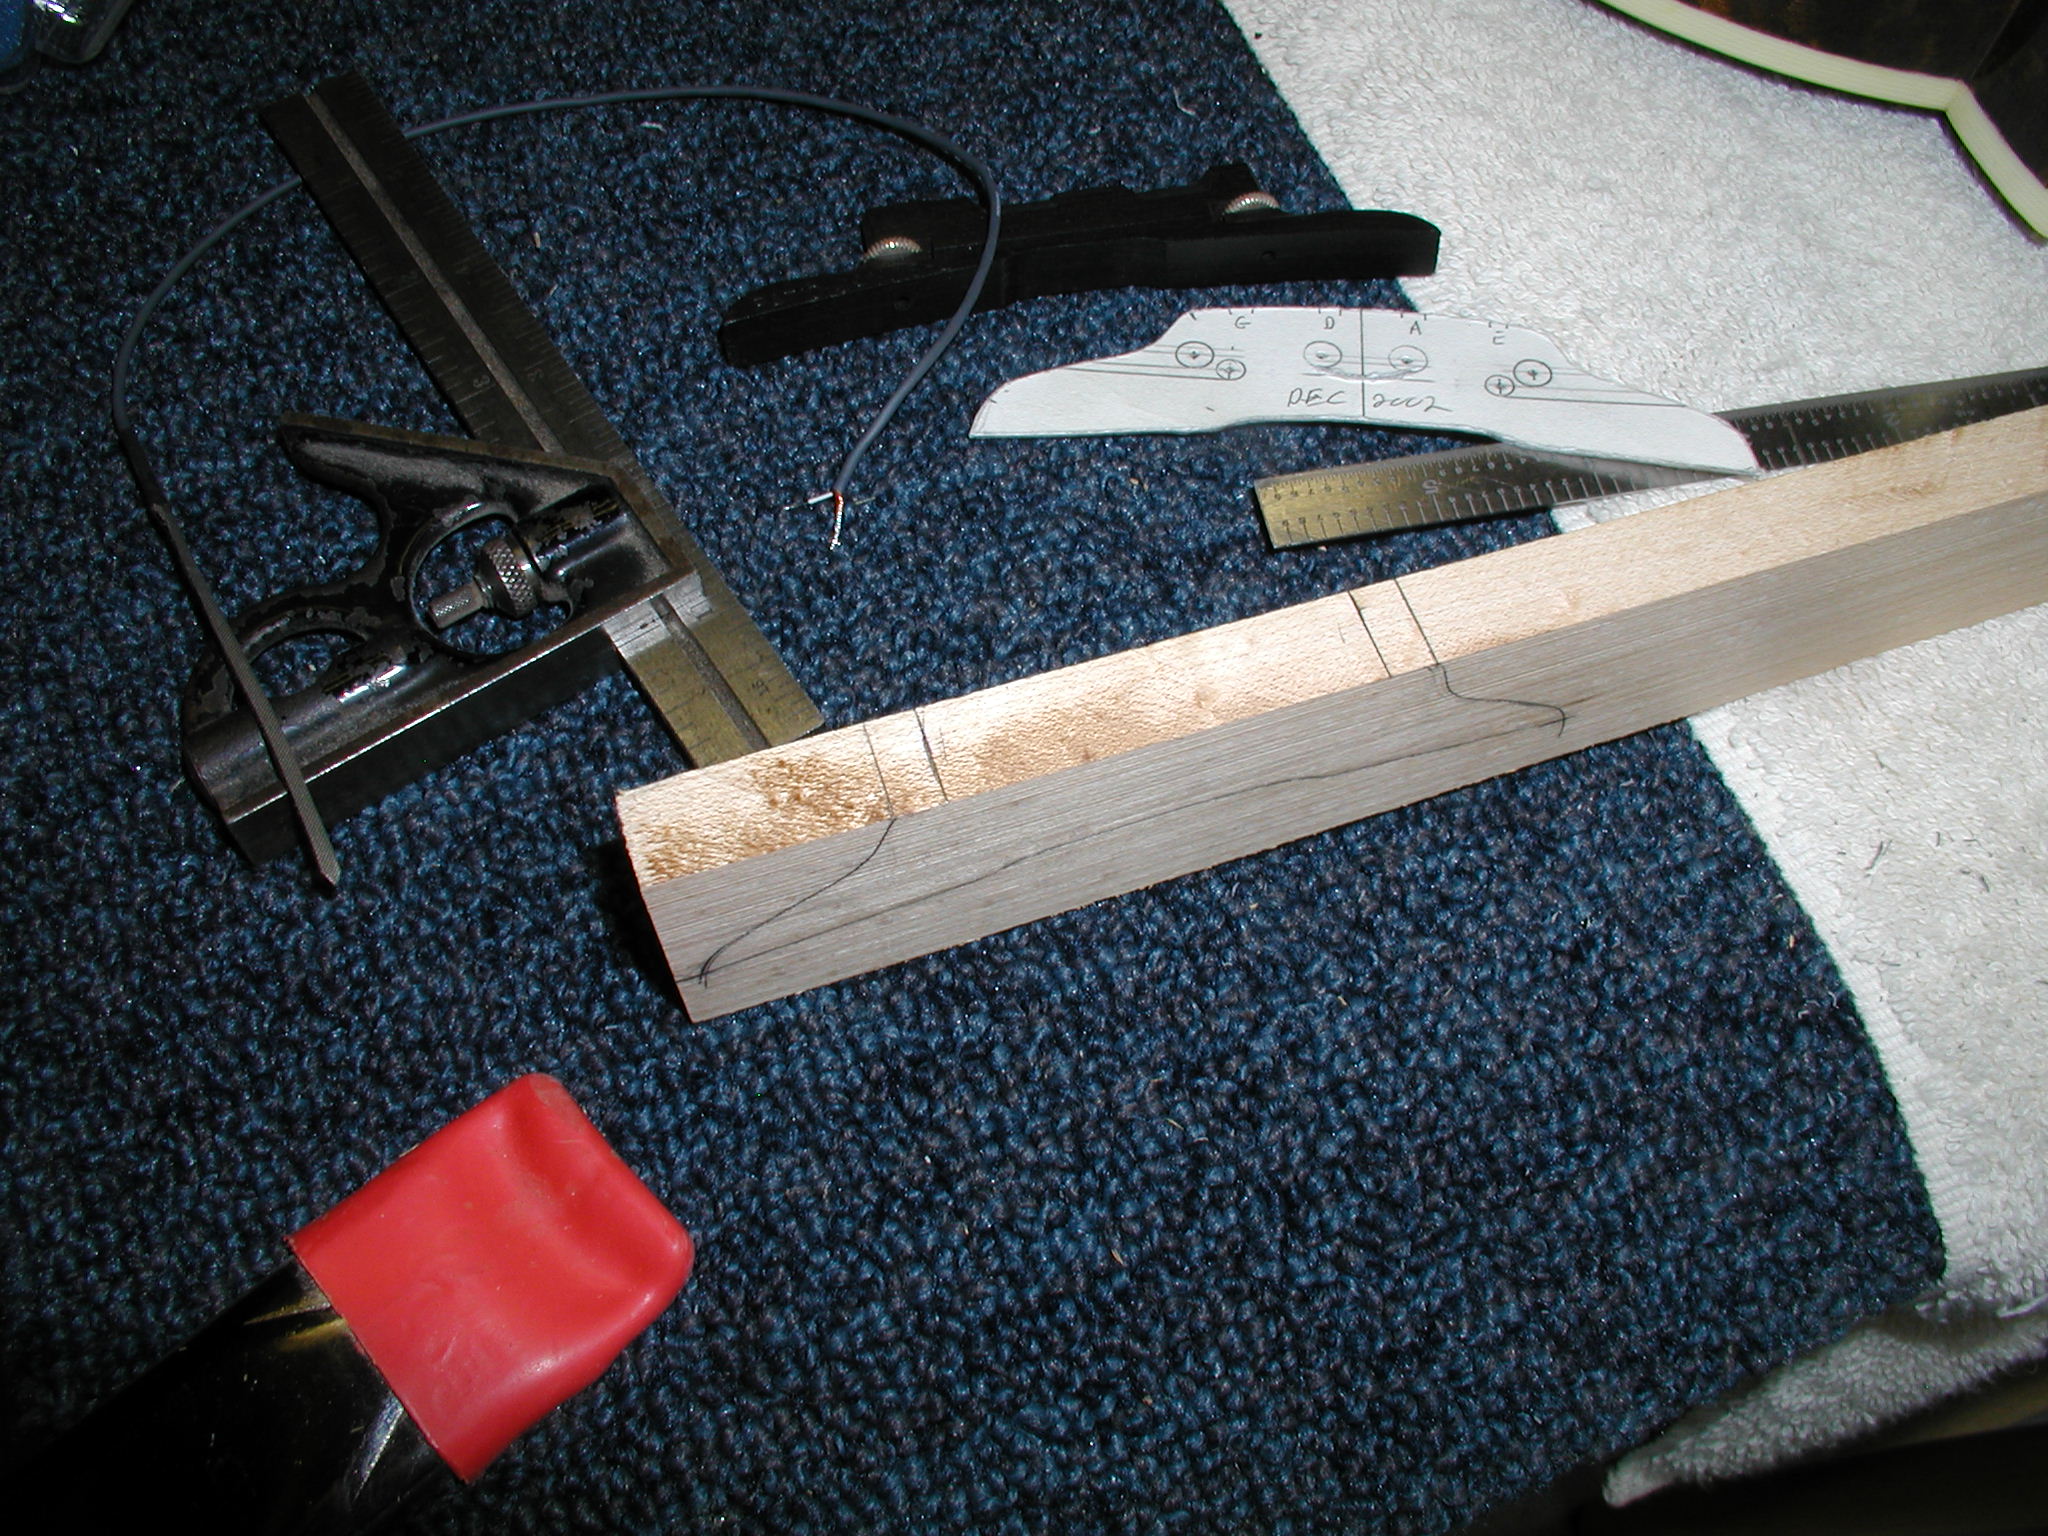
TR Project
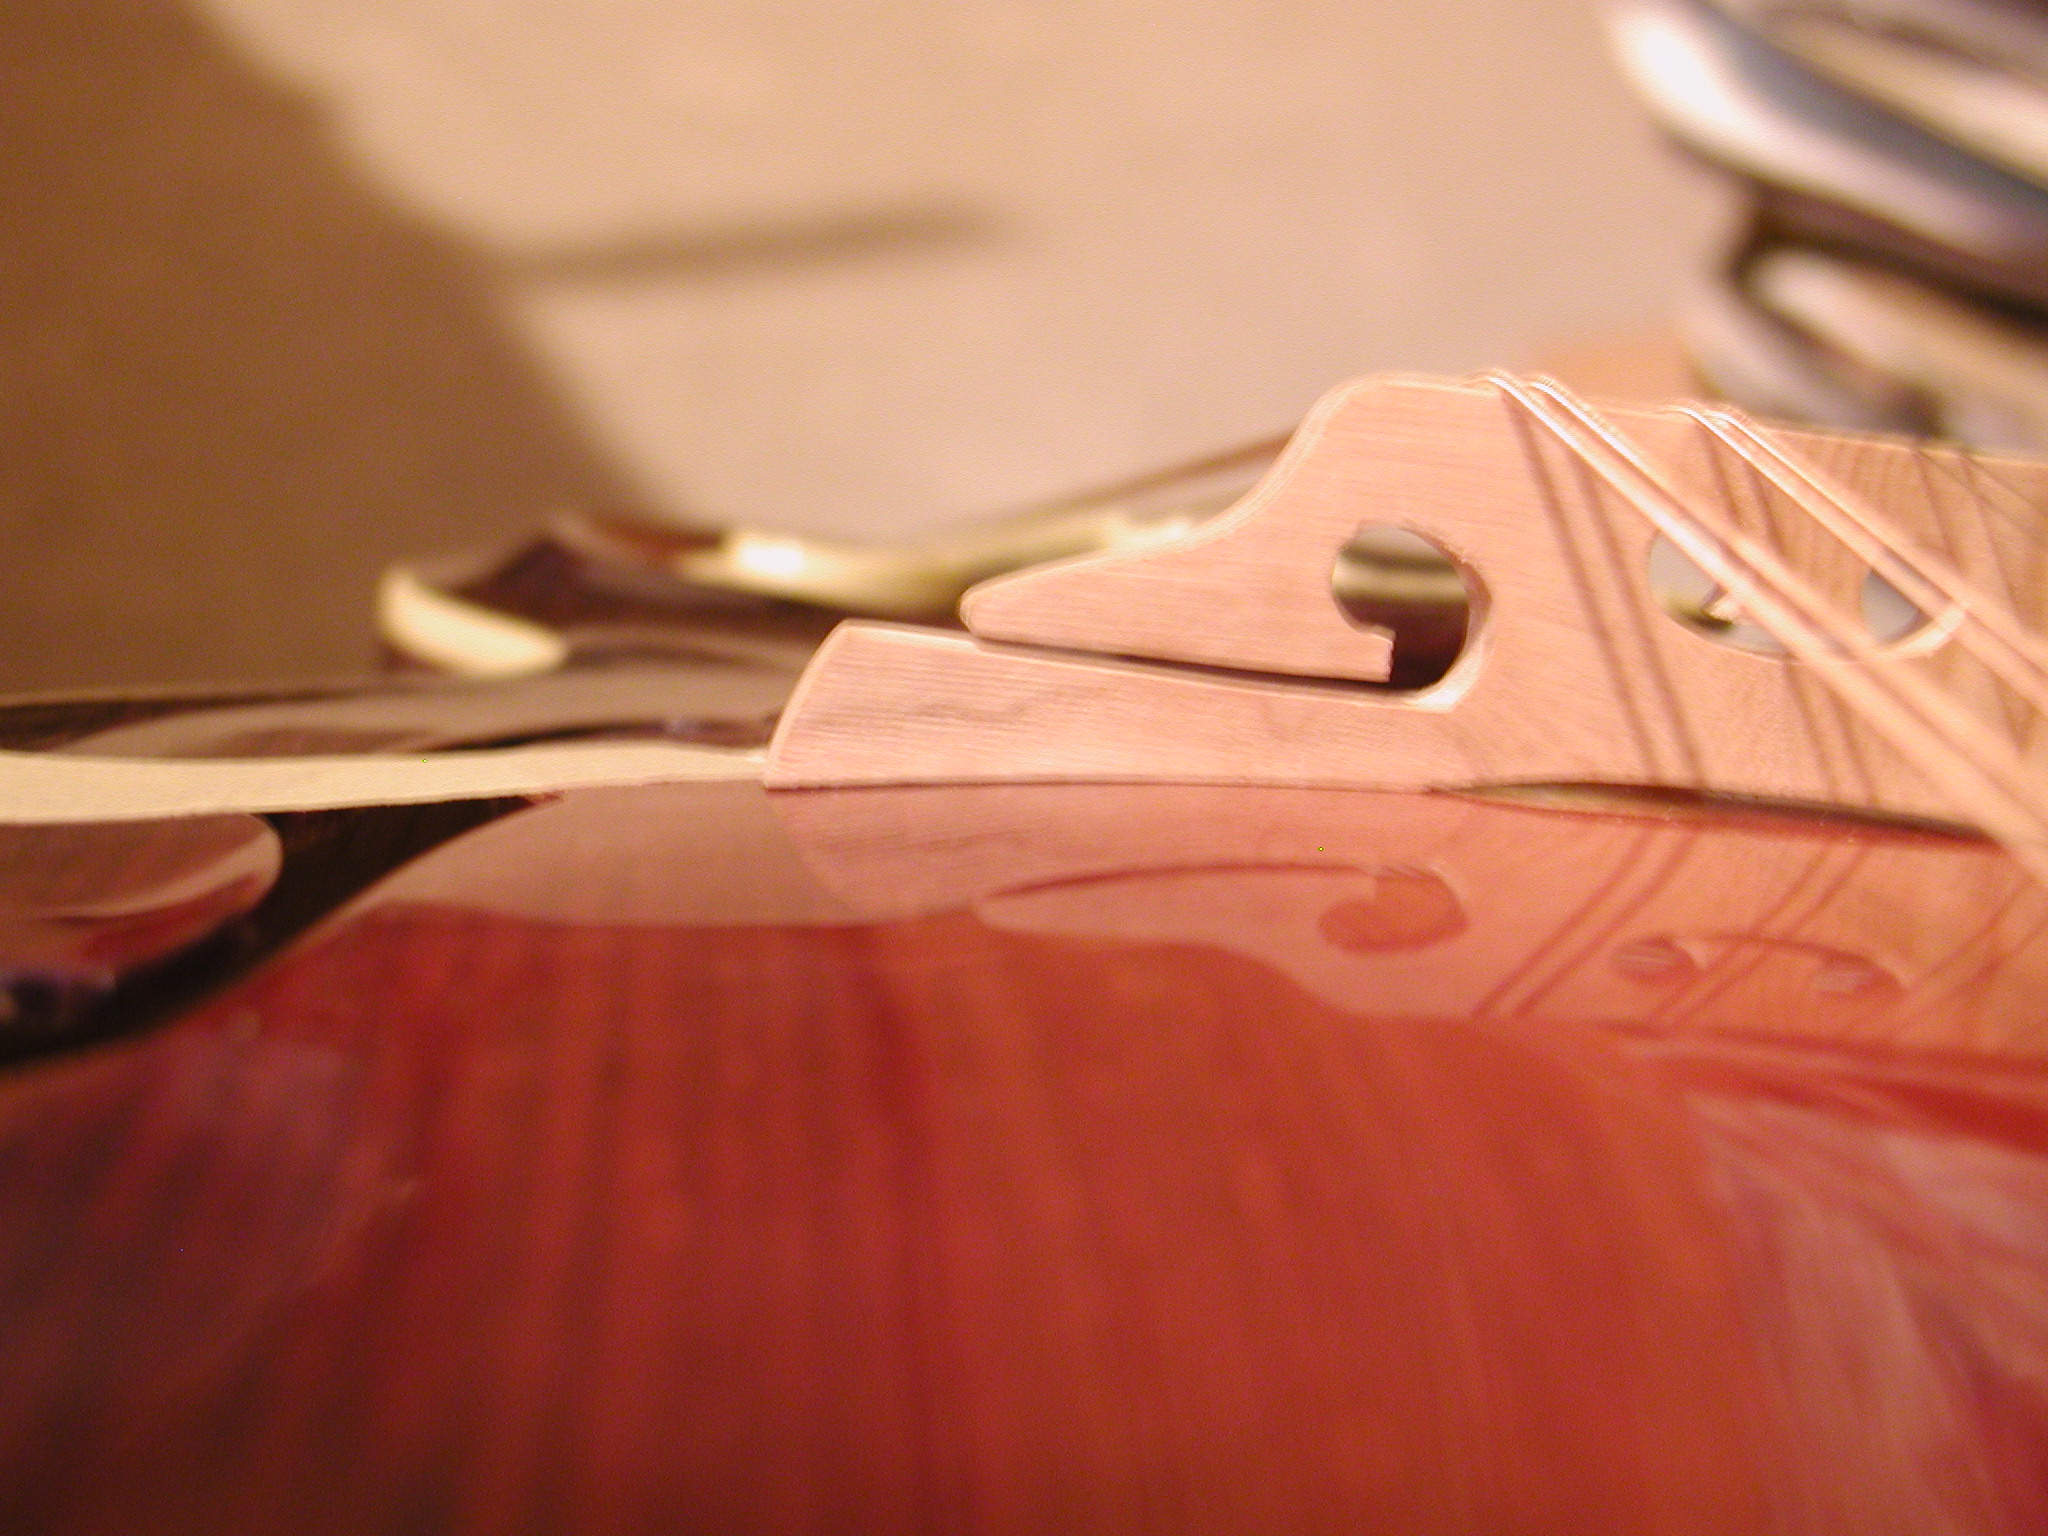
This project was a build for Tom Risner of Texas. He wanted to include a Pick-Up
The World pickup of some sort and we investigated various options. After chatting
with David Enke of PUTW we settled on putting in an under-saddle type pickup directly
in the bridge using a bone saddle on the top. This was sort of a learning process
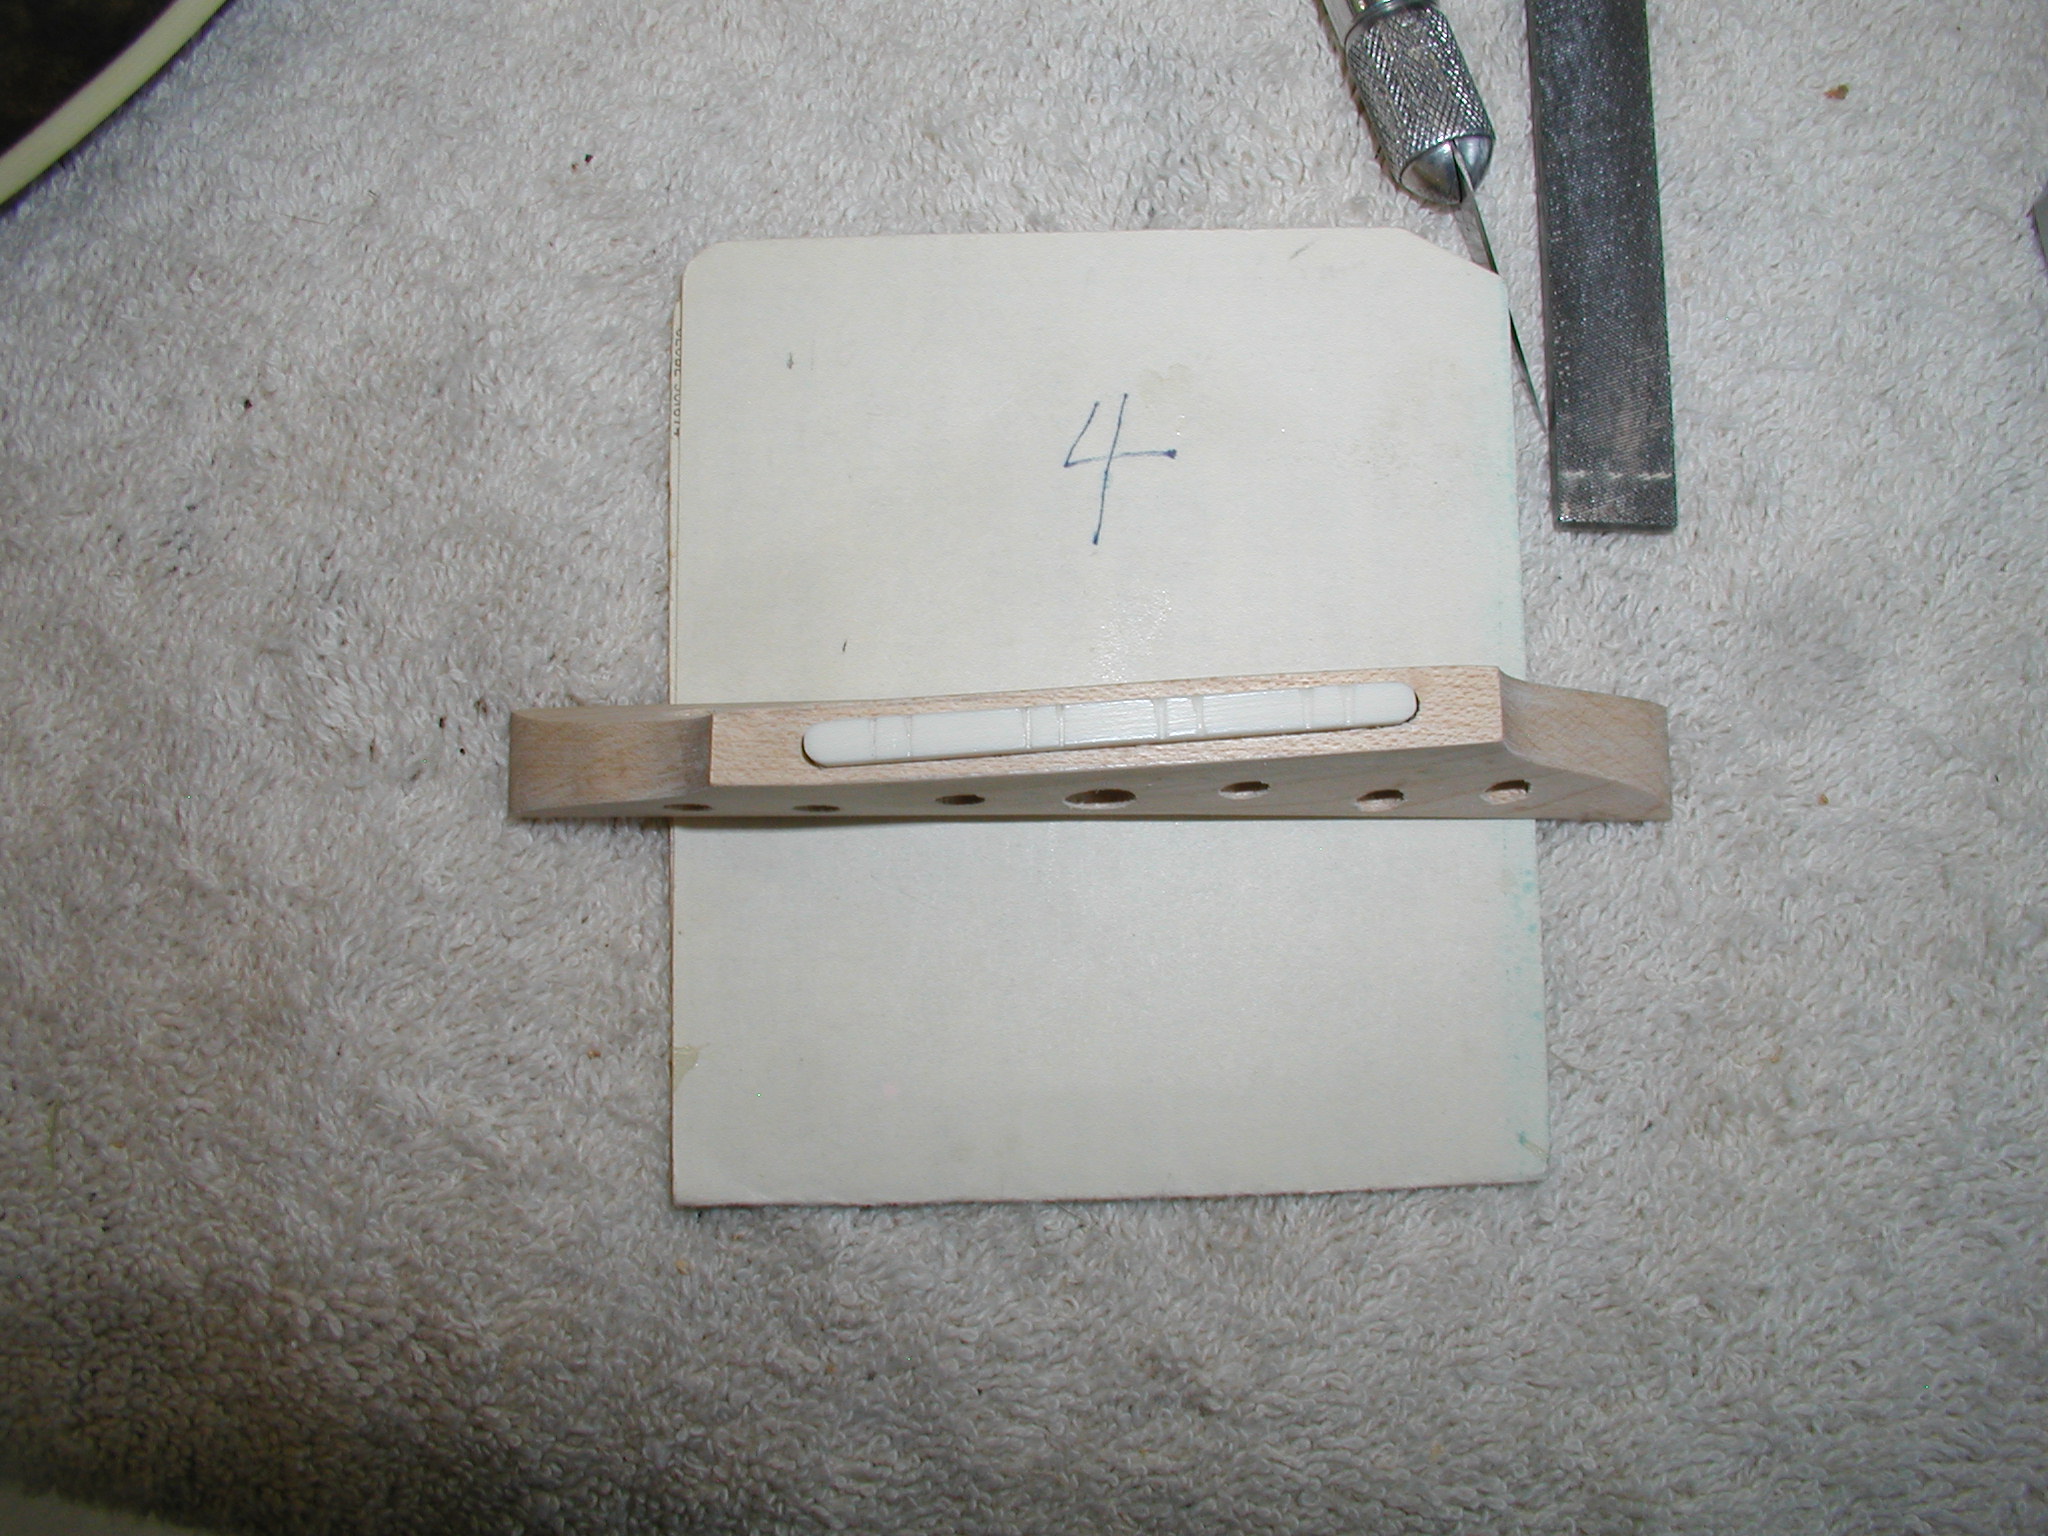
and it went through several itterations. The overall design of the bridge is birds-eye
maple with 7 holes. This follows more recent work by Red
Henry where the design has multiple holes but no slotted wings. This gets
around the issues of compression and flex in the wing legs and fitting problems.
This mando was very responsive and I wanted a full-foot bridge on it rather than
two feet with a space between. This worked out well.
Tom Risner - Under-Saddle Pickup Bridge
 |
The initial design is very similar to my
earlier, I'm using my original template here for the profile. |
 |
However, here I diverge a bit. I make the
profile on the side turn up rather than roll over and I mark on the top
in a bit to where the ends of the saddle will lie. |
 |
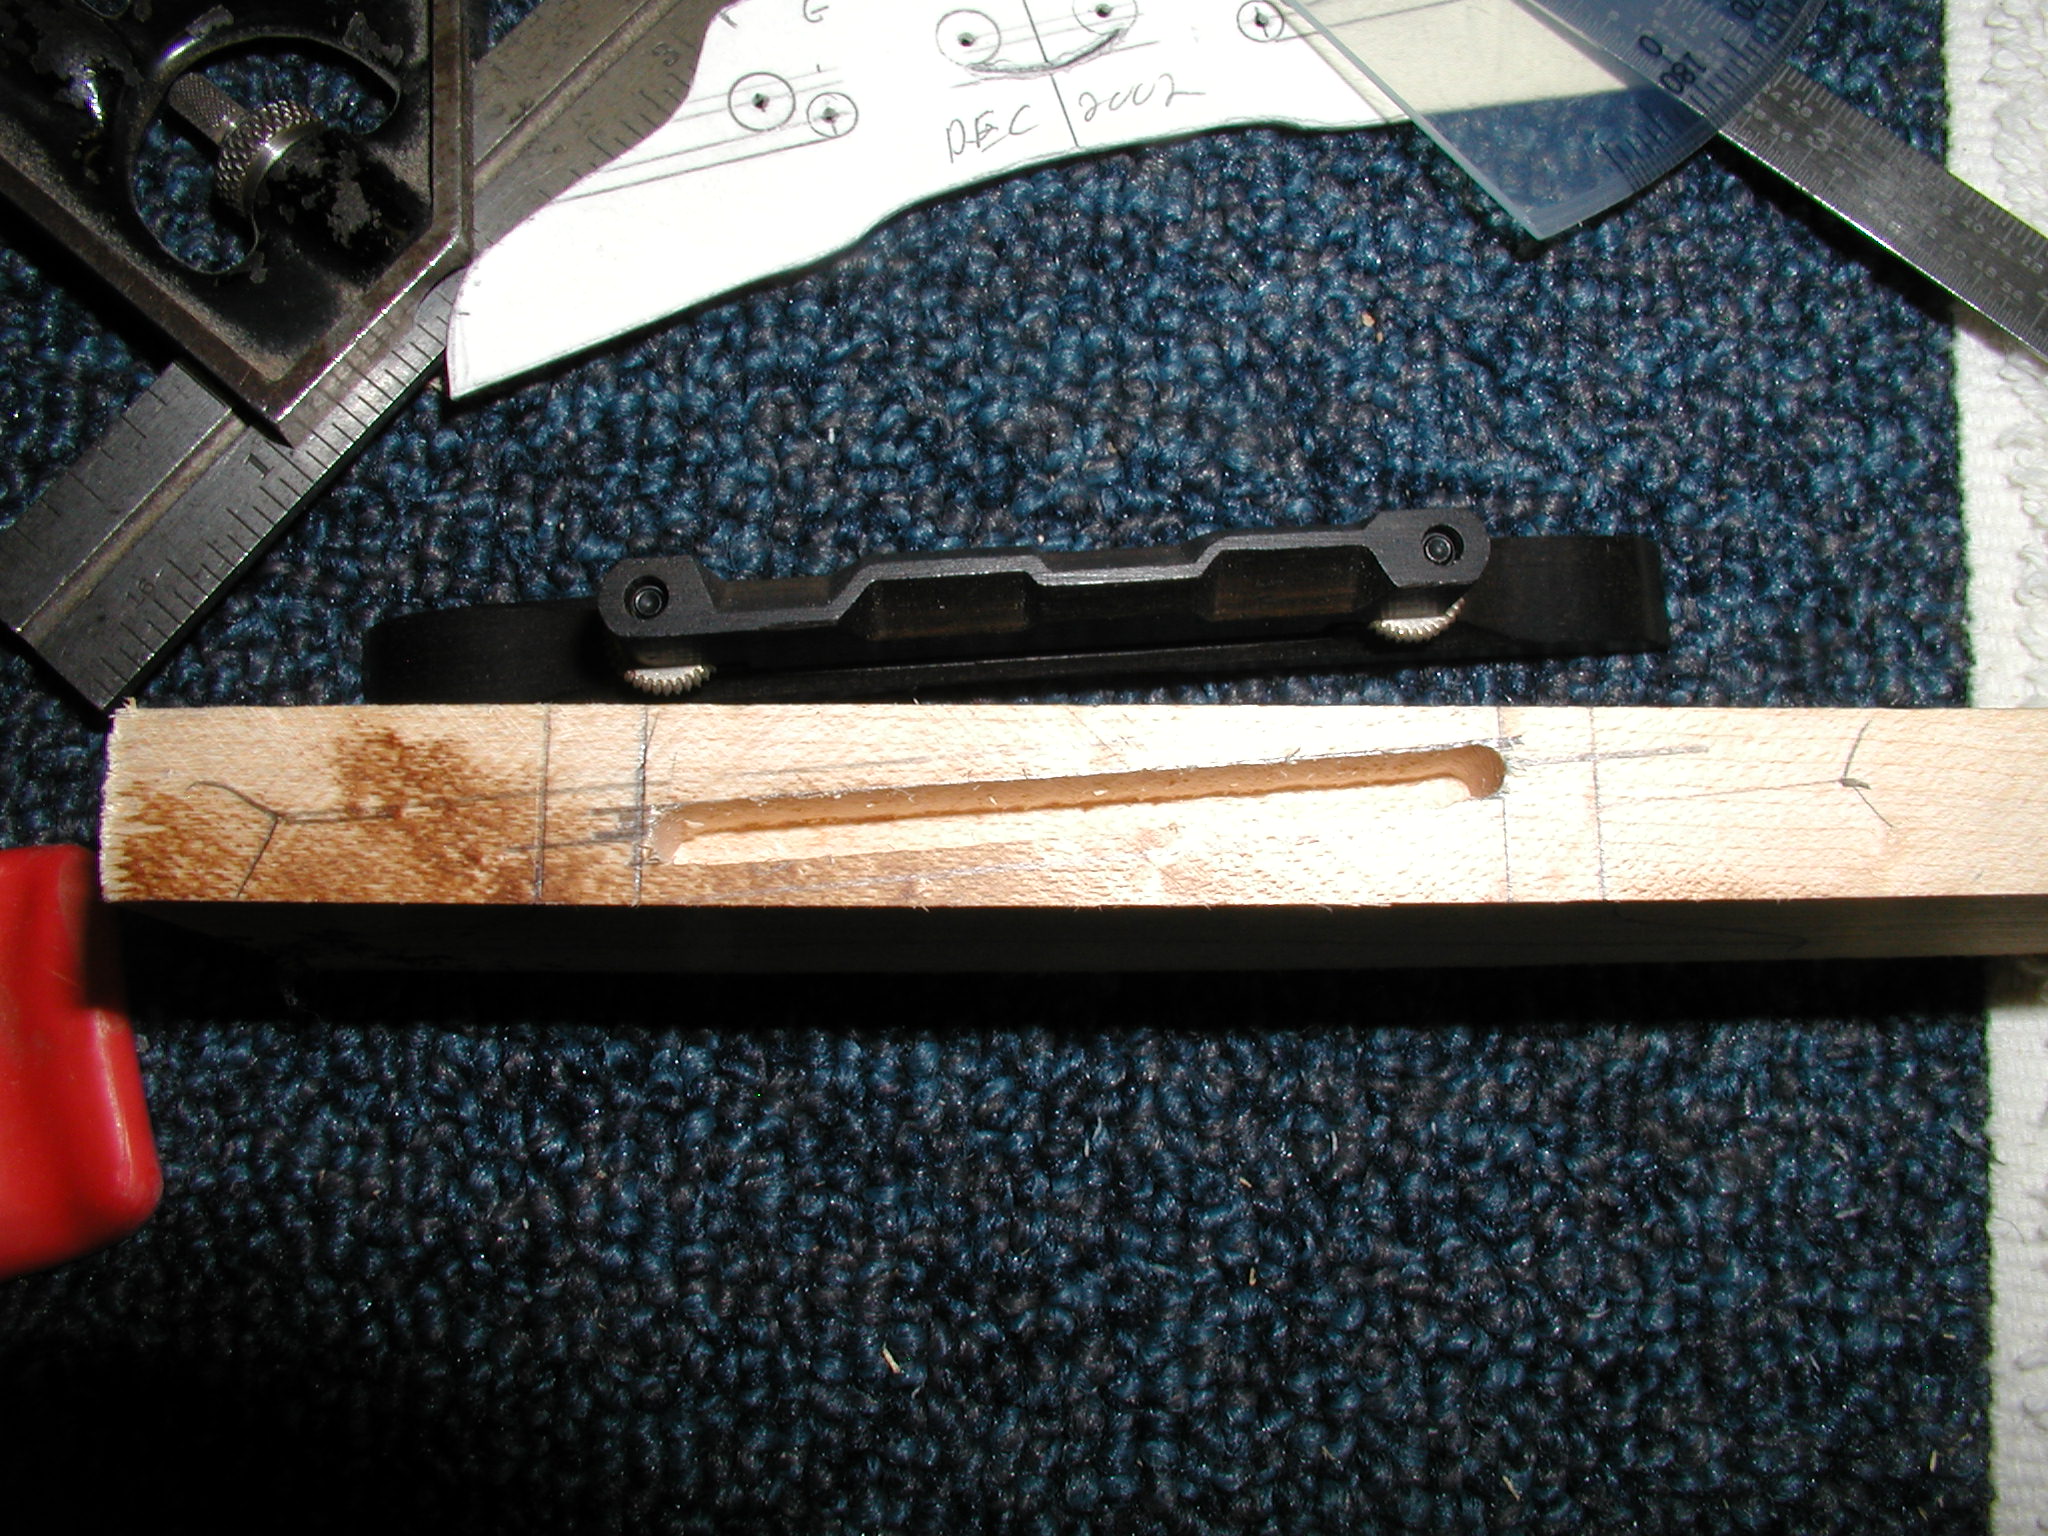
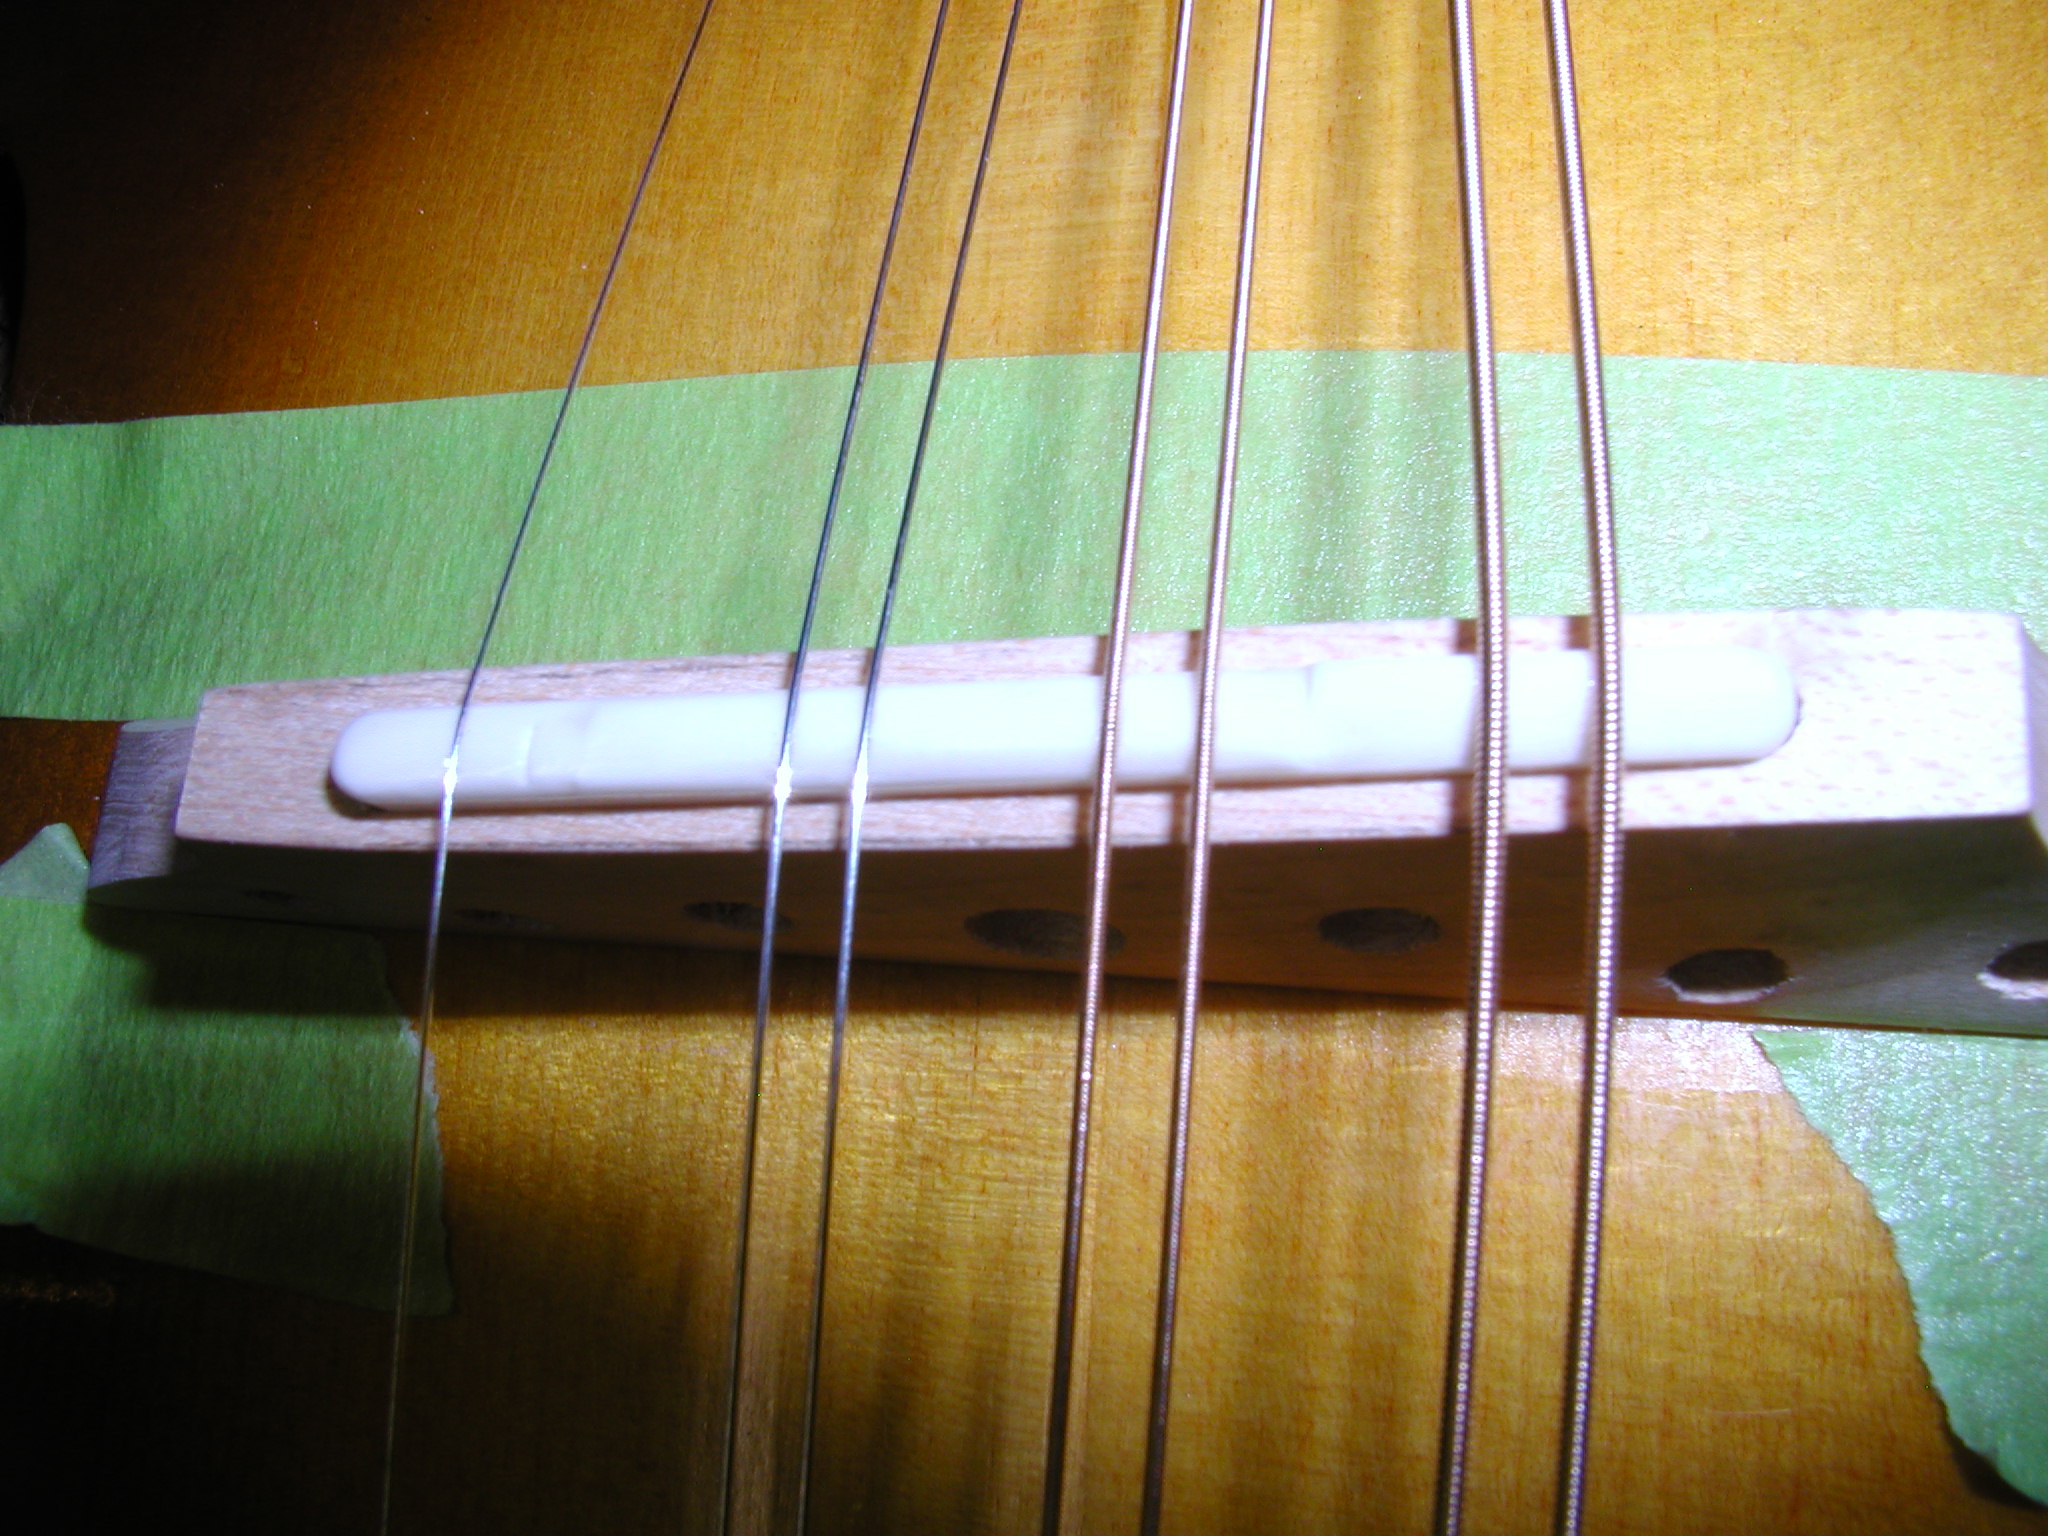
Here you can see the saddle location all
laid out. I'm using pretty much the same as I would for a guitar but I also
checked with a Randy Woods mandolin bridge and measured the angle on that.
The slot is going to be 1/8" wide, this is just enough
to accommodate the wide stagger of the mandolin strings. |
 |
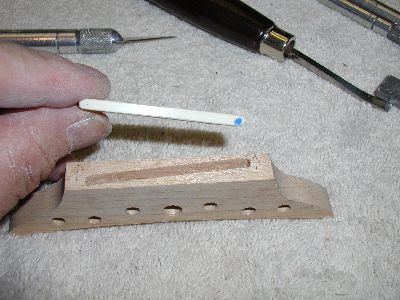
I slot the bridge using a mill/drill cross
feed table bolted to my drill press. The bit is a 1/8" carbide bill
bit available from industrial supply housed such as MSC
Industrial. |
 |
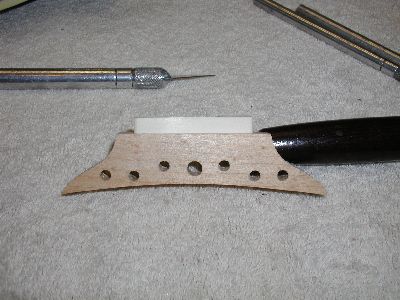
You can see this made a very clean slot with
a dead flat bottom. |
 |
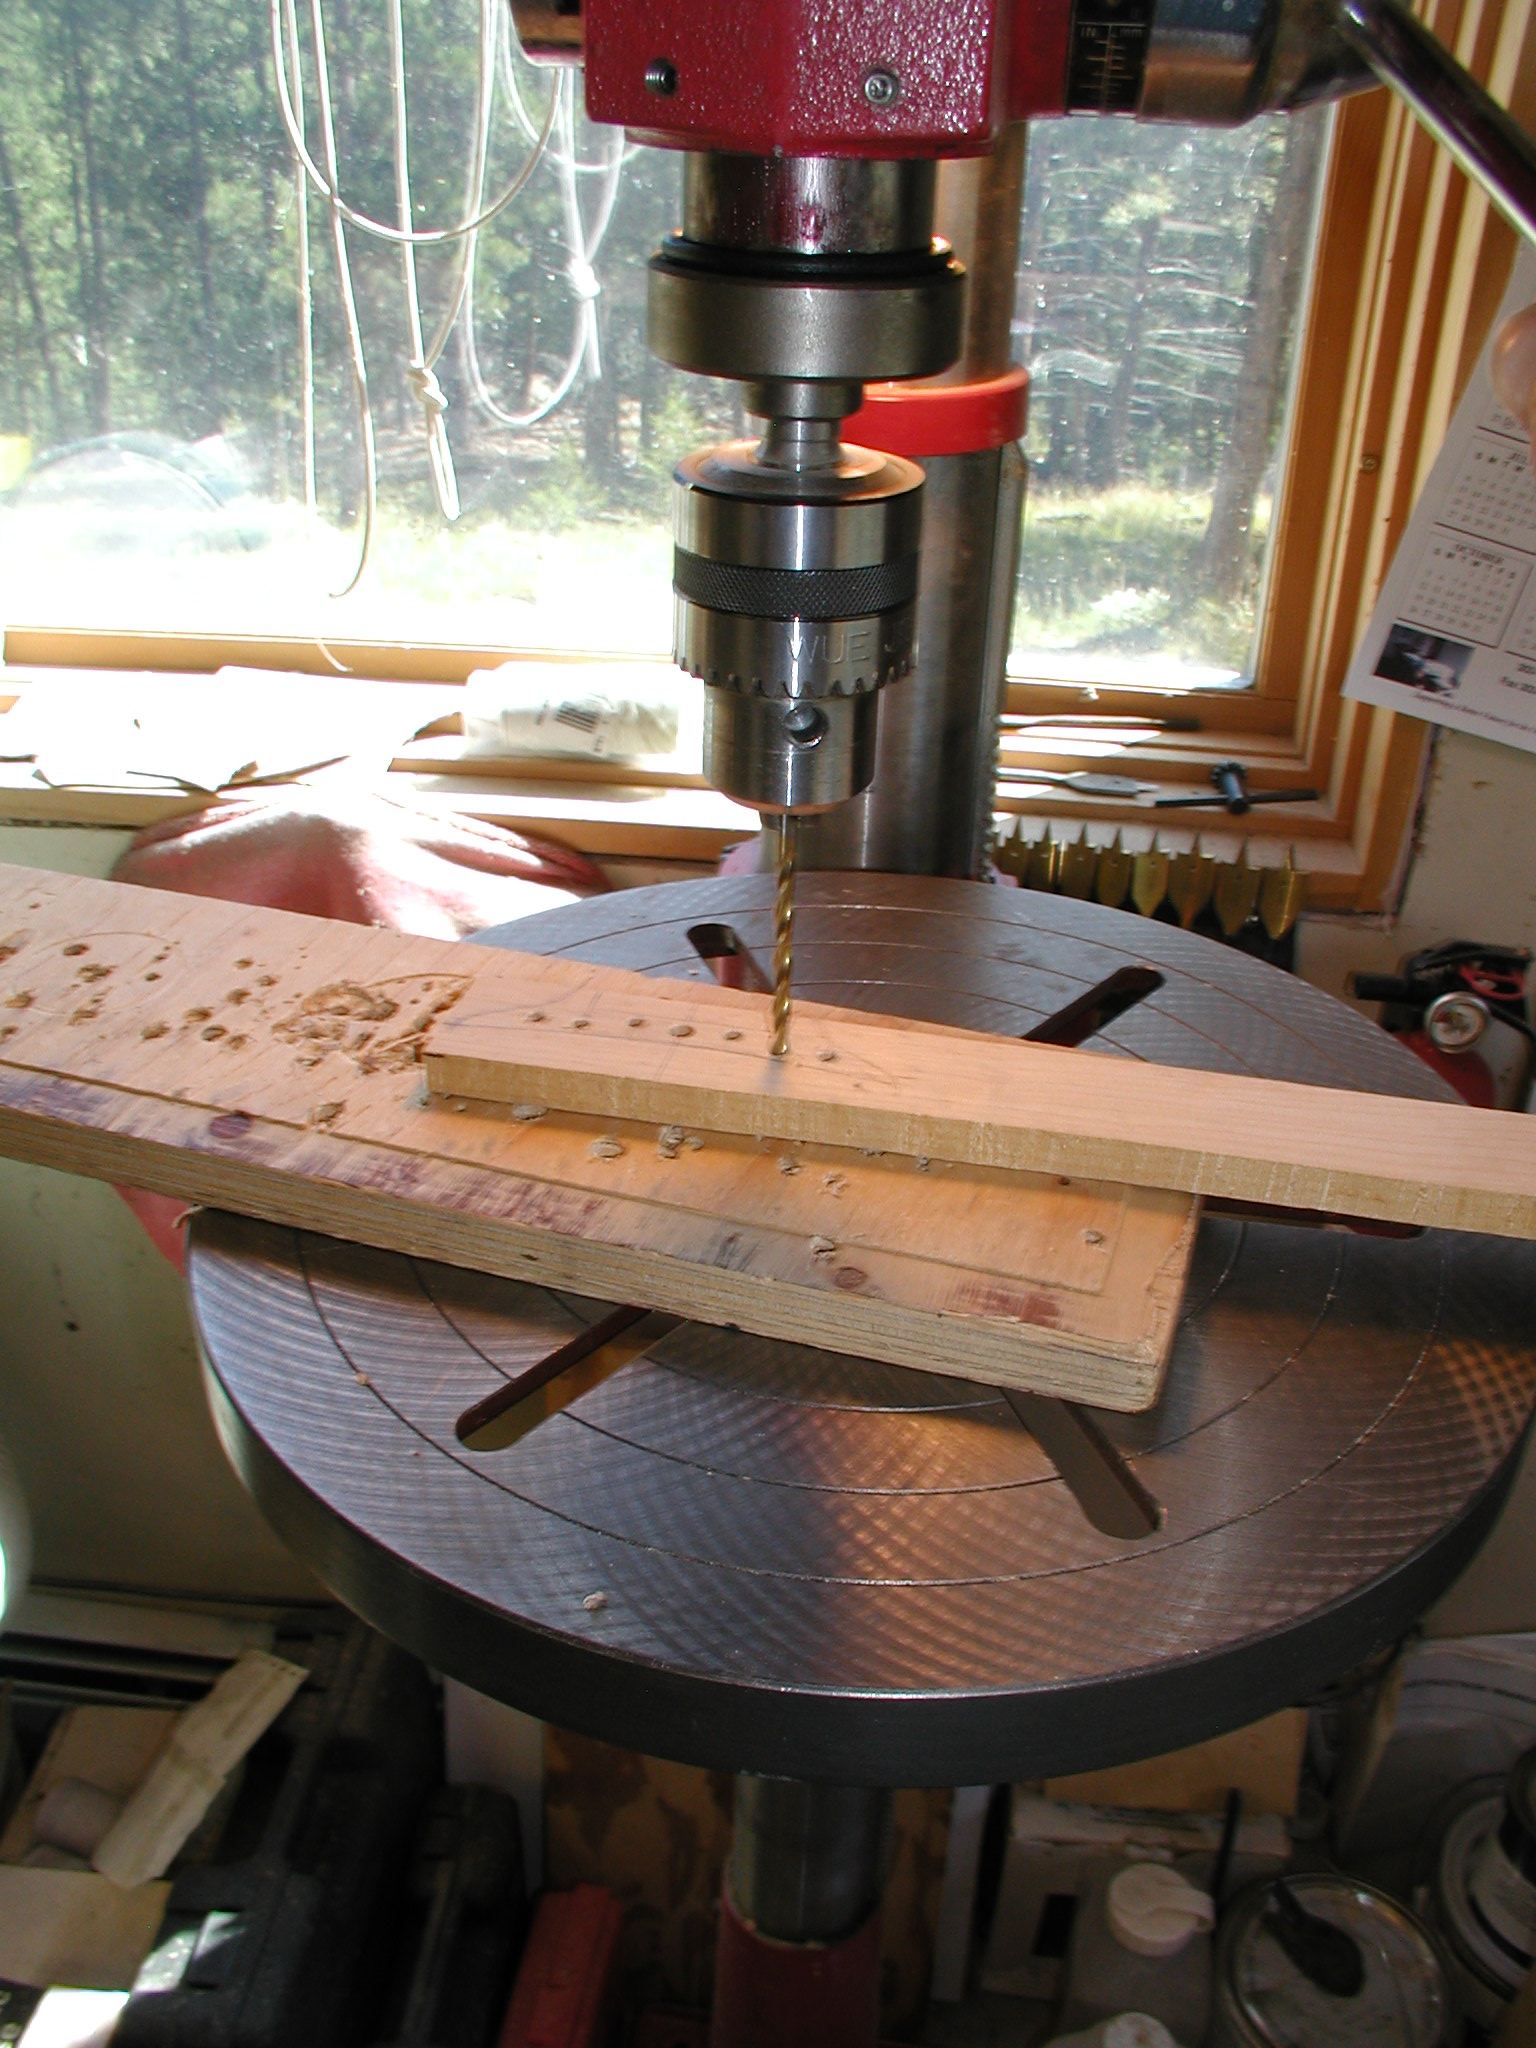
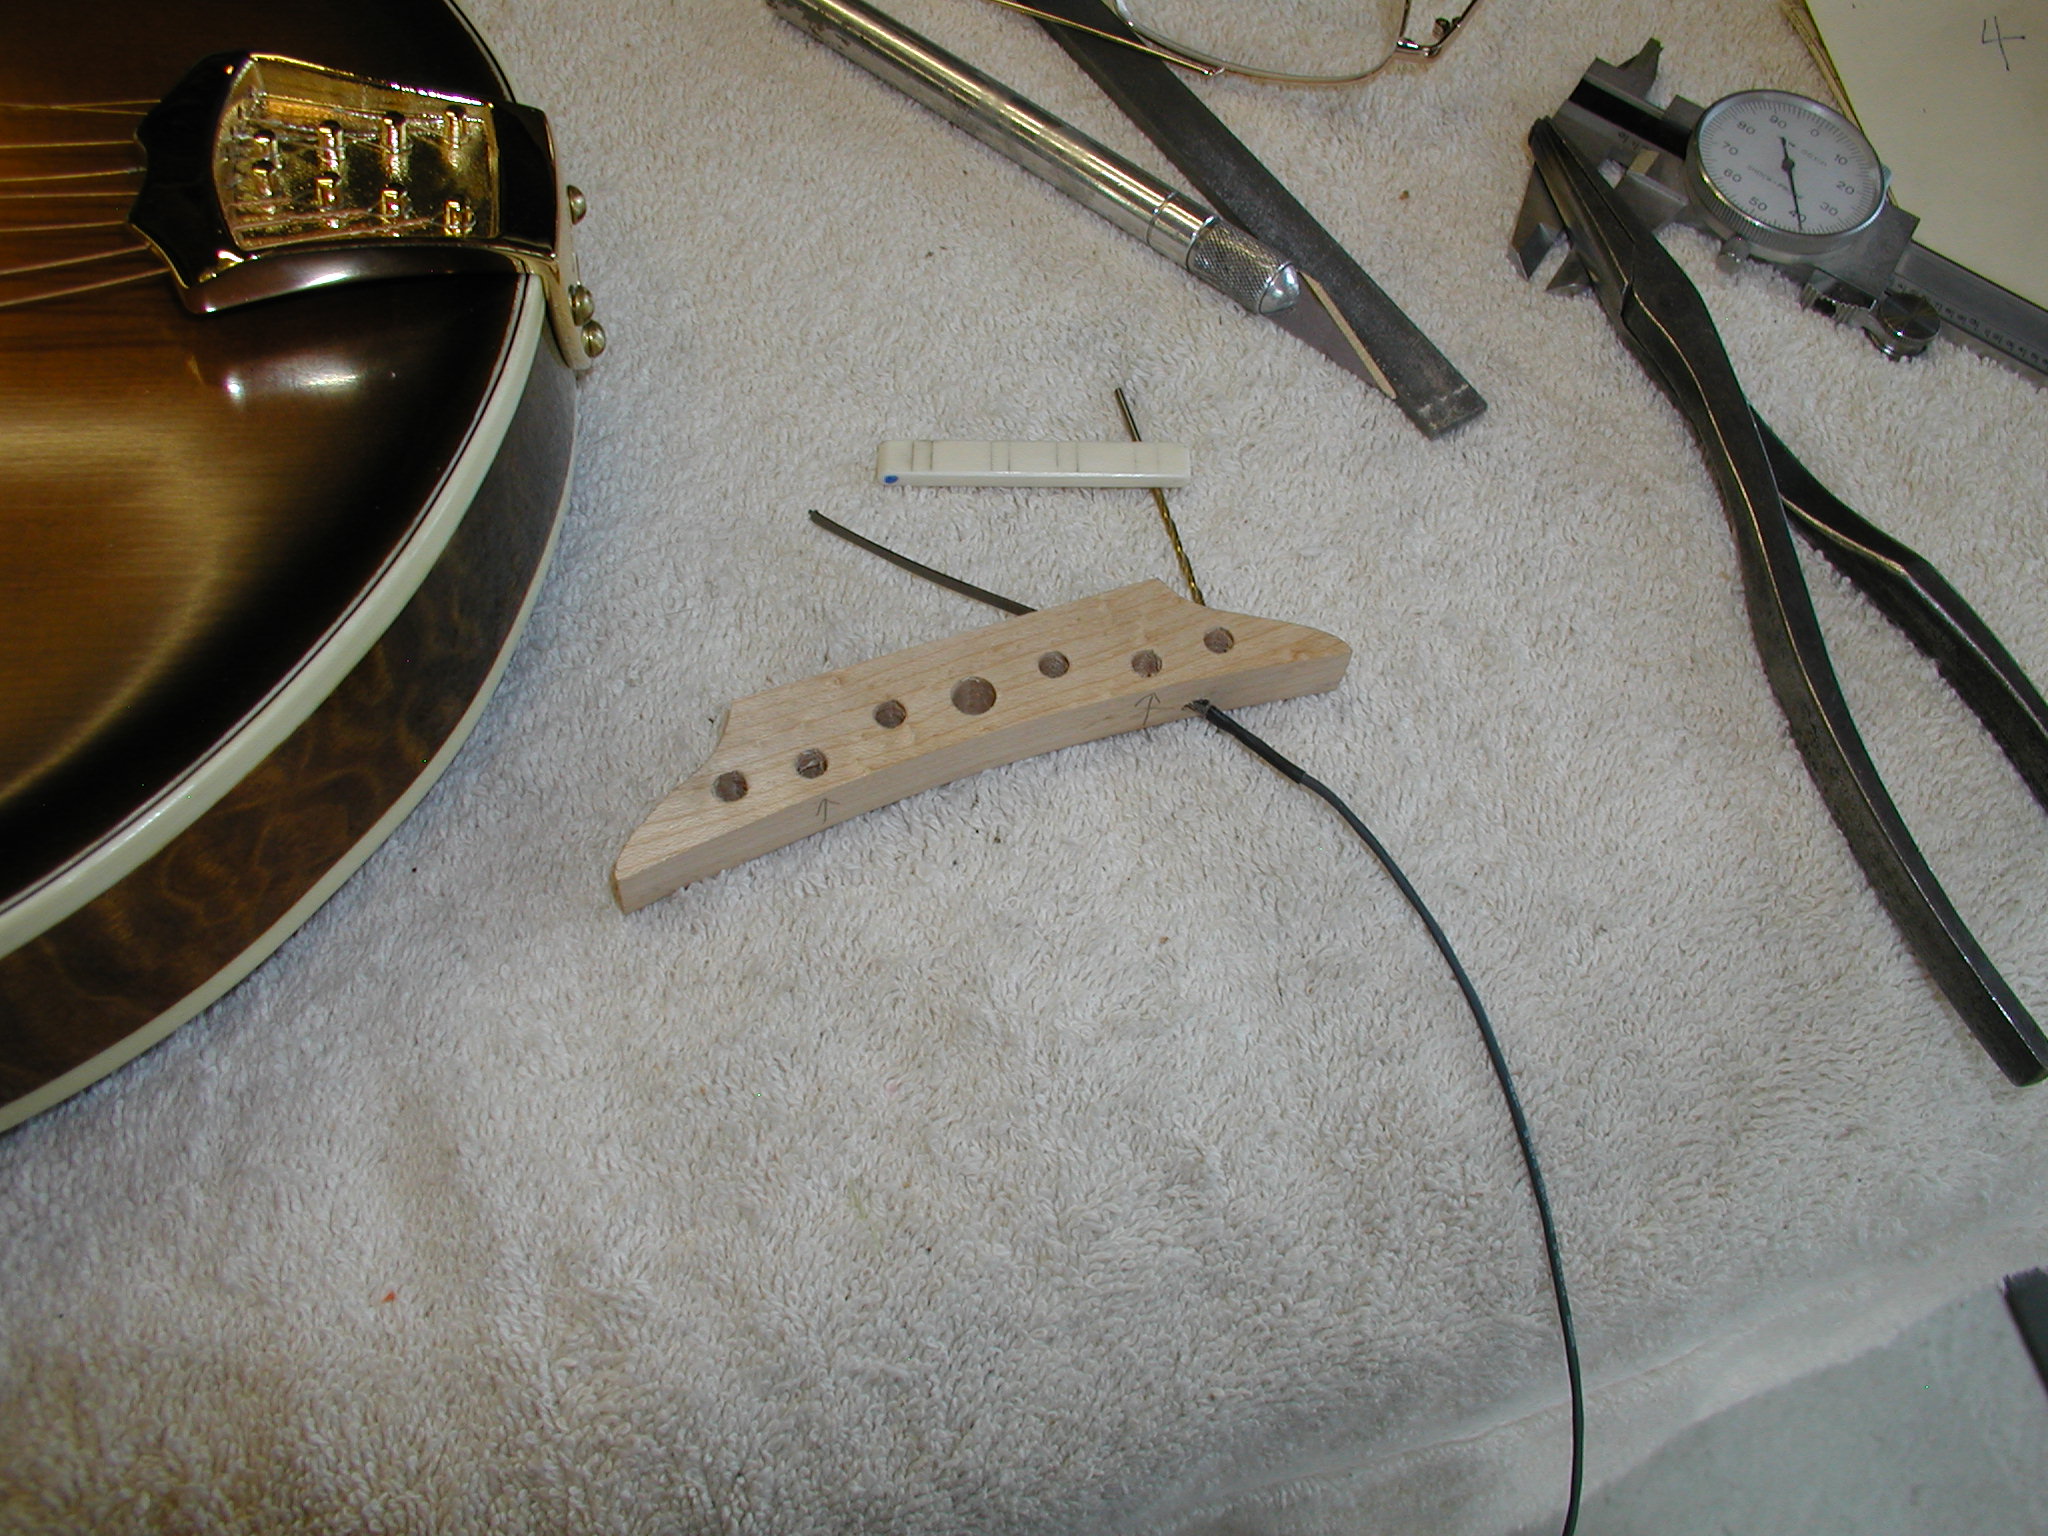
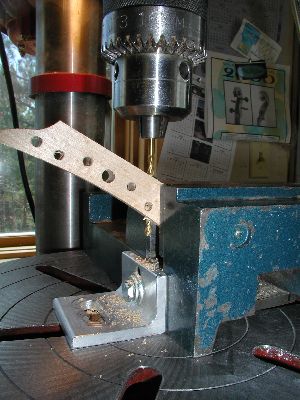
Now I drill the holes using brad-point bit.
I first drill with a very small bit and then drill with the brad-point using
the pilot hole as the guide. I drill half way through and flip it over and
drill to completion from the other side. This avoids any chipping or tear-out
as the bit breaks through. This hole pattern is my own take on Red's 9-hole
design. I wanted to leave some real estate to run the wire down w/o it showing
in the hole. This idea changes later on. |
 |
Whack it out on the bandsaw. |
 |
While it is still rough I go ahead and fit
the bridge to the top. This is a full single-foot design and I am using
carbon paper to mark where it is high. |
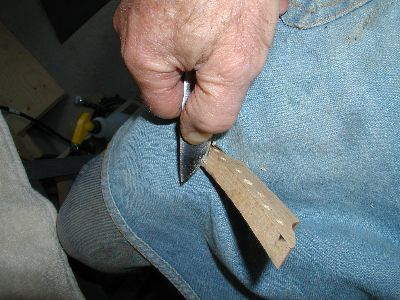 |
Once I can see the areas with carbon, I then
use a pocket knife with a curved blade to scrape that area away. This makes
a concave area on the foot. |
 |
As it gets close you can see that it is just
marking the outer edges. It is still pretty rough here |
 |
Getting closer now and I use the less
curved part of the knife so more of the bridge gets colored. I finalize
it by swapping out the carbon paper for some 120 grit garnet paper and
sand back and forth for about 1/4" wiggling in the same direction
as the strings run. Keep it very upright and since it is so close to a
true fit you don't need to press hard at all. Just "finit" the
process till you see the whole bottom is sanded true.
Once the saddle is fit to the top it is a good idea to re-check it's
overall height relative to the fretboard. If it is way too tall you may
want to sand the top edge down a bit and if necessary re-cut the slot
deeper. You want at least 3/8" - 1/4" of slot. |
 |
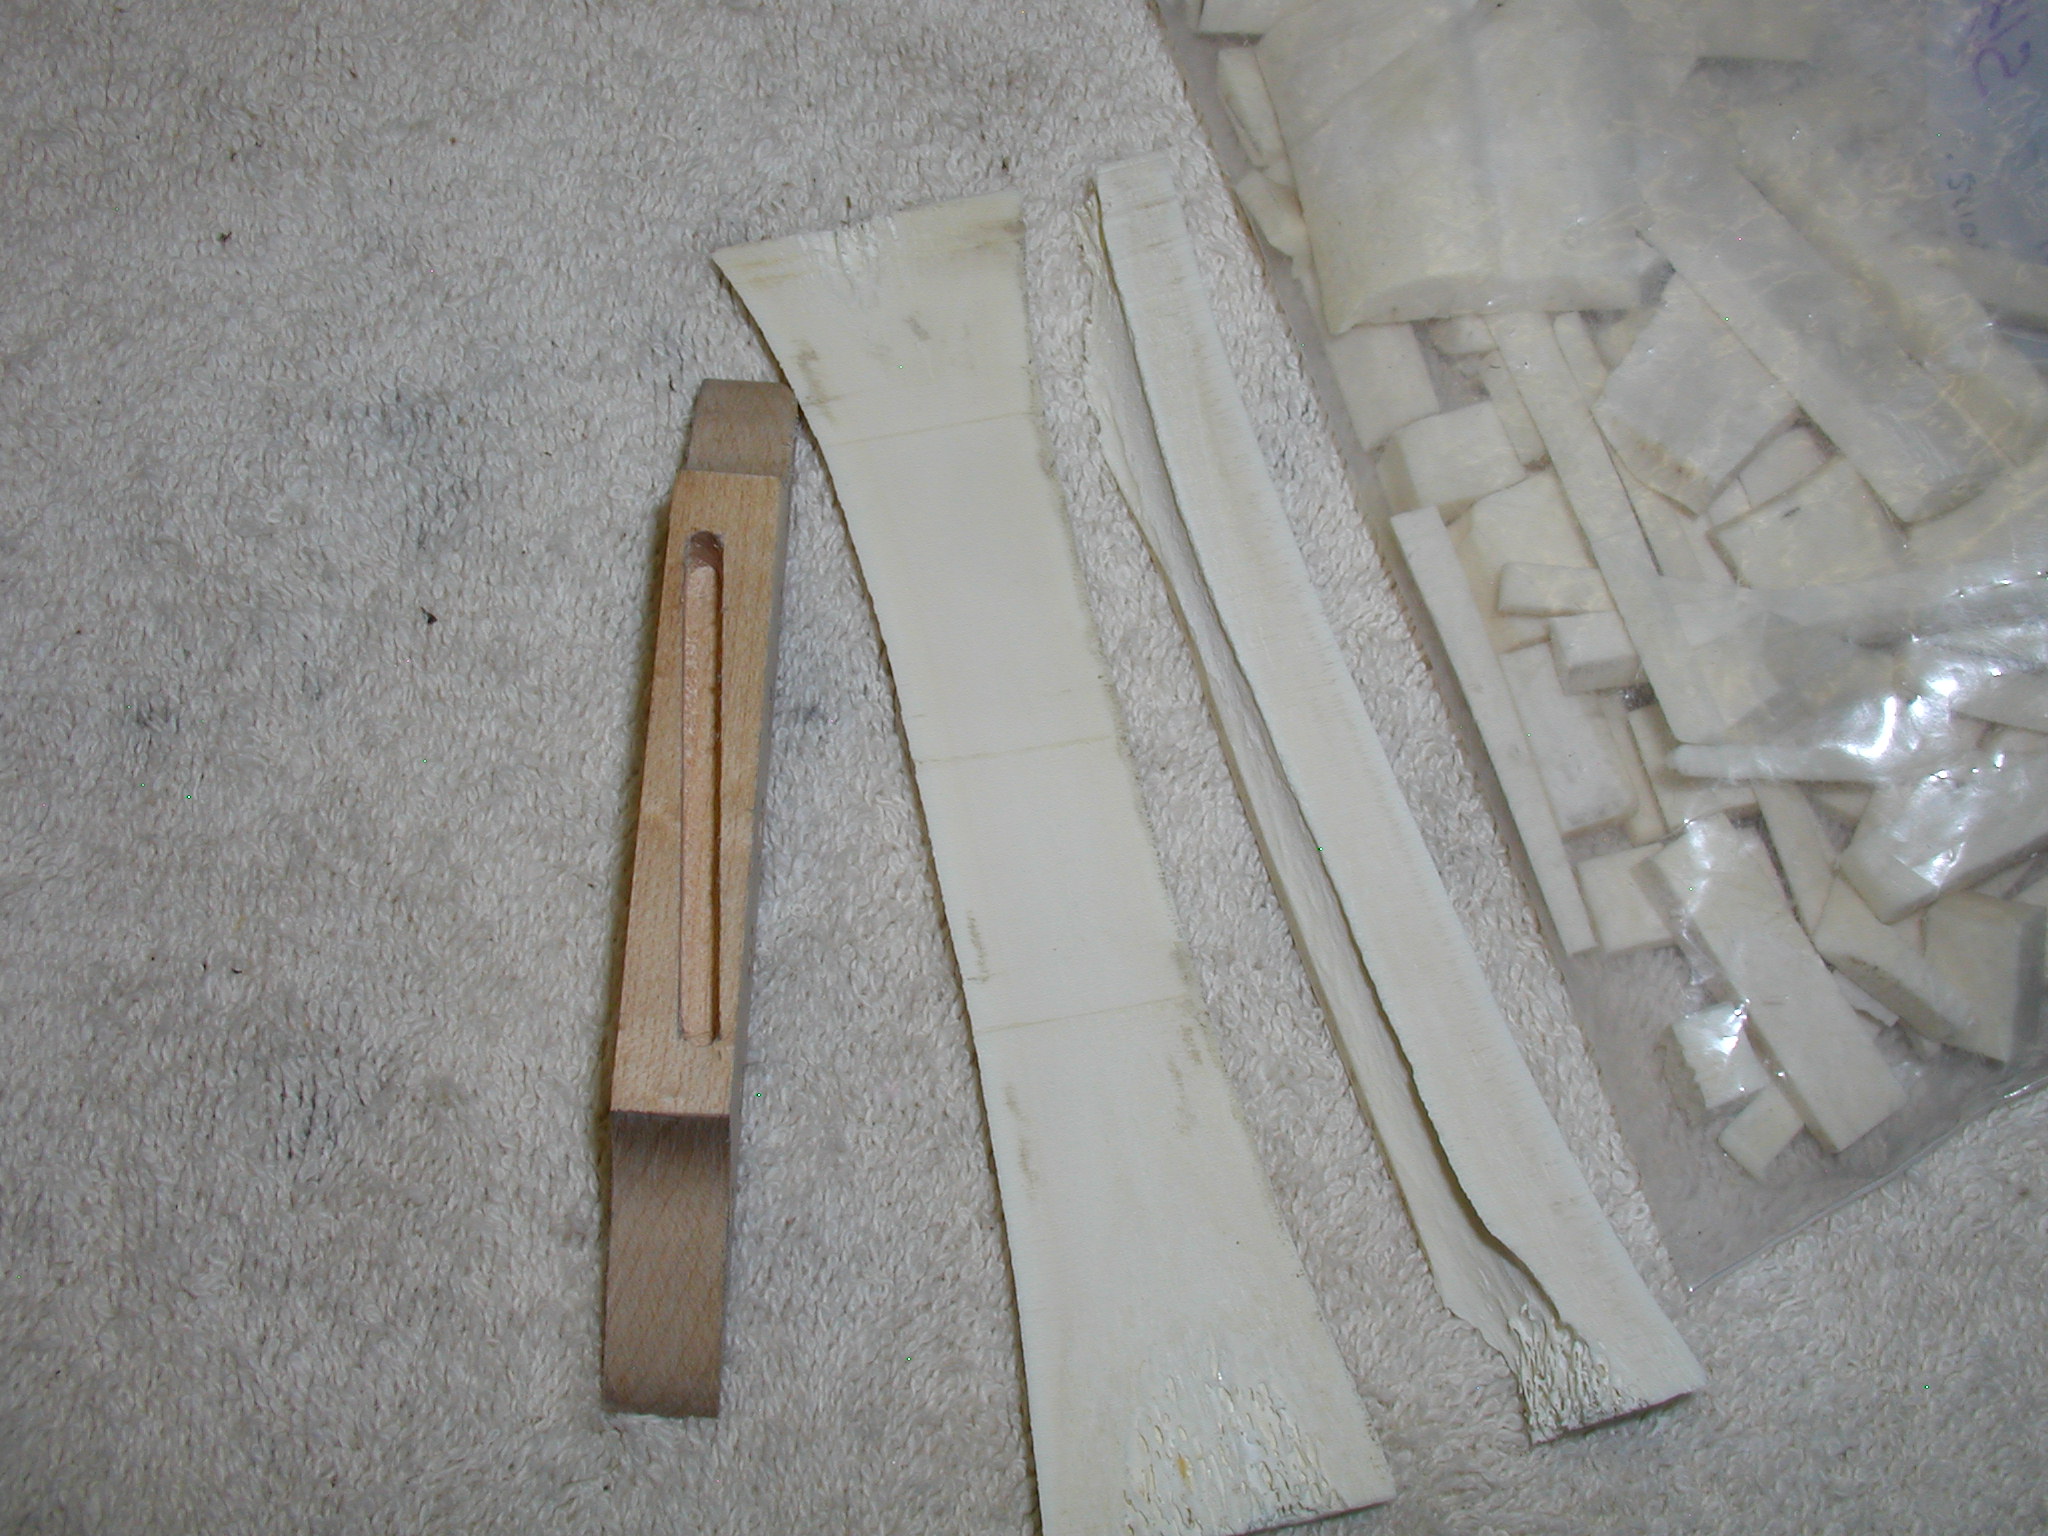
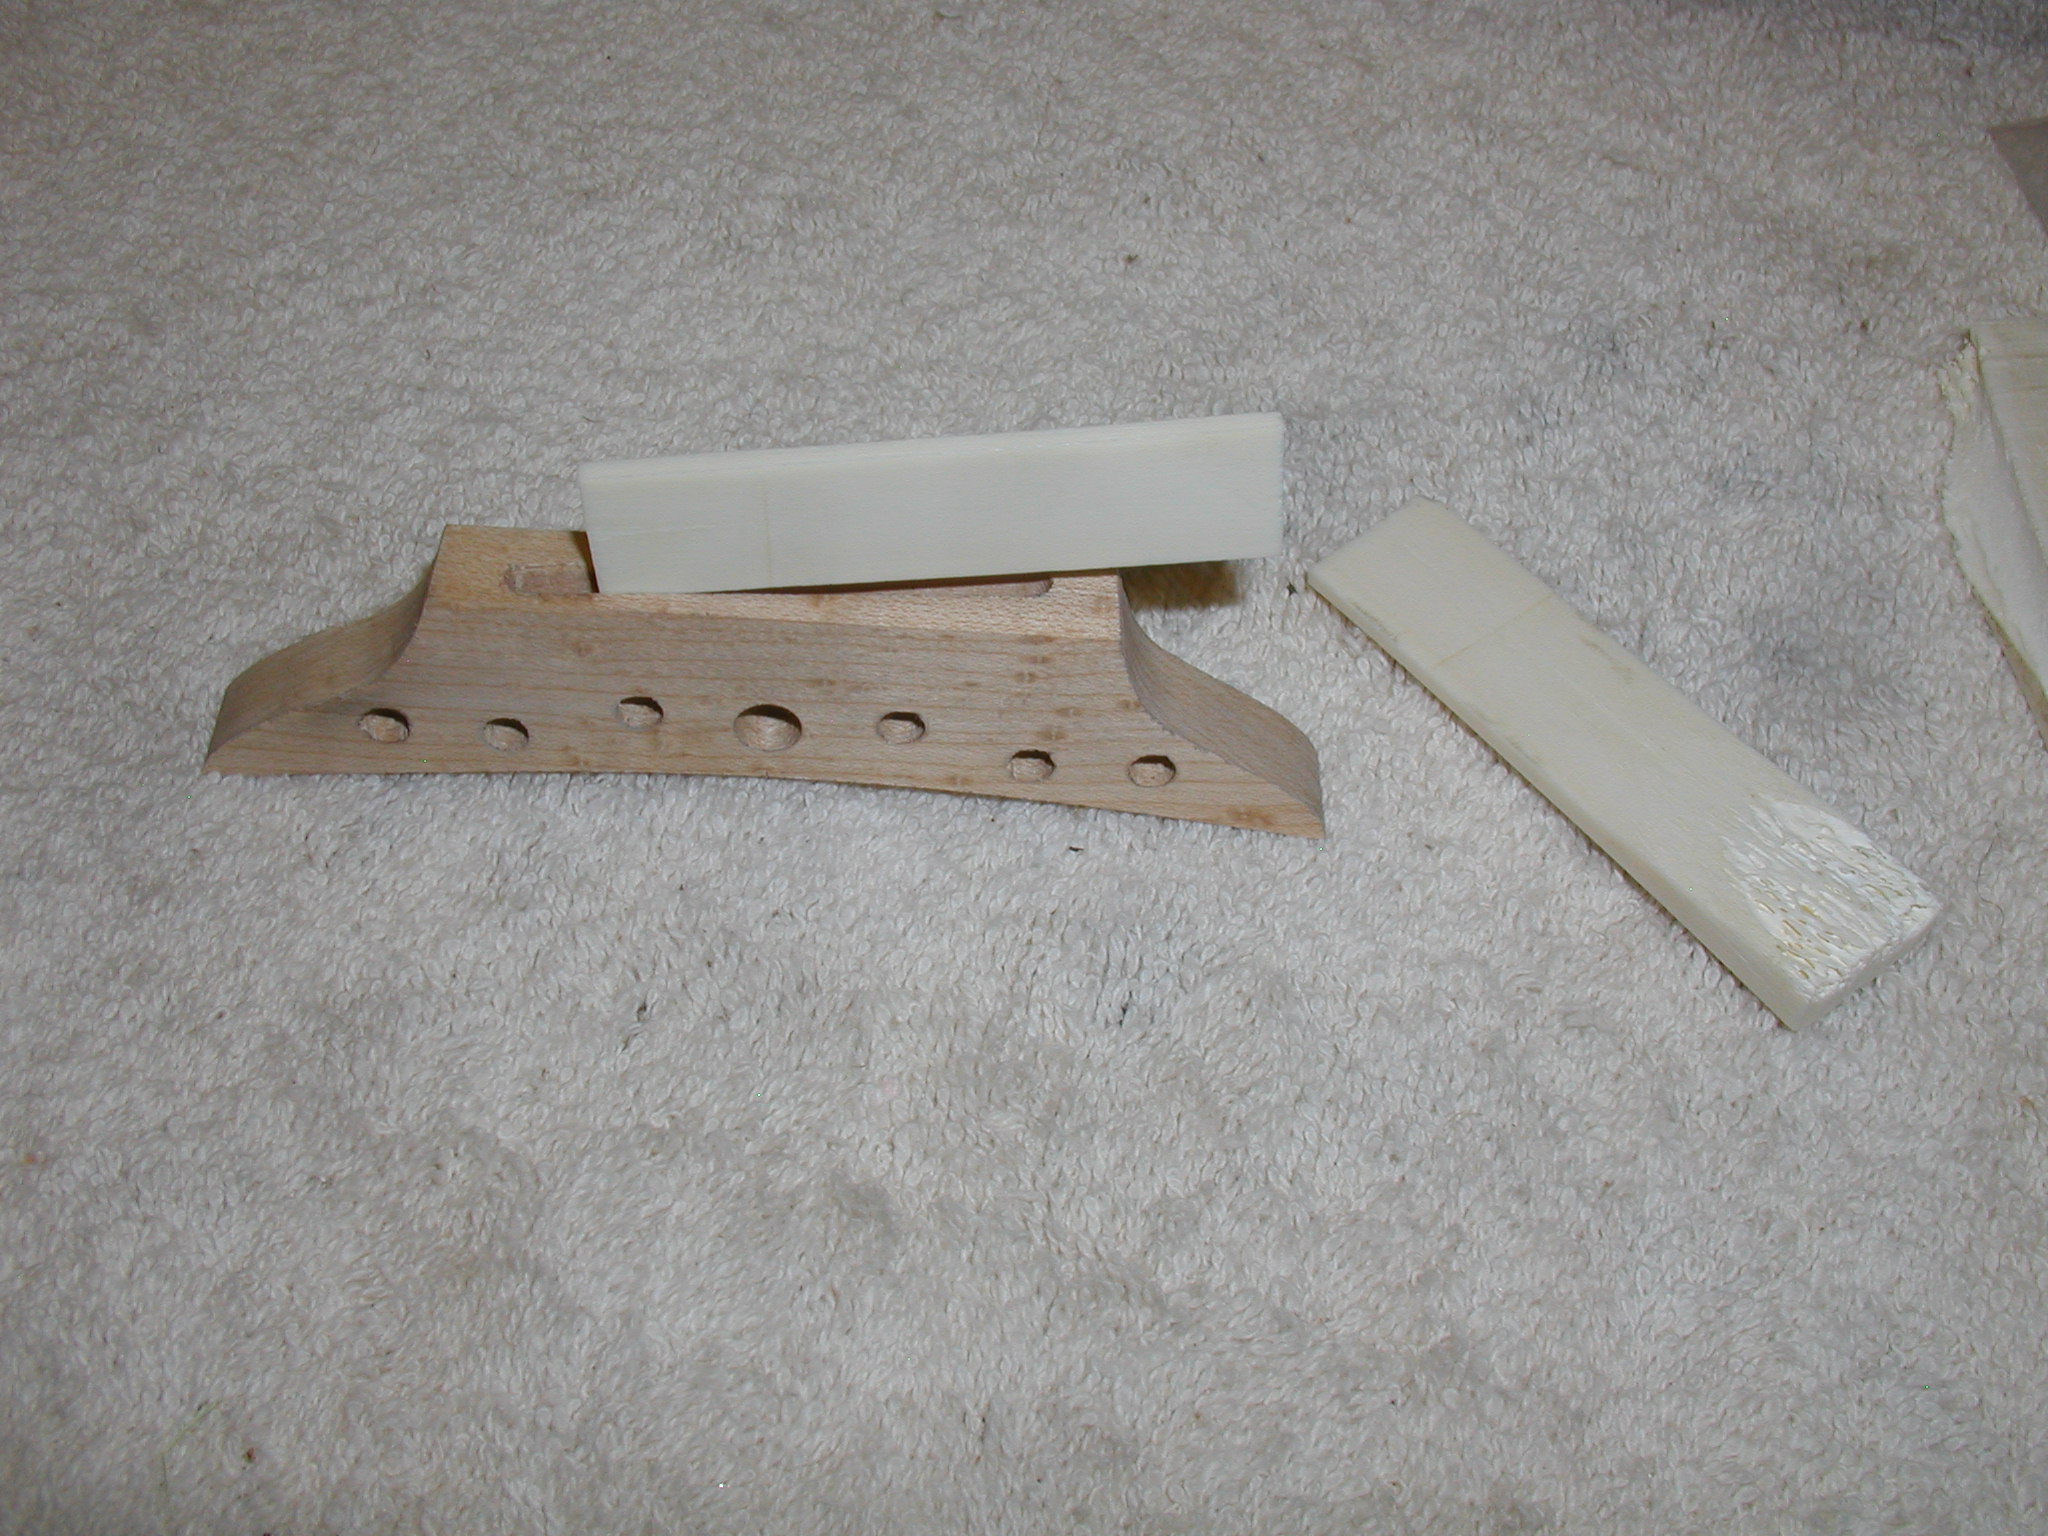
Now make the saddle. I use beef bones bought
from the pet store. I resaw them ont he bandsaw and then fabricate my nuts
and saddles from the good hard parts. |
 |
Here you can see two blanks I've made. I
hand sand these on my stationary belt sander with 100 grit till they get
real close but are still a snug fit to the slot. user a vernier caliper
to check and keep them square side to side and end to end w/o any taper. |
 |
When it is close I square it off in all directions
and flat the bottom true to the sides and ends. I select and mark the bottom
at this point. |
 |
I now final fit the saddle rounding the ends
and sanding with 600 and 1000 grit papers on a flat surface till the saddle
just slips in w/o binding. I bevel off the bottom edges so they don't catch
and mark the treble side with a colored dot. At this point it is still left
well too tall, we will fit that later on. |
 |
Here you can see it finalized and ready for
fitting the pickup. |
 |
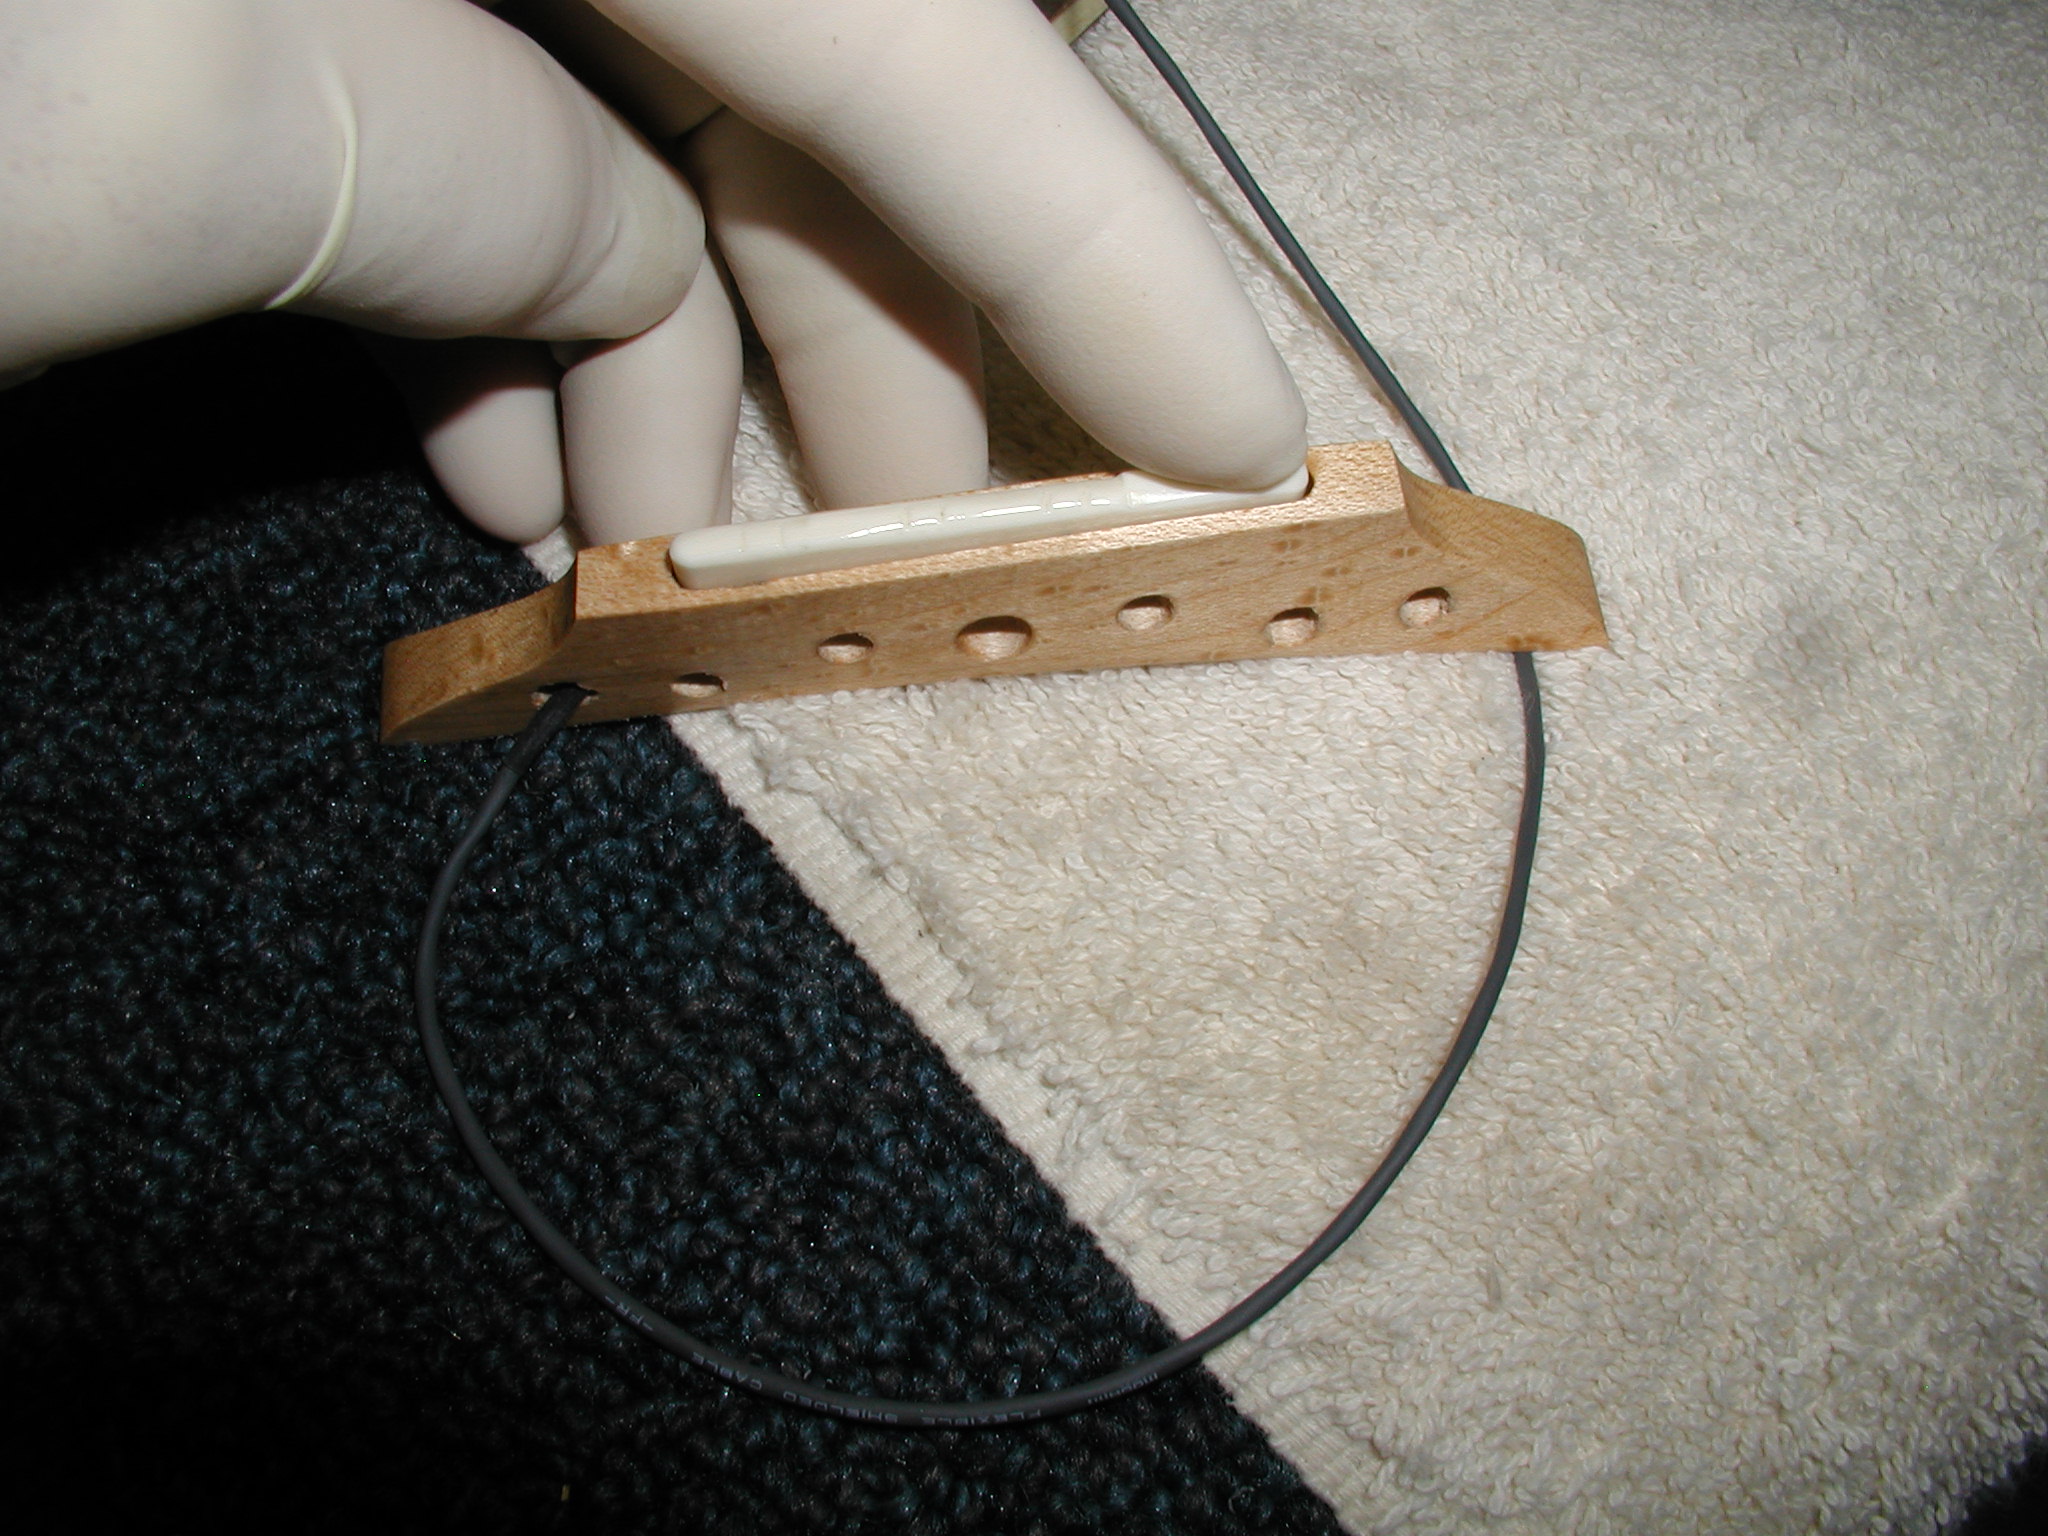
Here I'm following the initial plan and drilling
straight through just missing the holes as the route for the pickup wire.. |

|
Here you can see the pickup
in place. |
|
The maple bridge is pretty light but I decided
to take off the extra excess material that wasn't needed. So I sanded it
into a curved shape |
 |
This shows the new sort of swoopy twist design.
|
 |
An end view of the same. Next I string up,
lower the saddle as needed and find the proper position for the bridge to
accommodate the intonation settings. |
 |
Here it is in place where I've notched the
saddle and set the intonation, just like you would for a guitar saddle.
Note the green tape holding/marking the bridge in place. There is some up
and down of the strings in this process and after locating the sweet spot
I didn't want to lose it. |
 |
About this time I began to have second thoughts
about drilling the top. It occurred to me that it might be better to just
run the wire out one of the holes, under the pickguard and into the treble
F-hole. Tom also agreed that this was more to his liking. So I drilled the
treble side of the bridge into the outermost hole, beveled the edge of the
hole a bit and threaded the pickup wire down and out. Originally I thought
I'd have to cut the pickup to length but instead I just slipped the excess
down the other hole I drilled. |
 |
This is then topped with the saddle. I strung
up and measured the action at the 12th fret and sanded off some of the bottom
of the saddle till I had the action I wanted. Then I threaded the wire into
the upper part of the treble F-Hole, secured it to the bottom side of the
mando with 3-M red "gummy bear" tape and pulled it out the lower
part of the F-Hole. |
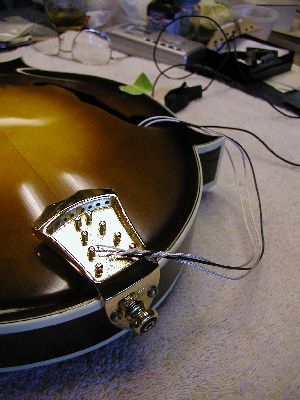 |
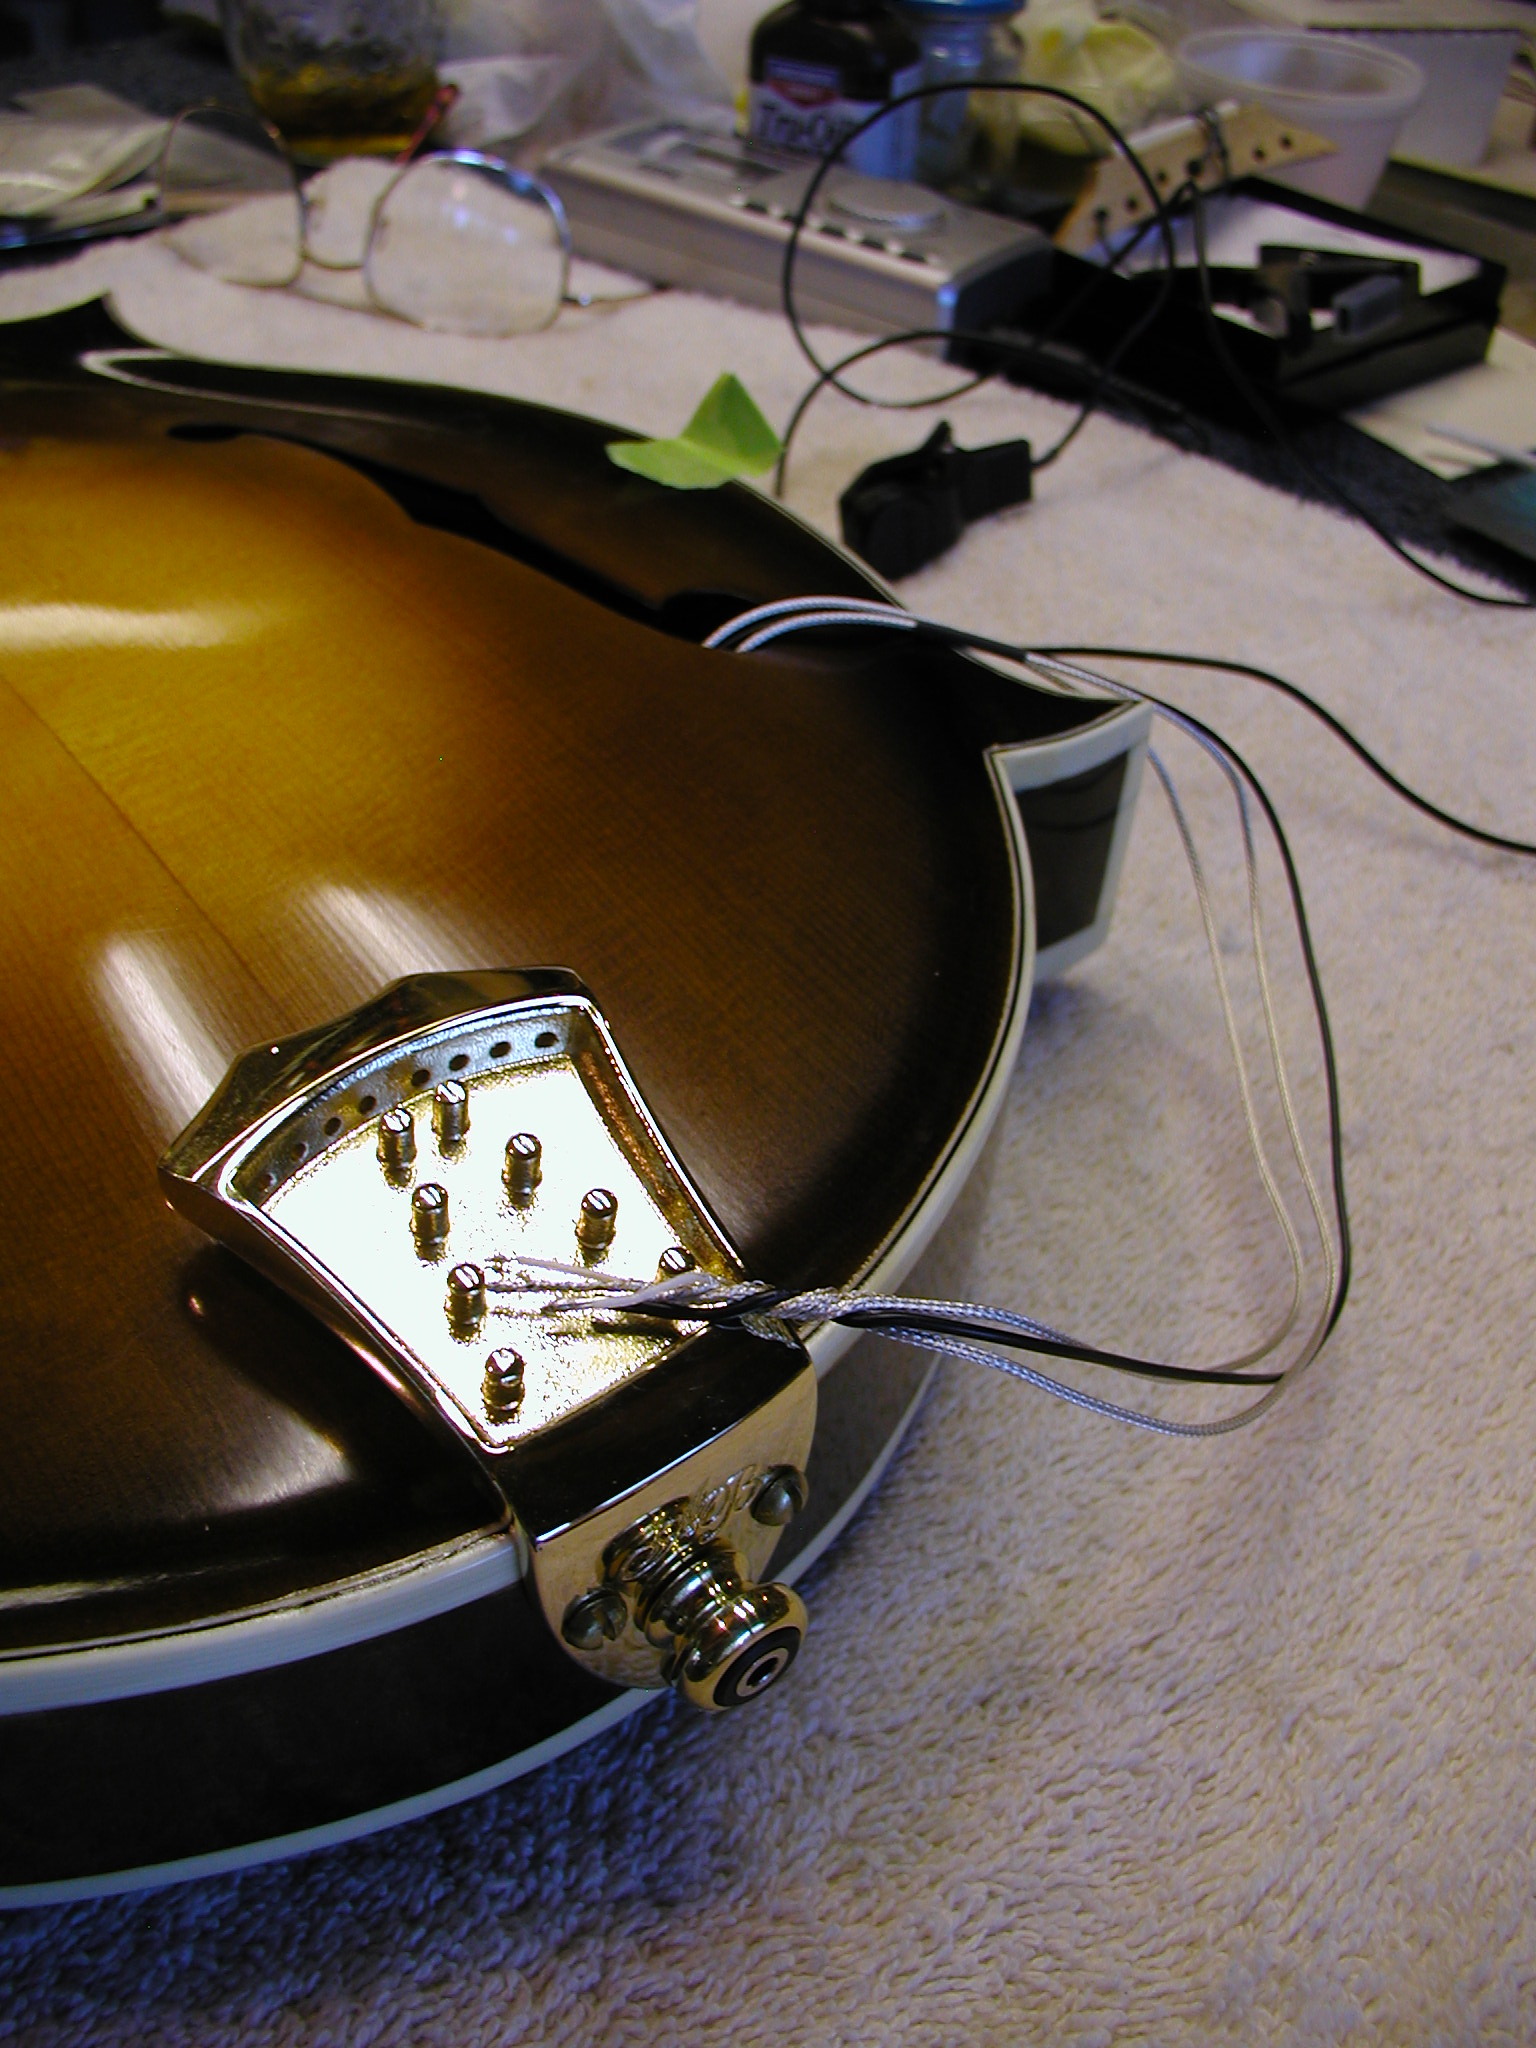
Last was the installation of a Vintage
Jack which fits into the tapered end pin hole w/o modification. The wires
for that also go to the lower treble F-Hole and get soldered to the pickup
wires. The joined wires get pulled snug and gummy-beared to the bottom
side so nothing rattles. |
|
|
|
|
The sound turned out perfect. The full fit bridge gave a full spectrum of sound
with a good full bass but with a punchy treble. The maple bridge is several
grams less than the comparable Randy Woods bridge, even with the pickup and
bone in place. So there is excellent note separation and apparent brightness.
The bass side I'd have liked to be a bit stronger but that is the trade off
for the punchy treble that the owner preferred. I did attach some temporary
weights to the bridge and that did bring in the bass side more so that could
be changed later on if desired. However, this Adirondack top is pretty stiff
and I expect the bass side to come in more anyway as it breaks in. The amplified
sound is typical Pick-Up the World, dead on true to the acoustic sound w/o and
added flavours. Great products from David and Annie! Recommended.